Installing an AVB license on Netgear GS7xxT switches
This article explains how to configure a Netgear GS716Tv3, GS724v4, or GS748v5 Ethernet switch to pass AVB traffic. Note that a License Key must be purchased separately in order to enable the AVB features on this switch. This license is called an "EAV License" (Ethernet Audio Video).
If you purchased a GS724Tv4 switch directly through Biamp Systems, this license is included and has already been installed, and the switch should already be configured to pass AVB. To restore the factory default settings to a GS724Tv4 that was purchased from Biamp, please see this article.
There are three main steps in getting the switch fully configured. First, register the switch on Netgear's website and activate the license key. Second, install the license key on the switch. And finally, enable the protocols that AVB requires.
Activate license key
A Netgear EAV License must be purchased separately from the switch. Please contact your Netgear reseller to obtain this license. The license code will be emailed to you as a string of letters and numbers, and this license must be activated on Netgear's website in order to obtain the actual license file. (If you purchased a GS724Tv4 directly through Biamp Systems, you can skip this section.)
- Go to the MyNETGEAR website.
- Login to the site if you already have an account, otherwise register a new account.
- Register the switch with Netgear to activate the warranty. If you registered a new account, then you have already registered the switch. Otherwise, click the Register a Product link and enter the serial number.
- Click on the My Products link to see a list of your registered products. Then, click the Activate License Key For Registered Product button. Enter your license code, and download the license file. Save the license file to your computer, as it will be used in the next step.
Apply license file to switch
The next step is to connect to the switch and send the license file, which will enable the AVB features in the switch. (If you purchased a GS724Tv4 directly through Biamp Systems, you can skip this section.)
- Connect your computer to the switch with a network cable.
- The switch has a default IP address of 192.168.0.239. Therefore, ensure that your computer's IP address is set in the same 192.168.0.xxx range. (The only exception to this rule is if the switch is connected to a larger network that has a DHCP server, in which case the switch will accept an automatic address from the DHCP server instead. In this case, you'll need to use Netgear's Smart Control Center software to discover the switch's IP address. Smart Control Center can be downloaded from Netgear's download site.)
- Open a web browser, and type in the IP address of the Netgear switch into the address bar. The default IP address of the switch is 192.168.0.239, but the IP may be different in some cases (see step 2 above).
- When prompted for a password, enter the default password, which is "password".
- Click on the Maintenance tab, then click on the Download sub-page. On the left side, select HTTP File Download. See figure 1.
- For File Type, choose License Key. Click Choose File and browse to the license file that you previously downloaded from the MyNETGEAR website. Then, click the Apply button in the bottom-right corner. See figure 2.
- To confirm that the license key was successfully added, you can go to the System tab, and then the License sub-page. You should see that the license key is active, and if you click on License Features, you should see MRP, MMRP, MVRP, MSRP, and DOT1AS. See figure 3.
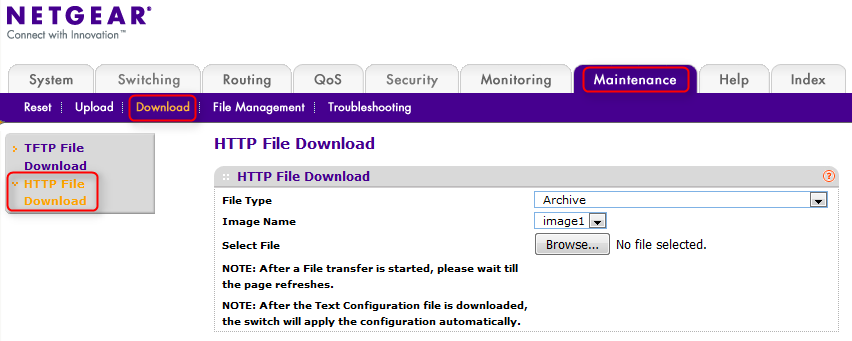
Figure 1 - install license
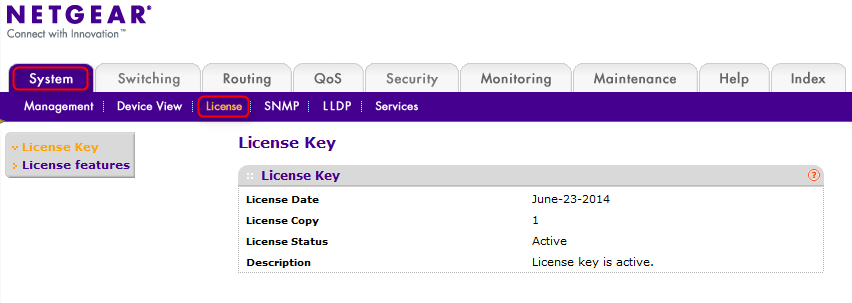
Figure 2 - check license

Figure 3 - license features
Enable AVB
To enable the features required for AVB, please see this article.