Using Riedel AVB Manager to synchronize a Tesira system to a 3rd party AVB device
This article explains how to use Riedel AVB Manager to slave (clock synchronize) one Tesira system to another, or a Tesira system to a 3rd party AVB device.
Tesira AVB should work with other AVNU-certified AVB audio products. When in doubt, verify with the manufacturer that their devices support AVB connections with other manufacturer's AVB hardware.
Tesira clocking
Tesira AVB devices that are part of the same Tesira system will automatically synchronize with each other as soon as the Tesira configuration file is loaded.
Tesira AVB devices that share the same network but are part of different Tesira systems will not automatically synchronize with each other. Similarly, a Tesira AVB system will not automatically synchronize to a 3rd party AVB device on the same network.
This lack of synchronization could result in glitches when sharing AVB audio between different Tesira systems, or when sharing AVB audio between a Tesira system and a 3rd party AVB device.
Requirements
A Tesira system can be synchronized to another AVB device using the clock signal embedded in a normal AVB stream. This means that to synchronize two or more devices, they must share audio over AVB. At minimum, one AVB stream must be transmitted by the device providing the master clock, and this AVB stream must be received by one device in each Tesira system that will synchronize to the master clock.
Only one device in a Tesira system needs to receive the clock-carrying AVB stream because Tesira devices in the same system will synchronize with each other automatically. If one device in a Tesira system is manually configured to receive a master clock signal, the rest of the Tesira system will immediately synchronize to it.
In order to synchronize with another AVB device, a Tesira system must have an AVB network configured as the system's Clock Master in the Media Networks Setup dialog. This is the default setting for all Tesira files, so it is not normally necessary to change this. For more information, see Using multiple networked audio protocols.
Configure AVB streams
The first task is to configure each Tesira system's 1722.1 compatible AVB.1 blocks.
If another Tesira system will be providing the master clock, it must have at least one AVB.1 Output block configured. If a 3rd party AVB device will be providing the master clock, it must be configured to transmit an IEEE 1722.1 compatible AVB stream according to the manufacturer's instructions.
All Tesira systems that will synchronize to the master clock source must have at least one AVB.1 Input block configured.
The AVB stream used for synchronization could be carrying any audio signal, including regular audio, the output of a tone or noise generator, or even silence.
If you cannot or do not want to use a stream carrying a normal audio signal, a simple way to create a dedicated stream for synchronization is to route a tone generator to an AVB.1 output block in the clock-master Tesira device. Similarly, in the Tesira systems that will synchronize to it, route an AVB.1 Input block to a meter block.

Figure 1 - clock source
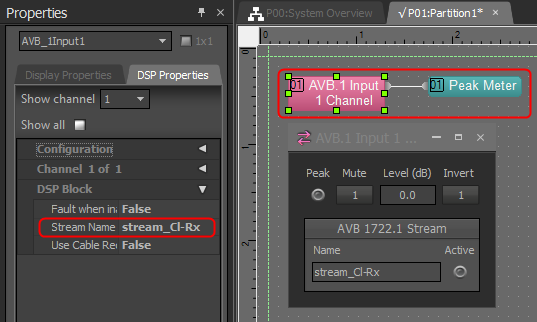
Figure 2 - clock receiver
Naming the AVB streams, as shown in the examples, can make the streams easier to identify in Riedel AVB Manager
Patch AVB streams
The AVB stream carrying the clock signal must be routed from the transmitting device to all receiving devices.
Open Riedel AVB Manager and go to the Connection Management tab. If it is not visible, it can be opened from the View menu.
Find the Talker (transmitter) stream that you want to use as the AVB clock signal, and patch the correct Listeners (receivers).
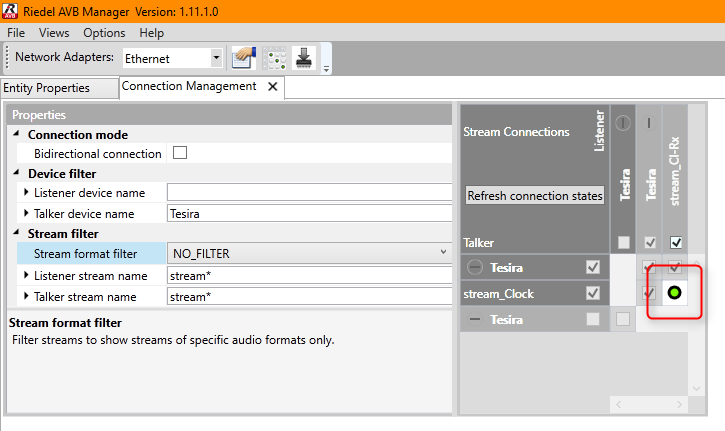
Figure 3 - patching streams in Riedel AVB Manager
The Stream Connections section will show only the devices' names at first (Biamp Tesira devices are all named Tesira). Click the "+" symbol next to each device name to display its talker and listener patch points.
Adding the filter string can be useful to make Riedel AVB Manager display only the streams you are interested in. By default, all Tesira AVB.1 streams names start with the word stream.
Slaving or synchronizing clocks
The last step is to configure each Tesira device receiving the clock stream to derive its internal clock from the clock signal embedded in the incoming stream.
Find the AVB MAC address
In Riedel AVB Manager, devices are identified by their AVB MAC address, so first find the MAC address of each device you want to synchronize to the master clock stream. There are two ways to do this.
Method #1
In Tesira Device Maintenance, select the device name in the Device List windows then press the Device Information button. Near the bottom of the dialog, the correct MAC will be next to the label "AVB 1 Primary MAC Address".

Figure 4 - finding the AVB MAC address in Device Manager
Method #2
In Riedel AVB Manager, hover the mouse cursor over the name of the Tesira device receiving the clock stream. The tool tip that appears will show the AVB MAC address next to the label "GUID".
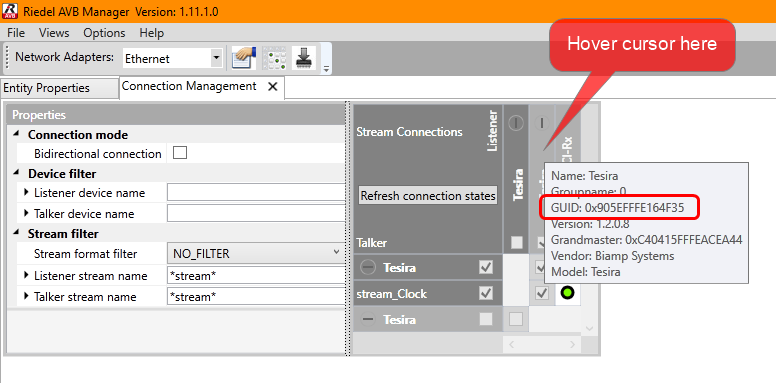
Figure 5 - finding the AVB MAC address in Riedel AVB Manager
Select the device in Entity Properties
Now switch to the Entity Properties tab in Riedel AVB Manager. If it is not visible, it can be opened from the View menu.
Select the device with the correct MAC address.

Figure 6 - select device in Riedel AVB Manager Entity Properties
Change the Clock Domain
In the window on the right, click on the arrow next to CONFIGURATION.1: 'Configuration' to expand it.

Figure 7 - Expand Tesira options
Next, find the number of the incoming stream that the Tesira device will derive its clock from. At the top of the window, the stream names and numbers are listed together. As you can see, it is helpful to name the stream.
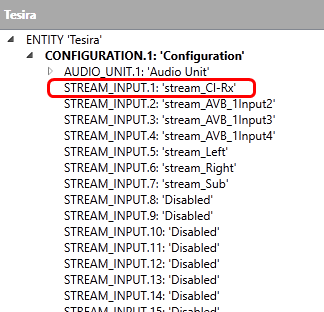
Figure 8 - Stream name and number listing
Finally, scroll down to to the entry Clock Domain.1: 'Tesira Clock Domain' and select it. In the windows on the right, in the Values section, change the Clock source index to the correct stream number.
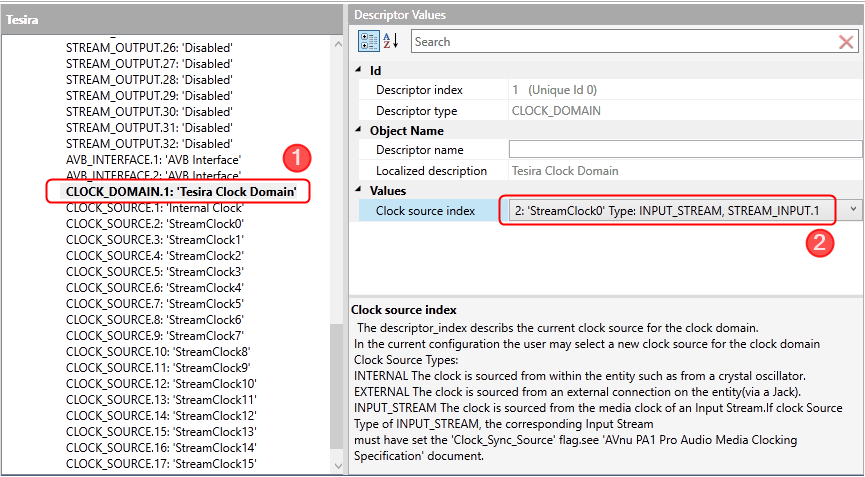
Figure 9 - Select the device clock source
Conclusion
The Tesira device will have now locked its internal clock to the clock signal embedded in the AVB input stream. Tesira will be slaved (clock synchronized) to the device transmitting that AVB stream.
If the Tesira device you configured according to the steps above is part of a system of Tesira devices, then the other devices in the Tesira system will automatically synchronize to this device via an implicit AVB pilot stream. The entire Tesira system will, therefore, be slaved (clock synchronized) to the device transmitting that AVB stream.