Using Tesira USB audio with For The Record
The TesiraFORTÉ DSP processor and Tesira EX-UBT AVB expander audio can be used to receive or transmit digital audio to a PC. One application where this is particularly useful is court recording systems. Many courtrooms use digital court reporting systems to keep a digital record of everything that takes place in a courtroom.
For The Record is a digital evidence recording software platform that runs on Windows PC's. This article describes how to connect the USB interface of the TesiraFORTÉ USB processor and Tesira EX-UBT AVB expander to a Windows PC, and use For The Record software to record 1-8 channels of digital audio.
When returned via USB, playback from For The Record will always be an automatic mix-down onto the first 2 channels of USB.
Create a Tesira configuration
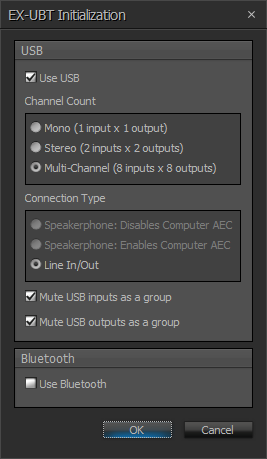
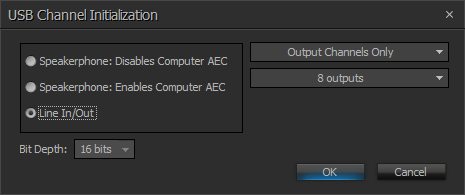
The first step to integrating the Tesira Platform with For The Record (FTR) software is to create a Tesira configuration file that includes USB blocks. There are two types of USB blocks available: the Tesira EX-UBT AVB expander and the Tesira FORTÉ's USB that can be inserted via the I/O Blocks menu in the Object Toolbar. When configuring the USB blocks for courtroom applications, the USB blocks should be either "Multi-Channel" (EX-UBT) or "Line In/Out" (TesiraFORTE) mode.
The Tesira EX-UBT AVB expander supports up to 8 channels in and 8 channels out which means court recording applications can receive up to 8 channels of audio signals to the recording application and also playback audio signals using USB.
Note that the playback from For The Record will always be a mix-down on the first 2 channels of USB, regardless of the available channel count.
The TesiraFORTÉ's USB interface supports up to 8 channels total, for transmit and receive combined. The most common configurations for courtroom applications are 0x8 (sending 8 channels of audio to FTR and receiving no playback audio channels) or 2x6 (sending 6 channels of audio to FTR and receiving 2 channels of playback audio). Note that in a 0x8 configuration, playback audio will likely come from analog audio connections on the computer.
Both of these examples will create the USB blocks with up to 8 channels for recording. For The Record (FTR) software can record all 8 channels of audio.
Connect Tesira USB to computer
 Next, connect a USB cable from the Tesira USB device connector to any USB connector on the computer. Note that the Tesira USB device connector is a Standard-B type connector. Any computer that supports USB Audio 1.0 will work with Tesira USB, without the need for manually installing drivers. Most modern operating systems (Windows, Mac, Linux, etc.) support USB Audio 1.0 natively.
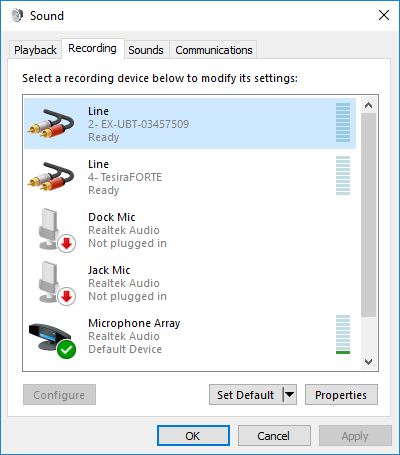
When you connect the USB cable to your computer, it should automatically detect the Tesira USB and automatically install any necessary drivers. Once fully connected, Tesira USB device will show up as an audio device in Windows. You can verify this by going to the Sound control panel (Windows Control Panels→Hardware and Sound→Sound).
However, please note that Windows generic USB Audio 1.0 drivers will only support up to 2 channels of audio. For courtroom recording applications that require more than 2 channels of audio, an audio driver must be installed manually. See the next section below for more information.
Installing Biamp USB Driver for Windows multi-channel recording
![]() By default, Windows cannot handle a USB audio device that uses more than two audio channels. Therefore, in order to send more than two audio signals third-party software is required to make the additional channels available. Biamp has released the Biamp Tesira USB Driver for Windows to support multi-channel audio.
By default, Windows cannot handle a USB audio device that uses more than two audio channels. Therefore, in order to send more than two audio signals third-party software is required to make the additional channels available. Biamp has released the Biamp Tesira USB Driver for Windows to support multi-channel audio.
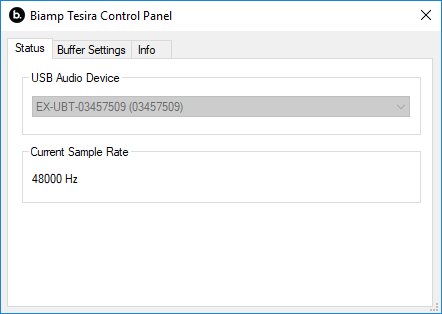
Download and install the Biamp Tesira USB Driver for Windows. Once installed you will see the Biamp Tesira Control Panel icon in the task bar:

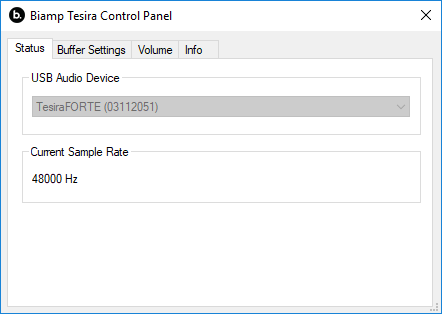
Open the Biamp Tesira Control Panel, you will see the Biamp Tesira USB device connected that will be presented as the "Biamp Tesira - ASIO" device in FTR. Example of the Biamp EX-UBT AVB expander:
Example of the Biamp TesiraFORTÉ USB:
Example of multiple Biamp Tesira USB devices connected at once. Note you can only select one device at a time.

Configuring FTR software to use Tesira USB
Once the USB cable is connected, the FTR software must be configured to use the USB audio from the Tesira USB. The setup procedure for FTR software is different depending on how many audio channels need to be recorded. Follow the steps apply to either the TesiraFORTÉ USB and Tesira EX-UBT in the appropriate sections below:
Set up FTR to record 1-2 channels
- Open the FTR Reporter software.
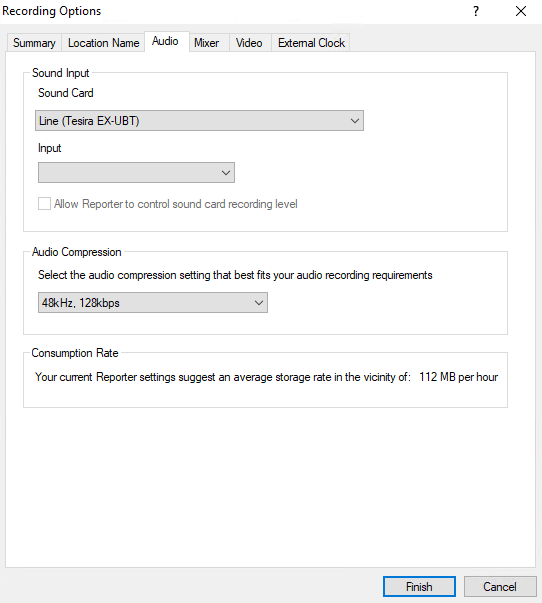
- In the toolbar, click the Menu button, then select Tools→Options→Recording.
- Select the Multimedia tab.
- For Sound Card, select the Tesira USB device.
- For Input, select "Master Volume".
- Check the checkbox for "I want Recorder to control my sound card recording level".
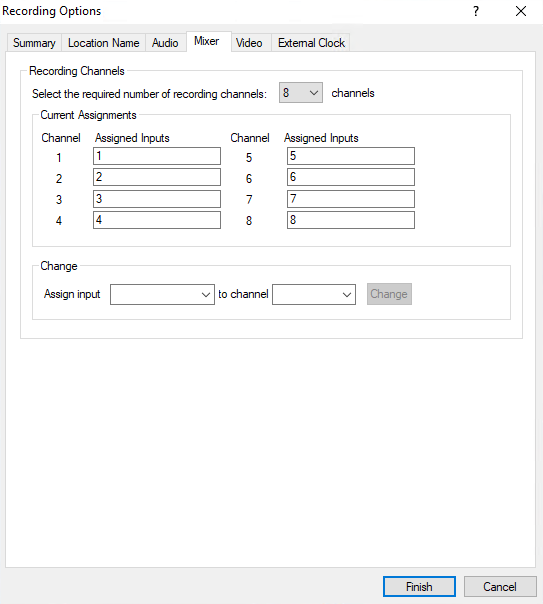
- Select the Mixer tab.
- Select the desired number of channels to record.
- Click Finish.
The FTR software should now be configured to use the Tesira USB audio signals. To confirm audio levels, click the Menu button, then select View→Input Level Window.

Set up FTR to record 3-8 channels using Biamp Tesira USB Driver for Windows
To use FTR to record more than two channels, some additional steps are required. Ensure that you have first followed the steps above, under "Set up FTR to record 1-2 channels", and then follow the instructions below to expand FTR's capabilities beyond two-channel recording.
- Open the FTR Reporter software.
- In the toolbar, click the Menu button, then select Tools→Options→Recording.
- Select the Multimedia tab.
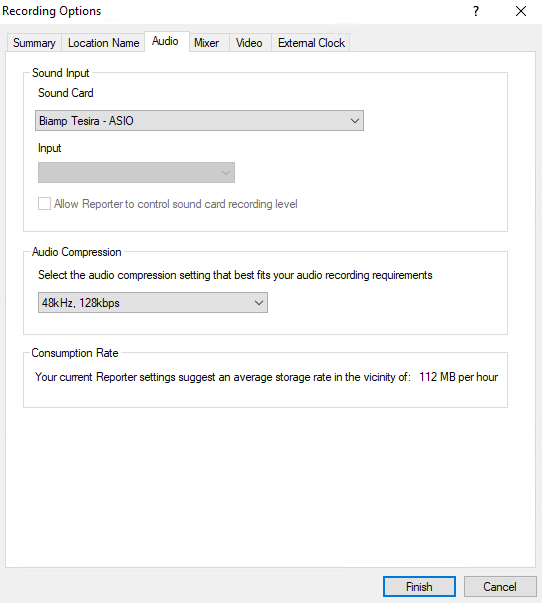
- For Sound Card, select the "Biamp Tesira - ASIO" device.
- Select the Mixer tab.
- Select the desired number of channels to record.
Troubleshooting
General
- When troubleshooting HID mute synchronization on various UC clients and hardware iterations, it is often helpful to test and compare the mute synchronization with a wired Microsoft Teams certified headset vs. the EX-UBT.
- Be aware that UC platforms vie for the HID mute synchronization on a host machine. This means that only one can have access to the HID communications at a time and it is common for conflict to occur if two or more UC platforms (SFB, Teams, Zoom, Hangouts, etc.) are running at the same time on the host machine. It might be worth closing all UC platforms before testing any HID mute synchronization.
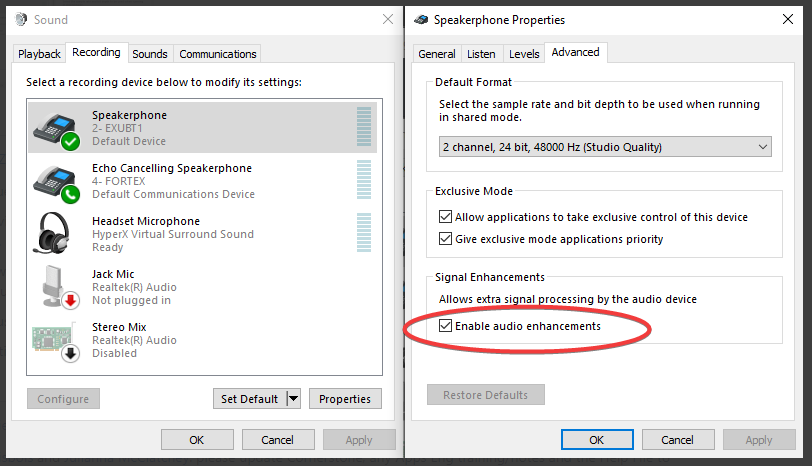
 A Windows 10 update has added a Speakerphone audio signal enhancement feature which is enabled by default. This has been seen to be detrimental to USB audio resulting in added noise and very low transmit levels. Disabling the feature in the Advanced options of the Speakerphone audio settings resolves the issue.
 - If the EX-UBT is shared via some form of USB switching device for BYOD applications, the main room NUC/UC Engine may benefit from having all non-used audio peripherals disabled.
USB Inspection Tools
- USB Device Tree View
- If interested, download this video demonstration: Simulating and Identifying EX-UBT flapping in Tesira Event Logs.mp4
- USB Device Viewer
- Thesycon - USB Descriptor Dumper Tool
Multi-channel audio
![]()
- When connected (/disconnected) to (/from) a PC the USB device should be added (/deleted) in Windows PC Device Manager's Universal Serial Bus controllers list (as a USB Composite Device) as well as the Audio inputs and outputs list in real time.
- The Biamp Tesira Control Panel for the Biamp ASIO driver (in the Windows tray) allows you to select the ASIO buffer size. A larger buffer will increase latency to the USB recorder but will reduce load on the CPU. Larger buffer sizes may reduce clicks, pops, glitches, or dropouts.
- When verifying USB output to computers it can be useful to route a tone generator to the USB output channels. A 1kHz tone at +12dBu routed to each USB output channel will clearly show activity on meters on the recording PC. On some recording platforms the meters may not indicate low "background level" activity so providing a high-level slate tone allows easy and repeatable validation of connected channels. Note that a +12dBu signal from the Tesira tone generator to a USB meter should indicate about -12dBFS.
- In Windows' Sound settings, select the desired Tesira USB playback device and choose 'Configure'. Ensure that the correct audio channel mode is selected. For 8-channel playback the '7.1 Surround' is the correct option, ensure all speakers are selected and that the full-range option is enabled for all channels.
- 3rd party audio metering software can be used to independently verify the USB audio input if there is a question of the customer's recording software accurately receiving input. Be certain the 3rd party software is configured for the correct number of channels, the correct sample rate, and is assigned to monitor the correct USB inputs. Options that have been seen to work in the past include:
- https://pas-products.com/multimeterbridge.html
- Under Settings > 'Select audio input' choose '8 channels'
- Under Settings > 'Level Outfit' - Meter Ballistics options choose 'Peak dBFS'
- https://www.orban.com/meter
- In the Settings tab choose Channels = '7.1 Surround' and the desired Audio Device input channels
- In the Meters tab be sure to Start metering using the button at the bottom center
- https://pas-products.com/multimeterbridge.html