Using TLS and SRTP in Tesira VoIP systems
VoIP Systems can be configured to utilize different levels of network communications security. Security options can include encryption of the data on the network and/or a verification of devices participating in a call exchange. The Tesira SVC-2 card and TesiraFORTE VI both support advanced VoIP security features and this article explains how to use these features.
Protocols
Tesira VoIP products support the following two protocols for enhanced network security:
Transport Layer Security (TLS)
TLS is a security mechanism that can be used during SIP sequence exchanges. Tesira VoIP supports TLS 1.2.
For VoIP systems, TLS can provide one or both of the following:
- Encryption of the packet exchange on the network
- The ability to verify if a device in the SIP exchange is considered trusted.
SIP traffic that is encrypted using TLS cannot be decoded by packet capture programs like Wireshark. Note that SIP traffic is only comprised of call control signals, and does not include the actual voice audio signals.
Secure Real-Time Transport Protocol (SRTP)
SRTP is a security mechanism that is used to encrypt the RTP (voice audio) stream of a call when it is traversing the network. RTP traffic exchanged using SRTP cannot be decoded by packet capture programs like Wireshark.
Configuring TLS
The level of security desired in a TLS connection will need to be considered before the configuration steps can be defined. TLS is almost always used to encrypt SIP traffic, and this is considered the minimum level of security. However, TLS can also optionally be used for device verification, which allows SIP devices to verify that the device they're interacting with is a trusted device.
Tesira VoIP has supported TLS version 1.2 since Tesira FW version 3.5.
The following questions could be posed to a VoIP Admin who has requested the use of TLS in a Tesira endpoint:
- Will TLS be used for encryption purposes only or will devices also participate in some level of verification?
- If verification is required, which devices must verify?
- Does the Server need to verify the Client?
- Does the Client need to verify the Server?
- Both?
The steps required to correctly configure TLS in Tesira will be based on the answers to these questions. The specifics of the particular security implementation on the network may only require certain portions of this article to be used. This article covers all of the options available.
Enabling TLS in Tesira
If TLS is to be used in Tesira, this step must be completed. The additional steps shown below will only be accessible after TLS has been enabled.
- Open the Properties Sheet of the VoIP Control Status Block and go to the DSP Properties Tab.
- Under "Protocol SIP" set the "Transport" field to TLS. (Fig. 1)

Fig. 1 Enabling TLS
It is possible to use TLS as an Encryption method for SIP exchanges, but not rely on an exchange of certificates for device verification. If the goal is to simply encrypt the SIP call control messages, follow the steps below and skip the sections below that deal with device verification.
- Enable TLS as shown above.
- Under Protocol SIPS ensure that the "Certificate Preferences" is set to "Accept All" (Fig. 2)
- No further TLS setup is necessary for TLS encryption.
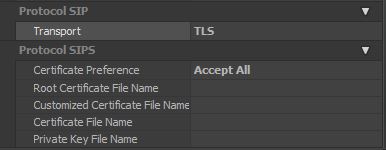
Fig. 2 TLS Used for Encryption Only
Enabling device verification in TLS
Part of the TLS security mechanism allows devices to exchange certificates for authentication. This is used to confirm that the distant device is who it claims to be. If a device presents an untrusted certificate, it will be denied and the TLS exchange will be stopped. It is important to understand that in order for this verification to work, certificate files must be loaded to either the Server (VoIP Proxy), the Client (Tesira Endpoint), or both devices. It should be noted that Tesira only accepts certificates that have been saved in the .der format. If the certificate file has been saved in the .pem, .pfx, or any other format, it must be converted. There are a number of online resources that can offer a means of making this conversion.
The only supported method of loading certificate files to a Tesira VoIP endpoint is via download from a TFTP server. So, in order to support any sort of device verification, you'll need to first set the TFTP settings in Tesira software.
Enabling Network Provisioning Server access in Tesira for TFTP
In order to properly verify a devices identity, Tesira must find a TFTP server and download a collection of certificate files. The next steps will detail setting up a TFTP Server connection within Tesira. This process must be followed if any sort of client verification is to be used.
In order to gather the proper files, the location of the TFTP server must be identified. The location of the TFTP server can be specified as a static IP address or hostname, or the location can be communicated to the Tesira device from a DHCP server. Any single TFTP configuration method described below can be used to point a Tesira VoIP endpoint to a valid TFTP location. Once the location has been designated, the next steps in the TLS validation process can proceed.
TFTP location settings can be found in the Properties Sheet of the VoIP Control Status Block. They are located in the DSP Attributes tab under Network Provisioning Server. The supported TFTP address options are as follows (choose one):
Static Configuration
- Change the TFTP Server Mode to Static
- Enter the static IP or Hostname in the popup window and click OK.
- You should see the static address in the Properties Sheet (Fig. 3).
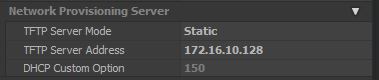
Fig. 3 Static TFTP Configuration
DHCP Option 66
TFTP Server locations can be provided with a DHCP exchange. If the network supports this and the Tesira endpoint is configured to use DHCP, a DHCP option can be used to tell Tesira the IP address of the TFTP server. The default DHCP option number for TFTP is 66. To obtain the TFTP server address using DHCP option 66:
- Set the TFTP Server Mode to DHCP 66 (Fig. 4).

Fig. 4 TFTP Using DHCP Option 66
Custom DHCP Option Number
It is possible to use a custom DHCP Option number for TFTP location services. However, the method that the DHCP server uses to deliver the address must also be considered in this case. The DHCP server could send the information by using a string value or by providing a binary value. Tesira offers selection for both.
- Set the TFTP Server to either DHCP Custom (String) or DHCP Custom (Binary)
- In the DHCP Custom Option enter the DHCP option number to be used (Fig. 5).
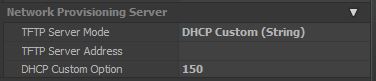
Fig. 5 DHCP Custom Option Setting
Configuring device verification
Once the TFTP server has been located and certificate files are accessible, it must be determined whether the client or the server will be doing the verifying, or both. Tesira supports any of the following options:
- Client (Tesira) verification of the Server (VoIP proxy)
- Server (VoIP Proxy) verification of the Client (Tesira)
- Mutual verification
Depending on which type of verification is required, choose the correct section below and follow the instructions.
Configuring Tesira to support a client verification of the server
This section describes how to configure the system so that the Tesira VoIP Endpoint will verify the identity of the Server.
- Enable TLS as outlined above.
- Identify a TFTP location as outlined above.
- Confirm that the Server's Root Certificate file has been loaded in the TFTP server. This file is maintained by the VoIP Admin and they will need to provide the name of the file. The file itself will be downloaded to the Tesira endpoint via the TFTP server. Remember that Tesira only supports certificate files in the .der format.
- Under Protocol SIPS, ensure that the "Certificate Preference" is set to "Fully Verify" (Fig. 6). Note that this is not the only option for Certification Preference, but it is the most common. Other less common options will be detailed below.
- The Tesira endpoint must load the Server's Root Certificate from the TFTP server in order to authenticate the device. To ensure the endpoint requests the correct file, enter the file name in the Root Certificate File Name field (Fig. 6).
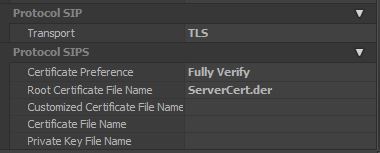
Fig. 6 Server Verification Settings
Additional Certificate Preference options:
Although supported, these additional verification options are rarely used. If they are used, each of these options will still require the initial loading of a Root Certificate file as detailed above.
- Trust - Selecting this option will store the initially received certificate for future verification purposes. If a certificate that has already been stored is received again, it is automatically trusted without the use of a Root Certificate.
- Keyword - Selecting this option will search the "Distinguished Name" portion of the server provided certificate for a keyword. The keyword must be entered in Tesira software within the Control Status Block Properties Sheet under DSP Properties / General / Line Properties / Protocol Tab / SIPS Keyword (Fig. 7). If this keyword is present in the certificate, the certificate will be trusted.
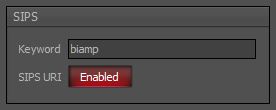
Fig. 7 SIPS Keyword
Configuring Tesira to support a server verification of the client
This section describes how to configure the system so that the Server can verify the identity of the Tesira VoIP endpoint. There are three certificate files required for this verification: a Client Root Certificate, a Certificate file, and a Private Key. Most secure networks will want to use their own certificates on both sides of the exchange. If this is the case, the VoIP Admin will provide the certificate files to be loaded into the Tesira VoIP endpoint. However, if client verification is required and the VoIP Admin is not able to provide their own files, Biamp can make generic certificates available. Inquiries for these certificates should be directed to the Biamp Technical Support team. Once the proper files have been gathered, proceed with the steps below.
- Enable TLS as outlined above.
- Identify a TFTP location as outlined above.
- Confirm that both the Certificate File and the Private Key file are loaded to the TFTP server. (Note if the desire is to not transfer of the Private Key across the network, a TFTP server can be placed and a temporary network to be used for the initial Private Key load. The only supported mechanism for loading the private key to a Tesira device is via a TFTP server. Contact Biamp Support if assistance is needed in this process).
- A Root Certificate must be loaded to the Server side of this exchange. This is what the server will use to verify the certificate sent by the Tesira system. If the generic Biamp Certificate files are used, the Root Certificate must be provided to the VoIP Admin. The Admin must then load the Client Root Certificate to the VoIP system. Remember that Tesira only supports certificate files in the .der format.
- Enter the name of the Certificate File in the Certificate File Name Field (Fig 8).
- Enter the name of the Private Key in the Private Key File Name (Fig 8).
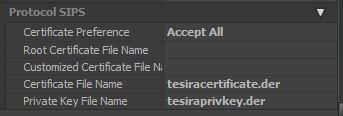
Fig. 8 Client Verification Settings
Mutual verification
The most secure setup is achieved when TLS encryption is used and all parties verify each other. This is known as mutual verification. Mutual verification is achieved by combining all of the steps listed above. The final result is shown in Fig. 9.

Fig 9. Mutual Verification Settings
Configuring SRTP
SRTP can be used with or without TLS, however the recommendation is to only use SRTP when TLS encryption is present. SRTP uses a key exchange that would be in plain text format if TLS isn't used. This could leave the encrypted RTP stream vulnerable to eavesdroppers.
SRTP settings are found in the VoIP Control Status Properties Sheet under the DSP Properties →Line Properties→Protocol Tab→SRTP (Fig. 10). To enable SRTP, simply select the desired method from the list.
- Disabled
- SRTP is turned off
- Allowed
- SRTP is not the preferred method of media transport for the Tesira VoIP endpoint. RTP will be used unless the far end phone designates that SRTP is required.
- Preferred
- SRTP is the preferred method of media transport for the Tesira VoIP endpoint. However if the far end phone does not support SRTP, RTP will be used.
- Required
- SRTP is the only method of media transport supported by the Tesira VoIP endpoint. If a far end phone does not support SRTP, the call will not be connected.

Fig. 10 SRTP Settings