Finding and changing an Audia/Nexia's IP address via RS232
This article explains how to connect to an AudiaFlex or a Nexia via its serial port to discover and/or change the device's IP configuration. Alternatively, it is sometimes possible to discover a device's IP via its Ethernet port.
Once you have discovered or changed the IP address it may be beneficial to discretely physically label the device with the IP address for future reference.
Cable
The first step is to connect your computer's serial port to the serial port on the back of the AudiaFlex or Nexia. A straight-through serial cable is required for this purpose (not a null-modem cable). If your computer doesn't have a serial port, you can alternately use most USB-to-serial adapters without any problems.
COM port
Before you can communicate with the unit over serial, you must identify the COM port that your computer will use.
Device Manager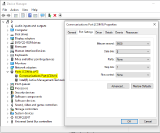

In Windows, you can identify the COM port using the Device Manager (which is located in your Windows Control Panels). In Device Manager, look for a category named "Ports (COM & LPT)". Expand that category and locate the COM port that you intend to use.
Check that the baud rate for the connected COM port is set to the correct baud rate. This value does not reliably update if changed from PuTTY, Tera Term, and Hyperterminal.
Software
Once a serial cable is connected and the COM port has been determined, you'll need to open a program that can communicate over the serial port. Biamp's Audia and Nexia software does not have this ability. There are many programs available for Windows that can perform this function, some of which may be included with Windows, and others that are freely available on the internet. This article describes how to use PuTTY, Tera Term, and Hyperterminal, but other programs are available.
PuTTY
PuTTY is a terminal emulation program that is freely available on the internet. You can download it from http://www.putty.org/. (In most cases, you can just download the top putty.exe file on the downloads page, under the "For Windows on Intel x86" heading.) Open the PuTTY software and follow these instructions: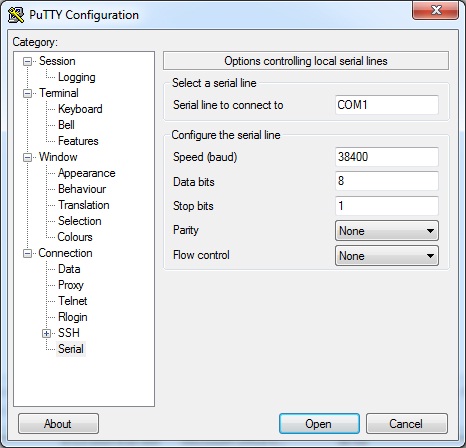
- The software will open with a category tree on the left, and options on the right. The "Session" category is selected by default on the left. With the "Session" category selected, go to the right side of the window and select the "Serial" radio button under Connection type.
- In the category tree on the left, select the "Serial" category.
- In the serial options, type in the COM Port that you will be using (including the word "COM").
- For the remaining options, use these values:
- Speed (baud): 38400
- Data bits: 8
- Stop bits: 1
- Parity: None
- Flow control: None
- Optionally, to display what's being typed, in the category tree on the left, select the "Terminal" category and set "Local echo" to "Force on".
- Click the Open button.
- To test the connection, hit the Enter key a couple of times to ensure that communication has been established. The unit should respond with a -ERR message.
If you don't get any response from the unit when you hit Enter, then your connection is not set up correctly. Double-check all of the settings described above and try again. Occasionally baud rate settings do not get passed along to the port, verify the baud rate for the port under Device Manager, select the port, right-click for Properties and look in the tab Port Manager.
If you do get a -ERR response from the unit when you hit Enter, then your connection is ready. Proceed to the Commands section below to continue.
Tera Term
Tera Term is a terminal emulation program that is freely available on the internet. You can download it from http://sourceforge.jp/projects/ttssh2/downloads/59442/teraterm-4.79.exe/. Open the Tera Term software and follow these instructions:
- The software will open with a "New Connection" dialog box
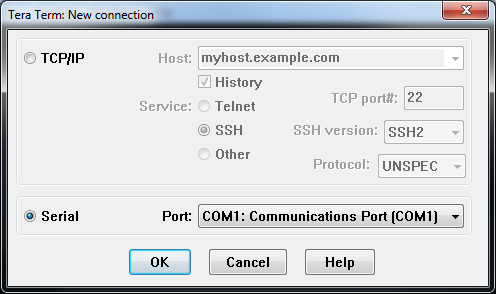 . The "TCP/IP" category is selected by default on the left. Select "Serial" instead, then go to the right side of the window and select the appropriate COM Port and click "OK".
 - You will now be presented with a Tera Term VT terminal window Go to "Setup" and choose "Serial Port".
- In the serial port setup window, confirm the COM Port that you will be using (including the word "COM").
- For the remaining options, use these values:
- Baud Rate: 38400
- Data bits: 8
- Parity: None
- Stop bits: 1
- Flow control: None
- Click the "OK" button and return to the "Setup" menu option in the Tera Term window and choose "Terminal."
- In this window you can change the size of the terminal window as well as some other settings. Check the box next to "Local echo."
- Click the "OK" button.
- To test the connection, hit the Enter key a couple of times to ensure that communication has been established. The unit should respond with a -ERR message.
If you don't get any response from the unit when you hit Enter, then your connection is not set up correctly. Double-check all of the settings described above and try again.
If you do get a -ERR response from the unit when you hit Enter, then your connection is ready. Proceed to the Commands section below to continue.
Hyperterminal
Hyperterminal is included with any installation of Windows XP or earlier. However, it is no longer included with Windows Vista or later. If your computer is running Windows Vista or later, we recommend using PuTTY or Tera Term instead.
If your computer is running Windows XP, you should be able to access Hyperterminal by opening up the Windows Start menu and navigating to Programs→Accessories→Communications→HyperTerminal. Open Hyperterminal and follow these instructions: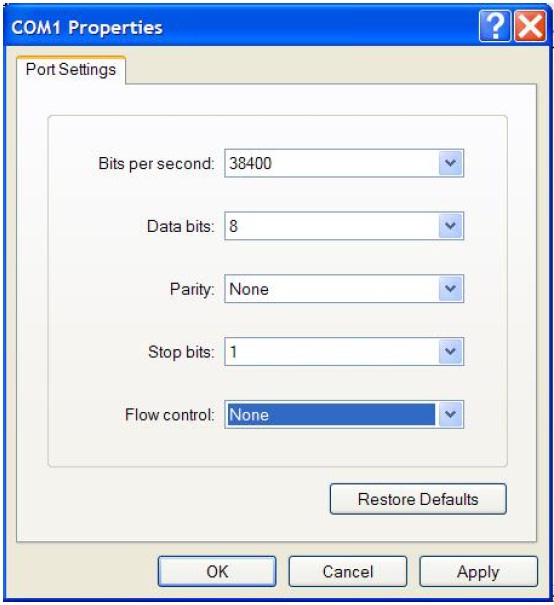
- In the Connection Description dialog, enter a name for your connection and click OK.
- In the Connect To dialog, under the drop-down menu labelled "Connect Using", select your COM Port and click OK.
- In the COMx Properties dialog, set the COM Port properties to:
- Bits per second: 38400
- Data bits: 8
- Parity: None
- Stop bits: 1
- Flow control: None
- Click OK.
- Optionally, to display what's being typed, go to File→Properties and select the Settings tab. Click on "ASCII Setup" and check the checkboxes for "Send line ends with line feeds" and "Echo typed characters locally", and click OK.
- To test the connection, hit the Enter key a couple of times to ensure that communication has been established. The unit should respond with a -ERR message.
If you don't get any response from the unit when you hit Enter, then your connection is not set up correctly. Double-check all of the settings described above and try again.
If you do get a -ERR response from the unit when you hit Enter, then your connection is ready. Proceed to the Commands section below to continue.
Possible issues getting connected via RS-232
PuTTY will not open after the serial settings have been entered.
This is typically due to the COM port assignment being incorrect. Go to Windows Start > Hardware and Sound > Device Manager, and open Ports (COM & LPT). You will need to determine which port is associated with the cable you are using, this may appear as "COM Port (COMx)" or "USB to Serial Com Port(COMx)", where x = the Port number. You need to specify this Port number in PuTTY in the "serial line" option.
Additionally, you will want to right-click on the Port and choose Properties and check the Port Settings to ensure that the correct baud rate (38400) has been passed through to the COM Port.
PuTTY opens but all I see is "hash" or meaningless "garbage" characters onscreen
Double-check the Flow Control setting for the serial connection. If it is "Xon / Xoff" it will cause this issue. An incorrect baud rate may also cause this issue.
PuTTY opens but nothing happens
If PuTTY appears to connect but there are no -ERR messages or other messages the Audia / Nexia's baud rate may have been changed from the default of 38400. You will have to manually try entering each of the following baud rates to see if it will elicit a response from the Audia / Nexia. 9600, 19200, 57600, and 115200.
Commands
Once you've successfully established a serial connection, there are several ways to manage the IP configuration of the device.
Get current IP configuration
 |
 |
The easiest way to get the current IP configuration of the unit is to simply power cycle the unit while you are connected via RS232. When the unit boots up, it will output a welcome message that includes its IP address, subnet mask, and default gateway.
Alternately, you can manually type commands to get the current IP configuration. The commands must be sent in all capital letters, and the backspace key cannot be used if a mistake is made:
GET 0 IPADDR- Gets the current IP address of the unit.
GET 0 SUBNETMASK- Gets the current subnet mask of the unit.
GET 0 DEFAULTGW- Gets the current default gateway of the unit.
Change IP configuration
The following commands can be used to change the IP configuration. Note that if the unit is currently running a configuration file (i.e. if it is passing audio), that configuration file will need to be cleared out (using the "CLEAR 0 DEVCONFIG" command) before the unit will allow its IP address to be changed. All commands must be sent in all capital letters, and the backspace key cannot be used if a mistake is made.
CLEAR 0 DEVCONFIG- Clears out the configuration file. This must be done before trying to change the IP configuration of a unit that is running a configuration file. Ensure that you have a backup copy of the configuration file before sending this command, since the configuration cannot be retrieved from the unit after it has been cleared.
SET 0 IPADDR xxx.xxx.xxx.xxx- Sets the IP address of the unit. Replace
xxx.xxx.xxx.xxxwith the desired IP address. The new IP address will not be used until the unit is power cycled. SET 0 SUBNETMASK xxx.xxx.xxx.xxx- Sets the subnet mask of the unit. Replace
xxx.xxx.xxx.xxxwith the desired subnet mask. The new subnet mask will not be used until the unit is power cycled. SET 0 DEFAULTGW xxx.xxx.xxx.xxx- Sets the default gateway of the unit. Replace
xxx.xxx.xxx.xxxwith the desired default gateway. The new default gateway will not be used until the unit is power cycled.
Further reading
An alternative method for discovering the IP address of a Biamp device is by capturing the network traffic using Wireshark. For more information, see How to discover the IP address of a device via the Ethernet port.