Recovering an Audia or Nexia with no IP Address from boot kernel mode
If an AudiaFlex or Nexia experiences a problem while booting up, or loses its IP address and can't connect over the LAN Network, it will boot into a safe mode referred to as "boot kernel" mode. The most common cause for this is if a firmware update is interrupted before it is completed. This article describes how to communicate with a unit that is in boot kernel mode, as well as how to recover it and make it boot normally.
Identifying boot kernel mode
When a device has booted into boot kernel mode, its front panel LED's will display this pattern:
| Front panel LED label | LED state |
|---|---|
| I/O | Off |
| com | Off |
| status | Solid Red |
If the front panel LED's are not displaying this pattern, then the unit is not in boot kernel mode.
Recovery procedure
If the unit is in boot kernel mode, follow this procedure to recover the unit. The basic steps are to connect to the unit using a serial cable, set a temporary IP address on the unit, and send a fresh copy of firmware to the unit.
Cable
The first step is to connect your computer's serial port to the serial port on the back of the AudiaFlex or Nexia. A straight-through serial cable is required for this purpose (not a null-modem cable). If your computer doesn't have a serial port, you can alternately use most USB-to-serial adapters without any problems.
COM port
Before you can communicate with the unit over serial, you must identify the COM port that your computer will use. In Windows, you can do this by going to the Device Manager (which is located in your Control Panels). In Device Manager, look for a category named "Ports (COM & LPT)". Expand that category and locate the COM port that you intend to use.
Software
Once a serial cable is connected and the COM port has been determined, you'll need to open a program that can communicate over the serial port. Biamp's Audia and Nexia software does not have this ability. There are many programs available for Windows that can perform this function, some of which may be included with Windows, and others that are freely available on the internet. This article describes how to use Hyperterminal, PuTTY, and Tera Term but other programs are available.
Hyperterminal
Hyperterminal is included with any installation of Windows XP or earlier. However, it is no longer included with Windows Vista or later. If your computer is running Windows Vista or later, we recommend using PuTTY or Tera Term instead.
If your computer is running Windows XP, you should be able to access Hyperterminal by opening up the Windows Start menu and navigating to Programs→Accessories→Communications→HyperTerminal. Open Hyperterminal and follow these instructions: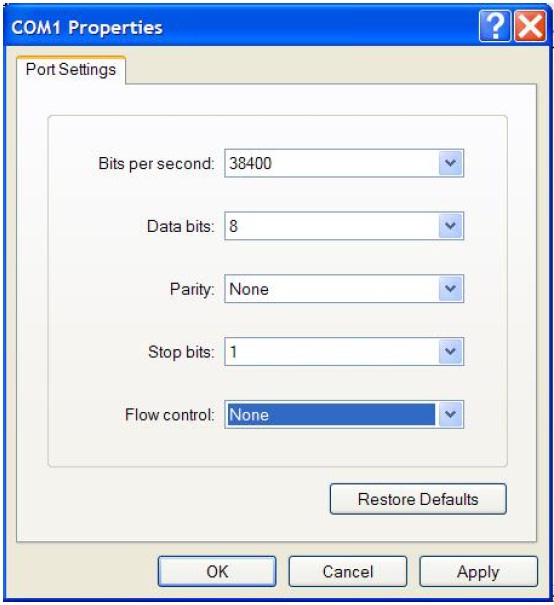
- In the Connection Description dialog, enter a name for your connection and click OK.
- In the Connect To dialog, under the drop-down menu labelled "Connect Using", select your COM Port and click OK.
- In the COMx Properties dialog, set the COM Port properties to:
- Bits per second: 38400
- Data bits: 8
- Parity: None
- Stop bits: 1
- Flow control: None
- Click OK.
- Optionally, to display what's being typed, go to File→Properties and select the Settings tab. Click on "ASCII Setup" and check the checkboxes for "Send line ends with line feeds" and "Echo typed characters locally", and click OK.
- To test the connection, hit the Enter key a couple of times to ensure that communication has been established. The unit should respond with a -ERR message.
If you don't get any response from the unit when you hit Enter, then your connection is not set up correctly. Double-check all of the settings described above and try again.
If you do get a -ERR response from the unit when you hit Enter, then your connection is ready. Proceed to the Commands section below to continue.
PuTTY
PuTTY is a terminal emulation program that is freely available on the internet. You can download it from http://www.putty.org/. (In most cases, you can just download the top putty.exe file on the downloads page, under the "For Windows on Intel x86" heading.) Open the PuTTY software and follow these instructions: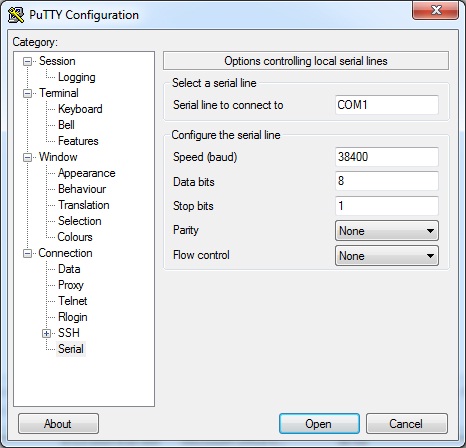
- The software will open with a category tree on the left, and options on the right. The "Session" category is selected by default on the left. With the "Session" category selected, go to the right side of the window and select the "Serial" radio button under Connection type.
- In the category tree on the left, select the "Serial" category.
- In the serial options, type in the COM Port that you will be using (including the word "COM").
- For the remaining options, use these values:
- Speed (baud): 38400
- Data bits: 8
- Stop bits: 1
- Parity: None
- Flow control: None
- Optionally, to display what's being typed, in the category tree on the left, select the "Terminal" category and set "Local echo" to "Force on".
- Click the Open button.
- To test the connection, hit the Enter key a couple of times to ensure that communication has been established. The unit should respond with a -ERR message.
If you don't get any response from the unit when you hit Enter, then your connection is not set up correctly. Double-check all of the settings described above and try again.
If you do get a -ERR response from the unit when you hit Enter, then your connection is ready. Proceed to the Commands section below to continue.
Tera Term
Tera Term is a terminal emulation program that is freely available on the internet. You can download it from http://sourceforge.jp/projects/ttssh2/downloads/59442/teraterm-4.79.exe/. Open the Tera Term software and follow these instructions:
- The software will open with a "New Connection" dialog box
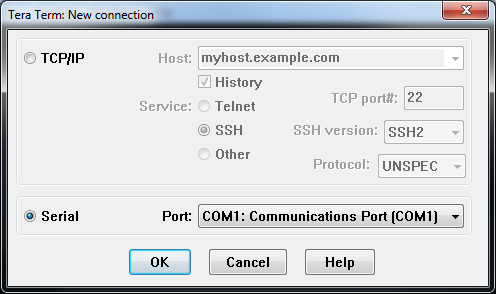 . The "TCP/IP" category is selected by default on the left. Select "Serial" instead, then go to the right side of the window and select the appropriate COM Port and click "OK".
 - You will now be presented with a Tera Term VT terminal window Go to "Setup" and choose "Serial Port".
- In the serial port setup window, confirm the COM Port that you will be using (including the word "COM").
- For the remaining options, use these values:
- Baud Rate: 38400
- Data bits: 8
- Parity: None
- Stop bits: 1
- Flow control: None
- Click the "OK" button and return to the "Setup" menu option in the Tera Term window and choose "Terminal."
- In this window you can change the size of the terminal window as well as some other settings. Check the box next to "Local echo."
- Click the "OK" button.
- To test the connection, hit the Enter key a couple of times to ensure that communication has been established. The unit should respond with a -ERR message.
If you don't get any response from the unit when you hit Enter, then your connection is not set up correctly. Double-check all of the settings described above and try again.
If you do get a -ERR response from the unit when you hit Enter, then your connection is ready. Proceed to the Commands section below to continue.
Commands
Once you've successfully established a serial connection, follow these instructions to recover the unit:
- Power cycle the unit while keeping the serial connection open. When the unit reboots, it should output the following message from its serial port:
Boot Kernel Serial BOA Text Server 1.001 (host id = 0)If this message does not appear on the screen, the unit is not in boot kernel mode and the steps below will not work correctly. - Set a temporary IP address on the unit by typing the following command, in all capital letters:
SET 0 DEVIPADDR 192.168.001.101
- After typing the above command, press the Enter key. Note that all octets of the IP address must be 3 digits long, and may require leading zeroes as shown above. The backspace key cannot be used if you make a mistake while typing. If the command is successful, the unit should respond with a
+OKmessage. If the unit responds with an error message, you may need to send the following command first (in all caps) to clear out the configuration file from the device before setting the temporary IP address:
CLEAR 0 DEVCONFIG
- Ensure that your computer's network interface has an IP address in the 192.168.1.xxx range. Open Audia or Nexia software, and Connect to Network. After discovering the device, click the Device Maintenance button.
- In the Device Maintenance window, click Update Firmware and send the latest firmware to the device. If you don't have the latest firmware, you can download it from Biamp's website. Once the firmware upgrade is complete, the unit will reboot itself, and should boot up normally with three green LED's on the front panel.
Troubleshooting
If, after following the above recovery procedure, the unit reboots with a red Status LED on the front panel (and the other two lights are green), send the following command over the serial connection:
RESET 0 FILESYSTEM
Wait for the +OK response, and then power cycle the unit.
If, after following the above recovery procedure, the unit reboots with a red COM LED on the front panel (and the other two lights are green), the unit may have booted up without an IP address. Send the following command over the serial connection:
SET 0 IPADDR 192.168.1.101
You may substitute a different IP address, if desired. Note that this command is slightly different than the command that is sent when the unit is in boot kernel mode, and no leading zeroes are required in the IP address. Wait for the +OK response, and then power cycle the unit.
Further reading
If the unit is not in boot kernel mode but you still can't connect to it, you can discover or change its IP address from the serial port. Details on this procedure can be found in How to manage an Audia/Nexia's IP configuration via RS232.