LAN/Serial Sequence - Volume command
This sequence can be executed when control system is not in mute state.
There are three different ways to handle the volume sequence: "Continuous", "Start/Stop" and "Inc/Decrement". Check the manual for your device to see how it is controlled. Remember to always fill in "Volume up" and "Volume down" commands except for "Inc/Decrement".
RS232/RS485 byte delay: If you need a delay between each byte sent on the RS232/RS485 port you can specify that here. This setting will take effect for only this sequence. If you need the delay for all the sequences you can specify it in the settings for RS232/RS485. This is only an option for devices from version 2.00.
Continuously
| Item | Description |
| The time between commands... | Defines the time between sending the first command and the second command. If the second command are not in use, this time is discharged. |
The sequence has the following function:
When key is pressed:
- Start sending the command and repeat the sending of the command with the interval entered.
- The LED of the button start flashing.
When key is released again:
- Stop sending command.
- The LED of the button stop flashing.
Start/Stop
When using Start/Stop, the button is pressed once and the command is sent until the button is pressed again.
The sequence has the following function:
When key is pressed:
- The first command (Start volume) is transmitted once.
- The LED of the button start flashing.
When key is released again:
- The second command (Stop volume) is transmitted once.
- The LED of the button stop flashing.
In/Decrement
When using In/Decrement, the button is pressed arbitrarily and the function of the command is/in decremented.
This sequence type can handle both "String" and "Binary" count. The type of count you need, depends on the protocol of the device.
It is only possible to have one in/decrement sequence in a device. But if the version of the device is 1.90 or higher you can have multiple. Please note that changing the device version can effect the Configuration Utility software not to support the device.
Count type = "String"
To use this count type, all the numbers that could change by the system, must be entered as ASCII numbers. If you cannot do this, it could be that you should use the "Binary count".
| Item | Description |
| Count format |
Define how the number is formatted. You can select between: Decimal: (1,2,3,4,5,6,7,8,9,10,11,12,13,14,15,16,17,18) |
| The repeat time... | Defines the time between sending the commands. The shorter the time, the faster volume is changing. |
| The minimum value... | Defines the minimum value that you want the user to be able to select. Please note that even though you have selected the count format as hexadecimal, you need to enter the minimum value as decimal. |
| The maximum value... | Defines the maximum value that you want the user to be able to select. Please note that even though you have selected the count format as hexadecimal, you need to enter the maximum value as decimal. |
| In/Decrease the value... | Define how much the value must change for each time the command is sent. Use + sign for positive values... Check this if you want all positive values to get a + character included in front of the count value. E.g. -12..0..+12 |
| Add leading zeros... | Check this if you want to make sure that the count value transmitted to the device will have the same number of digits for all values. This number of padded zeros will depend on the minimum and maximum values. E.g. if minimum value is 0 and maximum value is 100, the count value 0 will be transmitted as 000, and 52 will be transmitted as 052 because we have 3 digits in the maximum value 100. |
Example on how to setup this sequence:
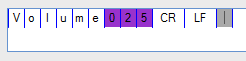
- Enter the code to send. (e.g. VolumeXXX<CR><LF>).Replace the XXX with the default value of the system when the control system is powered on. (In this case: 025).
- Select the bytes where the system must insert the in/decrement value. This is done by using the mouse. (From '0' to '5'). When using String count, you can select up to ten bytes.
- The three bytes are now selected, which is indicated with another color.
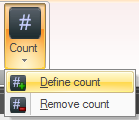
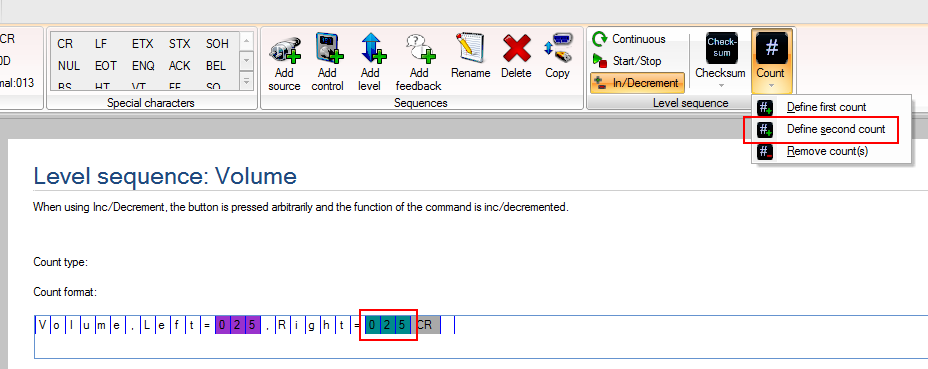
- Press the "Count" button from the Design menu and select "Define count".
- The selected bytes are now indicated with another color.
If the selected bytes are not valid, the following warning will appear:
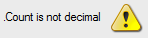
When this warning appears, it indicates that the bytes selected for counting is a non-numerical expression. Using a command containing a warning will result in the counting bytes being ignored.
From device version 2.30 it is possible to define a second count byte. You will see that the color of these bytes are different than the first count byte. The two values will always follow each other and have the same value.
Count type = "Binary"
When using this type of count, it is important to know that the in/decrement will be done at byte/integer level. If that is not what you require, please read the section on how to use "String" count.
| Item | Description |
| The first selected byte... |
If you have selected two bytes as the counting value, you need to select whether the first byte is LSB (Least Significant Byte) or MSB (Most Significant Byte).
|
| The repeat time... | Defines the time between sending the commands. The shorter the time, the faster volume is changing. |
| The minimum value... | Defines the minimum value that you want the user to be able to select. Please note that even though you have selected the count format as hexadecimal, you need to enter the minimum value as decimal. |
| The maximum value... | Defines the maximum value that you want the user to be able to select. Please note that even though you have selected the count format as hexadecimal, you need to enter the maximum value as decimal. |
| In/Decrease the value... | Define how much the value must change for each time the command is sent. |

Example on how to setup this sequence:
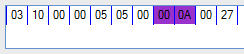
- Enter the code to send. (03 10 00 00 05 05 00 00 XX XX 27).
Replace the XX with the default value of the system when the panel is turned on. (0A and 00). - Select the bytes where the system must insert the in/decrement value. This is done by using the mouse. (From '0A' to '00').
When using Binary count, you can only select up to two bytes. - The two bytes are now selected, which is indicated with another color.
- Press the "Count" button from the Design menu and select "Define count".
- The selected bytes are now indicated with another color.
If the selected bytes are not valid, the following warning will appear:

When this warning appears, it indicates that the bytes selected for counting is not selected properly. Using a command containing a warning will result in the counting bytes being ignored.
Checksum calculation
Many protocols uses checksum to ensure that the data received are correct. There are many ways of making checksum calculations and different manufacturers uses different ways.
But the basics are the same. You take a range of bytes and do some kind of math with them. The result of this is called the checksum and are send along with the rest of the data. This way the receiver can do the same math on the data and compare its result to the checksum sent along with the data.
If the two checksums match up, the received data are correct and can be used.
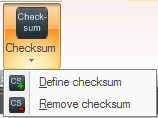
To make a checksum calculation click the Checksum button in the menu.
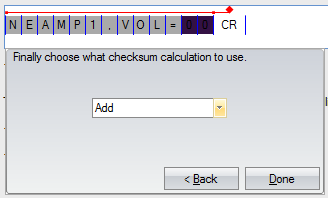
Simply follow the instructions on the window that appears, and finally it will look something like this.
In short what you have to do is define the bytes that must be included in the checksum calculation, where the result of the checksum calculation should be placed and how the calculation is done.
The sequence has the following function:
When key is pressed:
- Start sending the command and repeat the sending of the command with the interval entered.
Each time the command is sent, the selected value increases or decreases according to the pressed button. - The LED on the button start flashing.
When key is released again:
- Stop sending command.
- The LED on the button stop flashing.