

Devio UCX Setup and Configuration

Models
Devio UCX 1000
Devio UCX 2000
Devio UCX 3000
Apprimo Touch 10 UCX-T (Table touch panel)
Apprimo Touch10 UCX-W (Wall-mounted touch panel)
Pre-Installation
Important!
Notify your IT or Network Manager about this system installation.
- Basic information about setting up a Teams room is available here: Microsoft Teams Rooms Deployment Overview - Microsoft Teams | Microsoft Learn
1. Record the model name, serial number and MAC address information from the device or box labels.
2. Reach out to the IT Administrator for support to enable internet network connection and Teams / Zoom registration.
Intended Use and Capability
The Devio UCX hosts meetings in AV-equipped rooms. The system includes an Apprimo Touch 10 UCX-T or UCX-W touch panel for system operation with pre-installed UCX software. The system is controlled by one of the Devio UCX hub models (1000, 2000, 3000).
Minimum Hardware Requirements
- At least one external display with cable for HDMI-out connection
- Cat5e Ethernet cable
- HDMI cable for HDMI-in connection
Compatible Biamp Devices
Devio UCX systems integrate AV via USB or IP for the following Biamp products:
- Parle VBC 2500a/2800
- Parle ABC 2500a
- Vidi 250 / 280
- Parlé DCM-X, DCM-XA, DCM-XEX
- Parlé DTM-X, DTM-XEX
- Devio DPA-450BP
- C-IC6 or C-IC6LP loudspeakers
- TesiraFORTE X 400/800/1600
- EX-UBT
- EX-USB
- MPX 250
UCX Installation Guide
The Devio UCX hub is designed for placement on the wall behind the display or under the table. It can also be placed on flat surfaces like tabletops or desks. The Apprimo Touch 10 UCX-T is placed on the desk or tabletop. The Apprimo Touch 10 UCX-W can be ordered for wall-mounted applications. Click on the link below for the Installation manual.
Click here to download: Devio UCX System Installation Guide
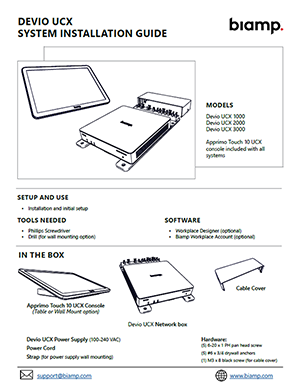
Included in the Box
- Devio UCX (1000, 2000 or 3000)
- Apprimo Touch 10 UCX-T (Table or Wall Mount)
- AC Power Adapter (x1)
Connect Devices
See the next section for connections to the Devio UCX (hub) and Apprimo Touch 10 UCX-T devices. Once the connection between the Devio UCX and Touch 10 UCX-T panel is made, connect the room AV devices to the Devio UCX using the steps below.
Devio UCX Setup
Make the connections
Check the compatibility and requirements of peripheral devices as well as their connection types. Typical systems and examples of each of the Devio UCX models are shown below (Typical System Examples).
1. Remove the cable cover.
2. Locate the ports on the rear of the hub.
3. Insert the cables and verify the connections are secure. The touch panel should be plugged into network Port 2 on the hub. A Parlé ABC or VBC conferencing bar should be connected to upper USB-C port and secured with its thumbscrew.
4. After all cables are plugged into the ports, power the hub to verify connectivity. The LEDs will light on the network ports to indicate communication.
5. Go to the next section to set up the Touch 10 UCX-T.
6. After connections have been made and verified, slide the cover on and secure with the screw.
Apprimo Touch 10 UCX-T Installation
Follow the steps below to install the Apprimo Touch 10 UCX-T.
Table (UCX-T)
1. Place the touch panel on a conference table or any location with easy accessibility.
2. Turn it over to expose the cable ports, and remove the cover if it was attached.
3. Connect a CAT5e cable from the #2 Ethernet port on the Devio UCX to the ethernet port on the touch panel.
4. (Optional): Install a USB-C cable for content sharing.
The touch panel does not require a separate AC Power Adapter. Power is supplied by the CAT5e PoE cable from the Devio UCX (port 2).
5. (Optional): 100 W power supply (for device charging) - Install the 100 W power supply's USB-C cable in the left port.
6. Route cables in the provided channels

7. Once the touch panel and all connections to the Devio UCX are made, power the Devio UCX.
8. If the green LED on the touch panel ethernet port is lit, then the touch panel is connected and getting power..
8. Install the Input cover on the touch panel and secure with 3 screws.
9. Turn the touch panel over and set on its base The touch display powers on in about 15 seconds.
Important! Once the connections are secure, the touch panel will display the Welcome screen.
Typical System Examples
Small Conference / Huddle Rooms
Devio UCX 1000 with VBC 2500a

Medium & Large Conference Rooms
Devio UCX 2000 with VBC2800 and DTM-X

Devio UCX 3000 with VBC2800, DCM-X, and two C-IC6s

Setup Procedure
Important! This section is required for all Devio UCX systems.
Coordinate with the IT or network manager to have log in information handy to enter during setup. This assumes that all peripherals and the touch panel have been connected to the Devio UCX hub per instructions in the manual and above.
1. Power the hub. Both the touch panel and the room's large display screen should show the Welcome screen.
- Ensure there is a stable connection to the internet as the system may require firmware updates. It may take more than a few minutes to update the firmware on the UCX devices and connected bar and/or camera. This should all be completed before continuing the setup process.
2. Follow the on-screen instructions to set up and configure the room account.
3. Once the accounts are set up, ensure that the hub recognizes any connected peripheral devices in the Settings menu.
4. Run Biamp Launch to configure the sound in the room.
5. Choose the meeting platform for the room.
6. (optional) Register the devices to Biamp Workplace. (Workplace setup / administrative information is available in the Workplace Admin Help File).
7. Test to verify the proper functioning of Teams or Zoom by joining a test meeting, testing audio and video functionality, and verifying network connectivity.
Technical Support
Contact US
+1 877-242-6796
See Simple Solutions for common Devio UCX issues.