Positioning Parlé microphones with Devio
This article describes the recommended positioning of both the TTM-XEX and TCM-XEX microphones for optimal beamtracking functionality and audio quality. The term "talker" will be used as shorthand for the average position of the average person's mouth who will be speaking into the Devio system. Ideal positioning of any microphone will be largely dependent on the physical acoustics of the space in which it is operating, but the information below should be used as a guide when determining this position.
TTM-XEX (Parlé Tabletop Microphone)
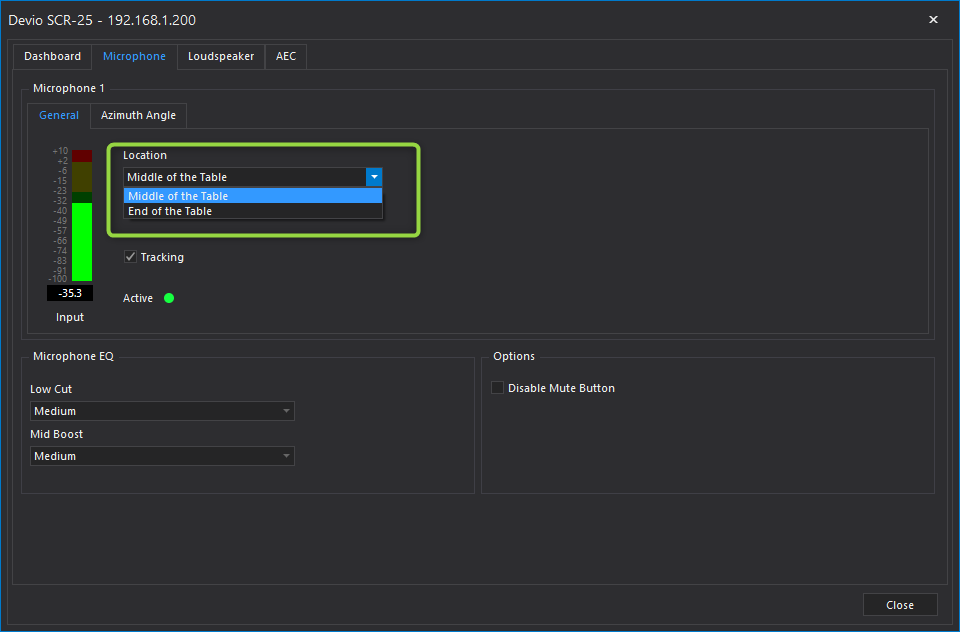
When a TTM-XEX is detected, the Devio System Administration Utility (SAU) software will automatically detect the type of microphone connected and display the options appropriate for that model. There are two supported location modes for the TTM-XEX:
- Middle of the table
- End of the table
Below are details on each of these modes, including recommended distances from the talker and configuration settings.
Selecting your location mode
Location mode settings can be configured from within the Devio System Administration Utility (SAU) software. To do so, you will first need to connect to your Devio SCR-20/25 in the SAU, then double-click on the unit you wish to configure from the device list. A pop-up window will appear, at the bottom of which you will find configuration settings for the microphone currently connected to the SCR-20/25.
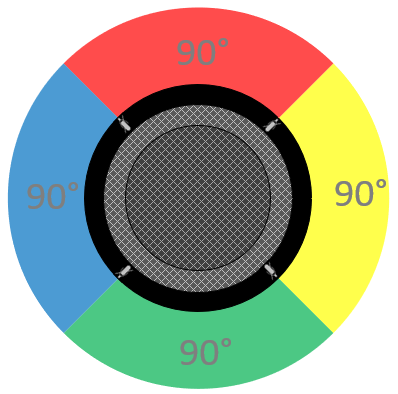
Middle of the table
When set to "Middle of the table" mode, the TTM-XEX is intended to be placed in the center of the huddle space's conferencing table. When set to this mode, all four of the TTM-XEX's 90-degree zones will be active, allowing for 360 degrees of beamtracking coverage area.
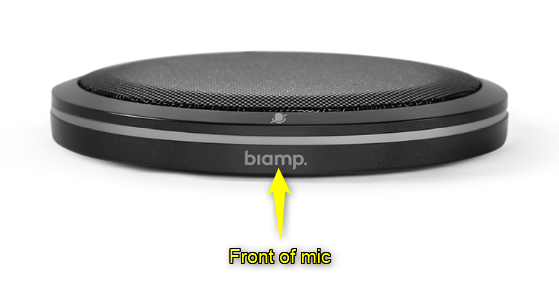
End of the table
This mode is intended for situations where the TTM-XEX will be placed at the end of a table, typically beneath a wall-mounted display monitor for video conferencing, and often against a wall. In this scenario, no talkers should be seated directly to the side of or behind the TTM-XEX. When set to "End of the table" mode, only a single 120-degree zone of beamtracking coverage will be active. The purpose of doing this is to help improve audio quality and intelligibility to the far end by reducing the amount of noise and reflections being picked up unnecessarily by the TTM-XEX when full, 360-degree coverage is not needed. The side of the microphone featuring a Biamp logo should be turned toward where talkers will be seated, as this is the center of the active coverage zone in this mode.

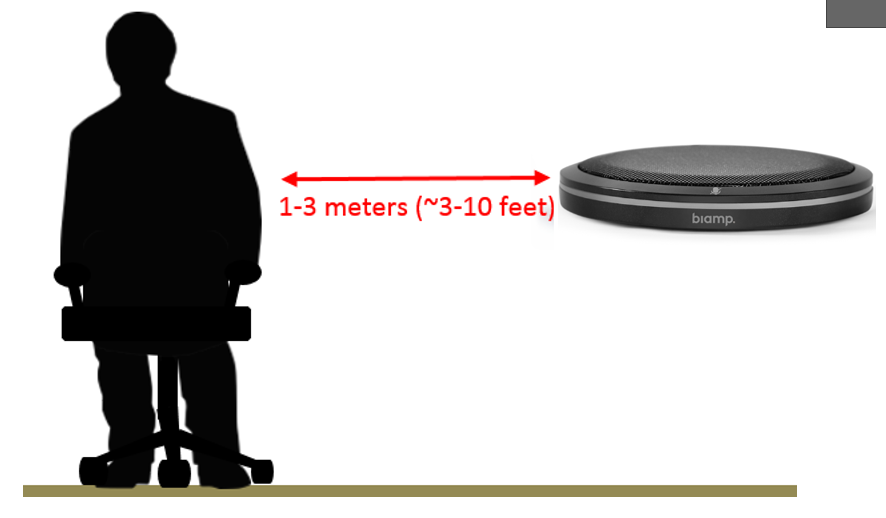
Distance to talker
Whether in "middle of the table" or "end of the table" mode, the recommended distance from the TTM-XEX to the talker is 1-3 meters (or approximately 3-10 feet).
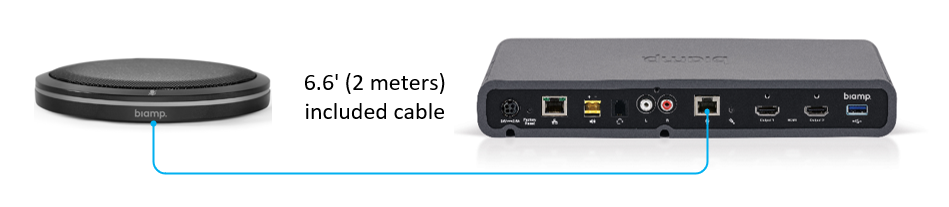
Cabling
The TTM-XEX includes a built-in 6.6' (2m) cable to connect with an SCR-20/25 unit.
TCM-XEX (Parlé Ceiling Microphone)
For huddle rooms and small meeting spaces where tabletop space is limited, the TCM-XEX provides the same beamtracking technology as the TTM-XEX in a ceiling-mountable form factor. When positioning the TCM-XEX, there are several factors to take into account:
- Ceiling height
- Area where the talkers will be located
- Microphone to talker distance based on initial estimated position of microphone in the room
- Ambient noise level in the room
Together, these factors will help determine where the TCM-XEX should be positioned. The below sections will go into greater detail on each of these topics.
Ceiling height
When a TCM-XEX is detected, the Devio System Administration Utility (SAU) software will automatically detect the type of microphone connected and display the options appropriate for that model.
Elevation angle of the beams are automatically controlled based on the mounting height (ceiling height) of the TCM-XEX and are configured within the SAU. In order to perform optimally, the ceiling height from the floor must be set to match the conditions in the room. To do so, you will first need to connect to your Devio SCR-20/25 in the SAU, then double-click on the unit you wish to configure from the device list. A pop-up window will appear, at the bottom of which you will find configuration settings for either the microphone.
The default ceiling height for TCM-XEX devices is 10'2" (3.1m) but is adjustable between 6'11" to 18' (2.1m - 5.5m)
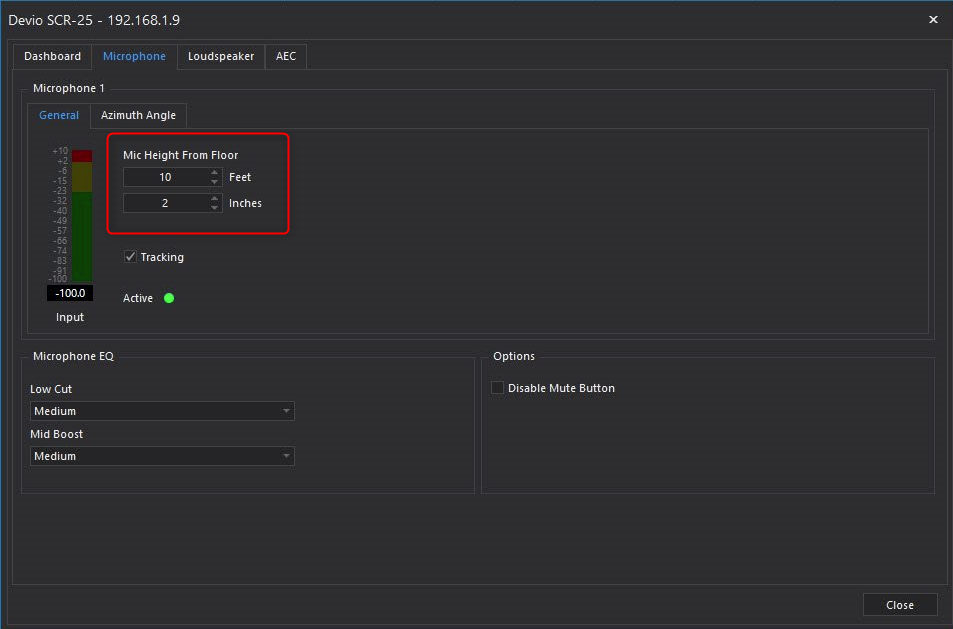
Select the appropriate ceiling height here and press Close to apply the changes.
Microphone coverage area
The coverage area of the TCM-XEX is determined by the ceiling height and acoustical conditions of the room. We have created an online tool to aid in these calculations to simplify determining the ideal location of the microphone.
Step 1: Gather the following information about the room:
- Ceiling height
- Measured ambient noise level in the room using a sound level meter set to A weighting
Step 2: Go to the Parlé Ceiling Microphone Calculator:
Parlé ceiling microphone calculator
Step 3: Enter the appropriate information to calculate the coverage area
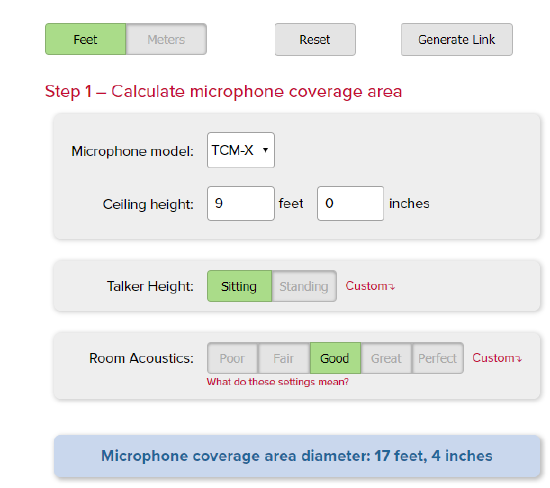
Feet/Meters - Select the unit of measure that meets your needs.
Reset - This button will clear all of the settings and put them back to defaults.
Generate Link - Once you have made the calculations, you can use this button to create a shortcut URL that will then appear in your browser's navigation bar. You can copy this address and keep for future reference or email to someone else.
Microphone model - Select either the TCM-X (equivellant for Devio TCM-XEX) or the TCM-1 microphone.
Ceiling height - Enter the ceiling height for the room.
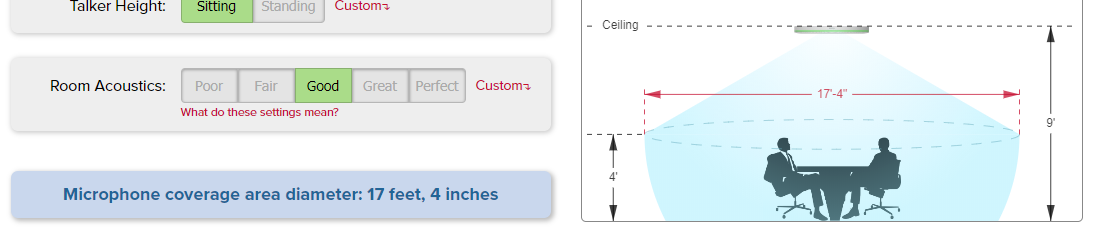
Talker Height - This setting will determine if the coverage area is based on a person sitting or standing. In most cases, you will want to use sitting for rooms that include seated participants.
Room Acoustics - Use this setting to adjust the calculations based on the acoustical properties of the room. Click the "What do these settings mean?" link that will take you to a page that references these settings to the noise floor, reverb time, and mic-to-talker distances. (See Acoustical Considerations section below)
Once you have entered this information, the calculator will give you the calculated "Microphone coverage area diameter" and a vertical coverage area diagram.
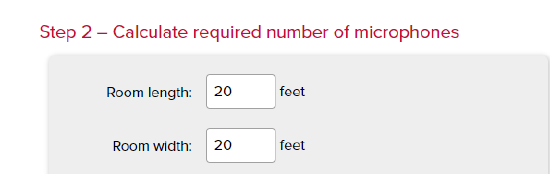
NOTE: The Parlé Ceiling Microphone Calculator has a section that allows you to calculate the number of microphones needed to provide coverage for an entire room. This step is not applicable to Devio as you are limited to ONE TCM-XEX or TTM-XEX microphone per Devio SCR-20/25. This section is used to calculate room coverage when using multiple Parlé used with a Tesira system. However, you may find the information provided by the coverage map useful in visualizing microphone coverage. If the calculator determines more than one microphone is required, it may indicate that this room will not perform well with a single microphone.
Acoustical considerations
Room acoustics are a major factor in microphone performance for any conferencing system. Effects on ceiling microphones are more prominent because the noise and reflection levels at the microphone position are higher in level when compared to the direct sound from the talker.
Background noise
As sound propagates through the air, it decreases in level. It is critical that the talker sound level received by the microphone is higher than the level of the acoustical noise in the room. This noise may include ambient noise from environmental controls, equipment in the room, or noise from outside of the room. The most common source of noise is the building HVAC, but computers and A/V equipment with fans, street noise from outdoors, and noise from people outside of the room are all sources of noise that could negatively impact the performance of the conferencing system. It is critical to take a measurement in the room using a calibrated sound level meter to determine the "noise floor" in the room. The difference between the measured noise floor in the room and the level of the talker at the microphone is referred to as the signal-to-noise ratio. This ratio must be at least 10dB, but should be closer to 25dB for optimal speech intelligibility. The recommended maximum noise floor for small conference spaces is between 35-40dBA (A-weighted sound level measurement). This level corresponds with the Noise Criterion range of 25-30.
The noise floor measurement is simple and sound level meters are readily available and inexpensive models can be purchased. There are even apps available for phones and tablets that yield acceptable results. This table indicates the noise floor levels used by the calculator based on the Room Acoustics Setting parameter:
| Room Acoustics setting | Noise Floor |
|---|---|
| Poor | more than 45 dBA |
| Fair | 39-45 dBA |
| Good | 37-39 dBA |
| Great | 35-37 dBA |
| Perfect | less than 35 dBA |
Reflections
When sound travels and encounters a surface, it reflects off of that surface similar to how light bounces off of a mirror. The surface will absorb some of the sound energy, but not all of it. The amount of energy reflected depends on the properties of the surface and is referred to as the absorption coefficient. Typically, softer surfaces such as fabric wall panels, upholstered seating, carpet, and people will absorb more sound energy and reflect less. Hard surfaces such as glass, stone, marble, hardwood, concrete, and drywall will reflect much of the sound.
These reflections are also picked up by the microphone just like speech from a person talking in the room. The microphone cannot differentiate between the two and some very strong reflections or a large number of reflections picked up by the microphone can negatively impact speech intelligibility. The key is to maximize that signal-to-noise ratio by minimizing the talker-to-microphone distance in the room. This minimizes the impact that these reflections will have on speech intelligibility.
There is a measurement called RT60 that reflects the decay of these reflections in the room. This measurement requires more expensive test equipment and additional training to perform and interpret the measurements. The table below lists the RT60 times used by the calculator along with the noise floor in determine microphone coverage. If this measurement is available for the room, it can be used in determining the Room Acoustics Setting value in the calculator.
| Room Acoustics setting | Reverb Time (RT60) |
|---|---|
| Poor | more than 1000 ms |
| Fair | 500-1000 ms |
| Good | 400-500 ms |
| Great | 300-400 ms |
| Perfect | less than 300 ms |
Mic-to-Talker Distance
The maximum distance allowed between the microphone and talker based on the acoustical characteristics of the room are listed below.
| Room Acoustics setting | Max. Mic-to-Talker Distance |
|---|---|
| Poor | 2 meters (6.5 feet) |
| Fair | 2.5 meters (8 feet) |
| Good | 3 meters (10 feet) |
| Great | 4 meters (13 feet) |
| Perfect | 5 meters (16.5 feet) |
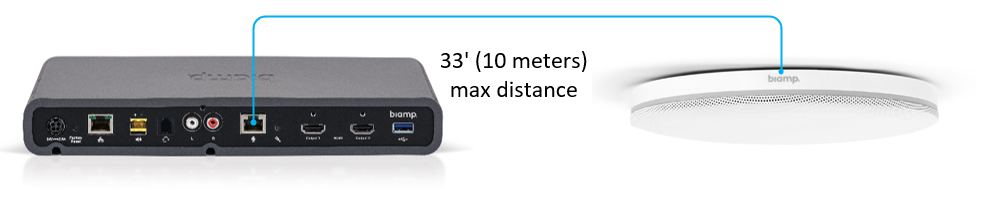
Cabling
The TCM-XEX connects to the SCR-20/25 using standard Category 5e or Category 6 cable. The maximum cable length between the TCM-XEX and SCR-20/25 is 33 feet (10 meters).