Parlé SBC 2 overview
About
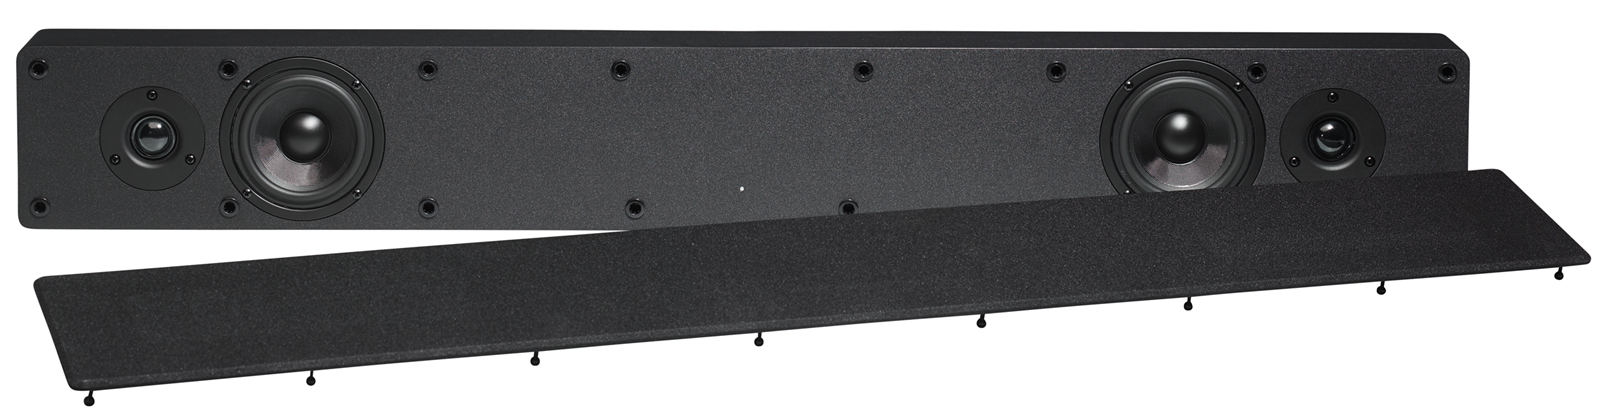
The Parlé SBC 2 is a high-fidelity speaker bar for use with conferencing systems in huddle rooms or small conference rooms. The SBC 2 is equipped with two 4” woofers and two 1” tweeters and can be table- or wall-mounted. Four input options are available to allow for interoperability with a variety of room environments.

Features
- Output Power Rating: 4 x 20 WRMS
- Equipped with two 4” woofers and two 1” tweeters
- Selectable EQ presets for Voice, Music, or Presentation
- Four audio input options: HDMI ARC, USB, Euroblock, and RCA. Sampling rate 44.1/48kHz on digital inputs.
- RS-232 control and integration
- Wake-on-signal capability
- Red/Green Mute status LED
- Dimensions:
- Width 1120 mm / 44.1"
- Depth 150 mm / 5.9"
- Height 200 mm / 7.8"
- Powered by 100-240 VAC mains via IEC C8 connector. Maximum power usage at 60 W, standby power usage <0.5 W.
Audio
Speaker Drivers
The SBC 2 speaker bar features dual 4" LF drivers paired with a pair of 1" soft dome HF drivers. Each driver is driven with 20 WRMS power to provide a frequency response 50 Hz - 20 kHz +/- 3 dB at a maximum SPL 106 dBA.
Audio Mode selection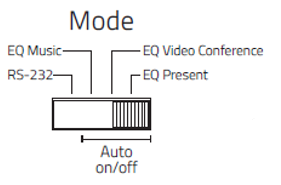.png?revision=1)
The Mode selection switch selects between RS-232 control mode and the Auto on/off mode. The position of the Mode switch in the Auto on/off positions selects one of three EQ presets. EQ presets can also be selected in RS-232 mode using commands. The presets are Video Conference, Music, and Present (presentations).
Auto on/off mode
When the switch is placed in any of the Auto on/off mode's three EQ positions, the conferencing bar activates its automated Wake-on-signal function. This sets the bar to automatically power on and off in response to sensed signals on its ports. Setting the switch in Auto on/off mode activates the Wake-on-signal even if it was previously disabled by a command in RS-232 mode.
In Auto, on/off mode, the RS-232 control port is still active. However, the SBC 2 bar will not respond to incoming commands or queries except to signal the connected control system that the conferencing bar is set to Auto on/off.
RS-232 mode
In RS-232 mode, the active RS-232 port is used to control the bar with commands, and status can be requested through queries.
The Wake-on-signal function is disabled by default in RS-232 mode. However, the function can be activated by RS-232 command if both Wake-on-signal and RS-232 control are needed for the application.
When changing the mode switch from “Auto on/off” to “RS232” the Sound Bar will automatically apply the following settings:
- Power = ON
- Mute = OFF
- Volume = 70 (If max volume is set lower than 70, then that will not be exceeded)
- Input = 1 (RCA Unbalanced)
- Wake on signal = OFF
- EQ setting = Video Conference.
Note: RS-232 control is deactivated when the bar is set to Auto on/off mode.
Equalizer presets
The EQ presets provide enhanced listening experiences for three use scenarios.
- Equalizer 1: Music. This setting is optimized for the best overall experience when listening to various types of music.
- Equalizer 2: Video Conference setting. This is the default setting when the Bar is operating in RS232 mode, and it enhances the experience when using unified communication equipment with the Sound Bar.
- Equalizer 3: Present setting (presentations). Optimized for Presentations with a combination of videos and speech.
Reminder: The presets can be selected using RS-232 commands or by using the Mode switch on the back of the bar.
Source behavior
Analog signals: Balanced and RCA
When powered on via the activating analog input sources (Balanced or RCA), the bar remains in the on state while a signal is present. When the signal is removed, the bar stays on for 20 minutes before automatically powering off. After powering off, the Wake-on-signal function re-activates, sensing for an active signal.
Digital signals: HDMI-ARC and USB Audio![]()
When connecting using the HDMI or USB ports, the bar uses the first digital signal detected to designate its active source. The bar will look for another active source when the first signal is lost. In the absence of a signal, the bar will stay on for 20 minutes before powering off.
In the adjacent example illustration, the connected TV is turned on first, making the HDMI-ARC port the active source for the bar. The user then decides to change the source to USB Audio and looks for the sound bar as a source on his Laptop audio output. However, the bar will not show up as a source on the laptop until the TV is switched off, causing the USB source to register as the new active source.
Likewise, if the USB source was activated first, the TV will not detect the Sound Bar on HDMI-ARC until the USB is disconnected from the Laptop.
When connecting the SBC 2 to a PC, the enumerated audio output shows as "Parlé SBC 2".
Note: The USB is version 2.0, The USB cable length should not exceed 5 meters (15 feet).
Power Status Indicator
The center-mounted power status LED indicator is visible through the grill on the SBC 2's front panel. It serves as both a status indicator and diagnostic aid for troubleshooting.
- The LED is on when the bar is powered during normal operation.
- The LED pulses slowly on and off when in a powered-off state.
- The LED blinks when the output is muted by a TV using CEC or an RS-232 command.
- If the LED is off entirely, verify mains power AC connection or circuit.
Connectivity
Rear Panel
All connections and controls are located on the SBC 2's rear panel. These are:
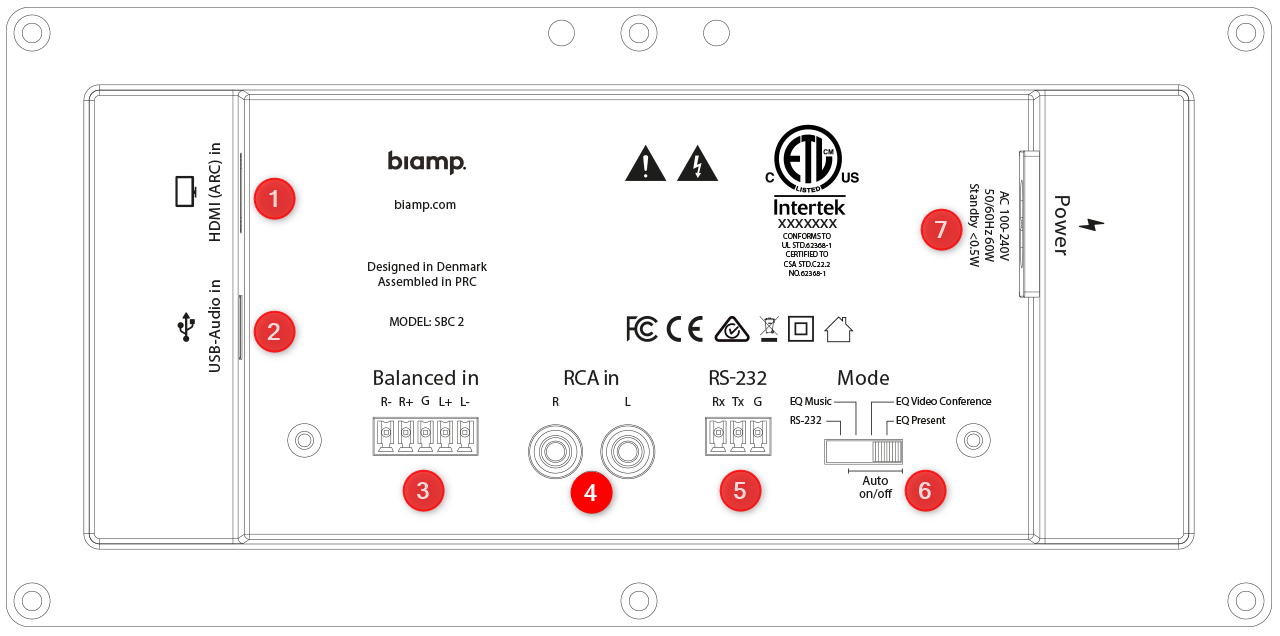
- HDMI (ARC)
- USB Audio Input (USB 2.0)
- Balanced audio connector
- RCA Unbalanced audio
- RS-232 connector
- Mode Switch for selecting RS-232 or Auto on/off
- Mains power in (100-240 VAC)
Balanced Audio
The connector marked “BALANCED” is a line level audio input that can be used in balanced or unbalanced modes. Connect the audio source using the supplied terminal block.
To connect the input to a balanced source, connect a ground to the shield of both cables.

To connect a single ended/unbalanced source to the balanced Euroblock;
- Connect the ground to the cable shield
- L+ to left signal output, R+ to right signal output
- Connect L-and R- to ground with a small piece of wire
Control
RS-232 mode
To control the conferencing bar via RS-232, connect a control system to the port with the following settings:
- Baudrate: 19200
- Databit: 8
- Stopbit: 1
- Parity: None
Format
The RS-232 protocol consists of commands and queries. Both actions are two-way data exchanges. The bar responds with an acknowledgment to a command and a value to a query.
Protocol considerations
- All RS-232 communications are case sensitive.
- Multiple commands can be sent without a time delay between commands by delimiting each command with the command ending \CR.
- Settings adjusted using RS-232 commands are automatically saved in the bar. The saved settings are then used as default values the next time the bar is powered on.
Command and query structures
RS-232 commands and queries sent to the bar are structured as follows:
- A header: "NEUNIT =1" all commands, queries and replies start with the header.
- The header and following command is delimited by a comma mark ","
- Followed by the command: "POWER-ON"
- A command can be changed to a query by replacing the string number after the equal sing with a question mark "?"
- Ending with a carriage return: "\CR"
- Carriage return is commonly referred to as "CR". If you need to enter it in hexadecimal, the value is 0D and in decimal, it is 13.
Global functions
All the functions allowed to adjust the basic functions of the Sound Bar are available in the global functions. All commands start with: “NEUNIT=1,” followed by the command in <A>, the value after the equal sign must be replaced with the value in <X> or a question mark, all commands must end with a \CR.

Example of use:
- NEUNIT=1,POWER=ON\CR Turn on the Sound Bar.
- NEUNIT=1,POWER=OFF\CR Turn off the Sound Bar.
- NEUNIT=1,POWER=?\CR Query the power status.
- NEUNIT=1,INPUT=1\CR Sets the audio input to input 1 (UNBALANCED).
- NEUNIT=1,INPUT=2\CR Sets the audio input to input 2 (BALANCED).
- NEUNIT=1,INPUT=3\CR Sets the audio input to input 3 (HDMI ARC).
- NEUNIT=1,INPUT=?\CR Query the selected audio input.
- NEUNIT=1,VOL=INC\CR Increments the master volume one step.
- NEUNIT=1,VOL=DEC\CR Decrements the master volume one step.
- NEUNIT=1,VOL=DEC\CR Decrements the master volume one step.
- NEUNIT=1,VOL=23\CR Sets the master volume to 23.
- NEUNIT=1,VOL=?\CR Query the current master volume level.
- NEUNIT=1,MAXVOL=50\CR Sets the maximum volume to 50.
- NEUNIT=1,MAXVOL=?\CR Query the current maximum volume level.
- NEUNIT=1,MUTE=ON\CR Mute audio output.
- NEUNIT=1,MUTE=OFF\CR Unmute audio output.
- NEUNIT=1,MUTE=?\CR Query the audio output mute state.
Audio input settings
All commands start with: NEUNIT=1,SETTINGS=INPUT, followed by the command in <A>, the value after the equal sign must be replaced with the value in <X> or a question mark, all commands must end with a \CR.

Example of use:
- NEUNIT=1,SETTINGS=INPUT,WOS=ON\CR Set wake-on-signal function on.
- NEUNIT=1,SETTINGS=INPUT,WOS=OFF\CR Set wake-on-signal function off.
- NEUNIT=1,SETTINGS=INPUT,WOS=?\CR Query the wake-on-signal setting.
Audio Output Settings
All commands start with: NEUNIT=1,SETTINGS=OUTPUT, followed by the command in <A>, the value after the equal sign must be replaced with the value in <X> or a question mark, all commands must end with a \CR.

Example of use:
- NEUNIT=1,SETTINGS=OUTPUT,EQ=1\CR Select equalizer preset 1.
- NEUNIT=1,SETTINGS=OUTPUT,EQ=2\CR Select equalizer preset 2.
- NEUNIT=1,SETTINGS=OUTPUT,EQ=3\CR Select equalizer preset 3.
- NEUNIT=1,SETTINGS=OUTPUT,EQ=?\CR Query the equalizer preset
Wake-on-signal technology
The SBC 2 bar can be set to automatically power on and off when a signal is present.
- USB: The Wake-on-signal function looks for an active 5 V signal on its USB port as an active source.
- HDMI: A connected TV turning on and off uses CEC to power the bar on and off. Check the TV manual for recommended settings regarding ARC and CEC. Some TV manufacturers require configuring to use ARC as the audio output. Others to use CEC for both the audio output and to control a connected device's power state.
- UNBALANCED (RCA) and BALANCED: To wake, the conferencing bar must detect an analog signal on one of the two inputs. The signal-sense trigger level is not adjustable. When the SBC 2 is powered on by an analog input, that source will remain the active source for as long as there is a signal.
- When the signal is removed, the bar will be kept on for an additional 20 minutes before automatically powering off again. And the wake-on-signal function will start over again sensing for an active signal.
- Volume at power-up: The volume level for Wake-on-signal will be the last volume used.
- Coming from the factory, the bar will wake up at level 70 out of 100.
- If another volume level is required for a specific application, the volume should be adjusted by RS-232 command.
- When the bar is powered off, the Wake-on-signal function senses audio inputs on the four designated ports for one second at a time in a circular manner. As a result, the power-on process can take up to 2 seconds after a signal first starts transmitting.
Reminder: The Wake-on-signal function is disabled by default in RS-232 mode. However, the Wake function can be activated by RS-232 command if it and RS-232 control are required for the application.
Mounting
SBC 2 is designed to be easily installed. It can be mounted on the wall beneath or above a screen or placed free-standing on a desk. Brackets for wall mounting are included in the box as well as 4 rubber feet. Also included in the box is a template for easy mounting.
Wall Mounting
- Use a level to ensure the template is level, then tape the template securely to the wall.
- Use an awl or other sharp object to punch 4 small holes through 4 of the marked locations on the template.

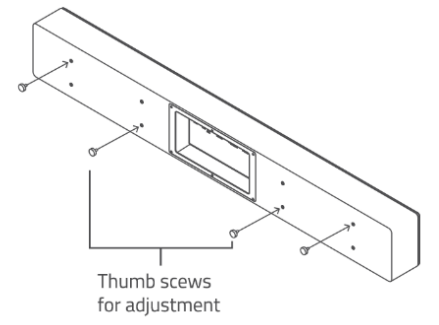
- Fasten the bar's brackets to the wall, using the screws supplied in the wall mount kit.
- The provided screws can be used with or without the anchors to accommodate installation on wood stud or sheetrock.
- If drilling into Sheetrock, screw the wall anchors into the drywall with a Phillips head screwdriver. Verify the heads are flat against the wall surface. Use a level to verify accuracy a final time, and then tighten the screws securely.
- The bar comes with four thumb screws for the wall bracket. Hang the SBC 2 securely on the two (2) brackets and adjust the two thumb screws.
- See the drawing for correct placement and the thumb screw positions.
VESA 400 or 800 holes at the rear of the Sound Bar are provided as an additional mounting option.