Partitions in Tesira
Partitions are a very powerful feature that can make implementation and management of large installed audio and/or video systems easier. This feature allows Tesira systems to be easily used in systems that span multiple rooms, applications that require a very large number of inputs and outputs, or large commercial buildings or campuses with many zones. Partitions also allow integrating and managing audio and video in a single Tesira configuration.
Partitions allow a Tesira system to be divided into independent audio and video sub-systems. Each partition is displayed on a separate tab in the Tesira software and configures a separate group of I/O and DSP resources in the system itself. One or more partitions can even be updated with a new configuration without interrupting the audio or video being processed in other active partitions.
Creating Partitions
When creating a new configuration, the software asks for Partition Type with choice of 'Audio', 'Video (10G network) and 'Video (1G network)'.
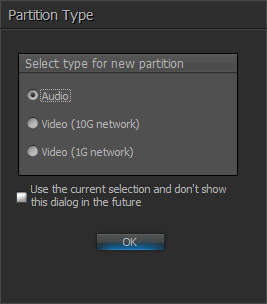
Based on the choice, the software automatically creates a single default Partition, which can be called "P01: Audio Partition1", "P01: Video (10 Gbps) Partition1" or "P01: Video (1 Gbps) Partition1". You can choose to build the whole configuration in the default partition, or you can add additional partitions by clicking the new partition buttons (highlighted) in the standard toolbar.
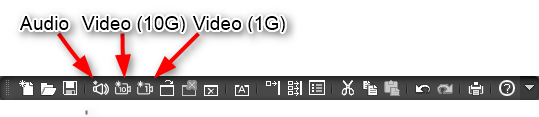
The standard toolbar now includes three 'new partition' buttons: Audio, Video (10 Gbps) and Video (1 Gbps).
Partitions appear as additional tabs just above the workspace. The three partition types have different default background color to easily identify them. It's easy to rearrange the default tab order by clicking and dragging a partition tab to another position.

Up to 32 partitions can be added in a Tesira system. Note that at compilation, every partition must contain a valid audio or video path. An empty partition or one with an incomplete A/V path will result in a compiler error.
The other buttons in the standard toolbar related to Partitions are 'Open', 'Close', 'Delete' and 'Rename'. These functions can also be accessed through the System menu, under Partitions. It is possible to hide partitions from view by hitting the 'Close' button or the 'x' on the tab.
Using Partitions
A designer decides how best a system should be split into partitions. Some of the common ways of implementing partitions are:
- Each partition represents a separate physical space. For example, in a multi-room conference setup, each room is in its own partition.
- Inputs and/or outputs and their associated processing grouped in separate partitions. Useful in installations where the I/O count is very high.
- A dedicated partition for routing and mixing all sources to destinations. Useful in systems utilizing large mixers with I/O from many partitions or zones.
A simple example would be a room combine/divide situation. The system could be divided into Partitions 'Room 1' and 'Room 2', affording the independence that separate systems for each room might offer, yet they would remain linked in a single configuration file. Within each partition, the configuration can be built as if each room were a stand-alone system.
This way, Partitions Room 1 and Room 2 could be completely independent and, when required, share audio, video and logic signals using Partition connectors.
Partition Connectors
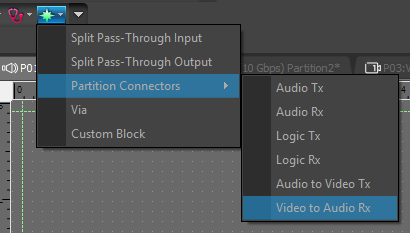
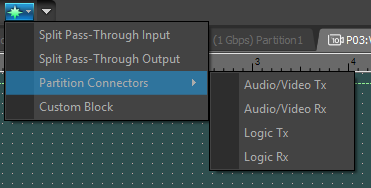
Partitions can share AV streams, audio and logic signals by means of Partition Connectors, which can be found in the 'Specialty' section of the Video and Audio Object toolbar. The connector options are different for Video and Audio partitions.
Note: Each connector on a Video Partition Connector represents an AV 'Stream' which may contain multiple audio channels in addition to a video channel. Audio Partition connectors only carry audio channels, and each connector represents a single channel of audio.
Connectors in Audio Partition
For Audio partitions, The Audio Object Toolbar provides six types of connectors:
- Audio Transmitter
- Audio Receiver
- Logic Transmitter
- Logic Receiver
- Audio to Video Transmitter
- Video to Audio Receiver
Here is a brief description of the Audio Partition connector types:
- Partition Connector Audio Transmitter and Audio Receiver: The Audio Receiver receives audio signals from an Audio Transmitter in a different partition. The transmitter and receiver must be linked to each other, and this can be accomplished either from the Audio Receiver dialog box or from the System View window.
Partition Connector Audio Transmitter: 
Partition Connector Audio Receiver: 
Audio Receiver Dialog:
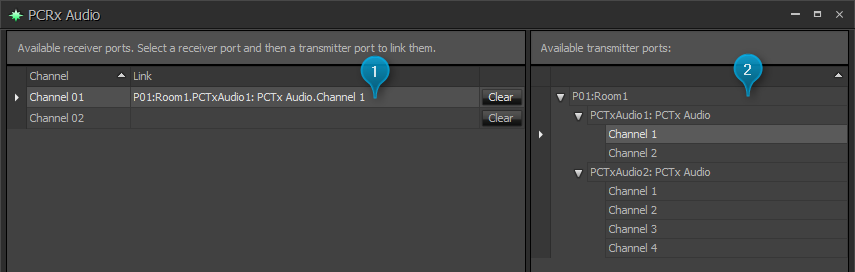
The control dialog of a PCRx Audio block shows the number of assignable channels of the block in the left pane and the available transmitter ports across all other partitions in the right pane. Each channel of the PCRx Audio block needs to be assigned manually by clicking the receive channel first (1) and a transmitter channel next (2).
- Partition Connector Logic Transmitter and Logic Receiver:
The Logic Receiver receives logic signals from a Logic Transmitter in a different Partition. The transmitter and receiver must be linked to each other, and this can be accomplished either from the Logic Receiver dialog box or from the System View window.
Partition Connector Logic Transmitter:
Partition Connector Logic Receiver:
- Partition Connector Audio to Video Transmitter and Video to Audio Receiver
These connectors provide links to Video partitions and carry the audio portion of the AV stream. These connectors can be configured for four different audio formats: Mono, Stereo, 5.1 and 7.1. They only carry PCM audio streams and do not work for Dolby, DTS or any other proprietary formats.
Partition Connector Audio to Video Transmitter (Stereo):
Partition Connector Video to Audio Transmitter (5.1 ):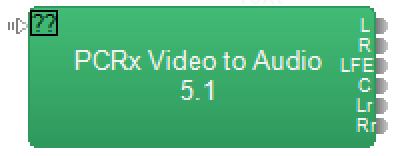
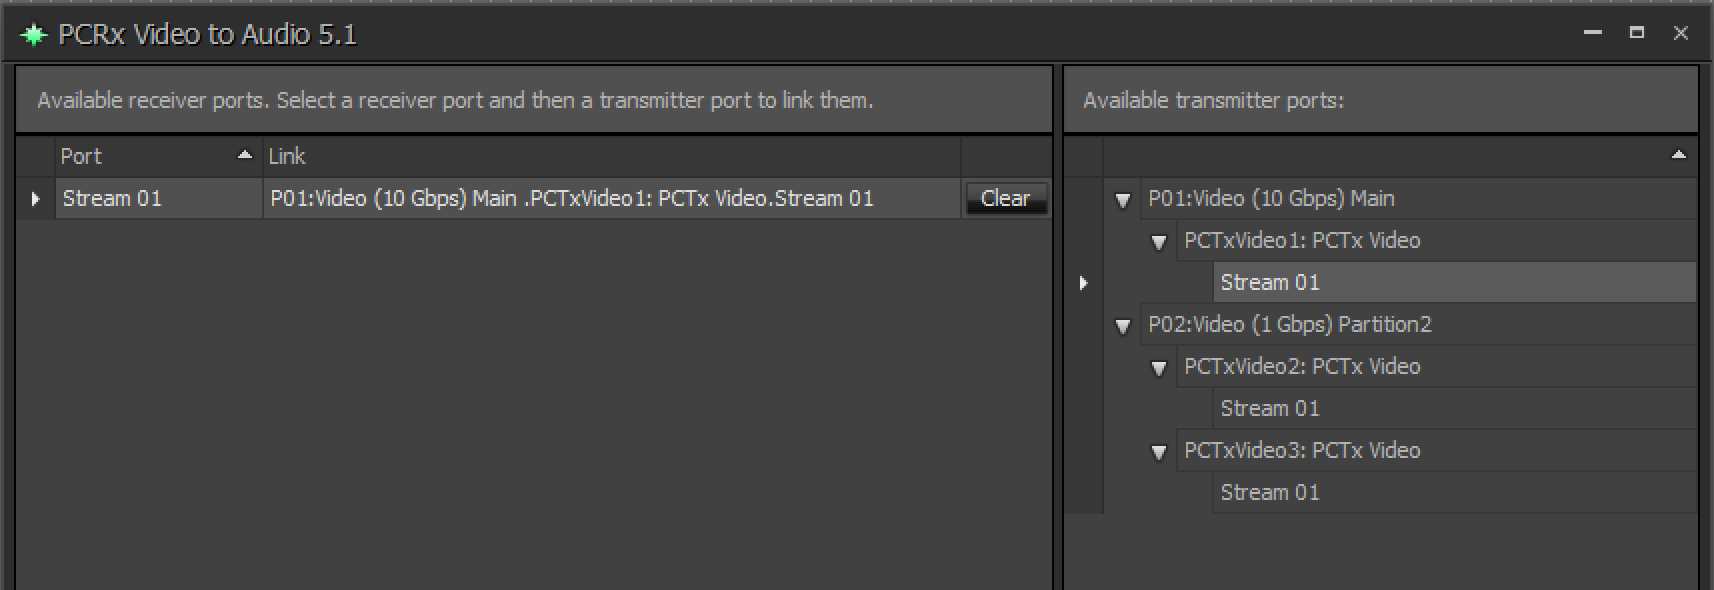
Video To Audio Receiver Dialog:


Connectors in Video Partition
For video partitions, the Video Object Toolbar provides four types of partition connectors
- Video Transmitter
- Video Receiver
- Logic Transmitter
- Logic Receiver
Here is a brief description of Video Partition Connector types:
- Partition Connector AV Transmitter and AV Receiver: The Video Receive Partition Connector blocks are used to accept AV Streams from other partitions with AV Transmitter (Video partitions) or Audio to Video Transmitters (Audio partitions). The transmitter and receiver must be linked to each other, and this can be accomplished either from the AV Receiver dialog box or from the System View window as detailed further in the article.
Partition Connector Audio Transmitter:
Partition Connector Audio Transmitter:
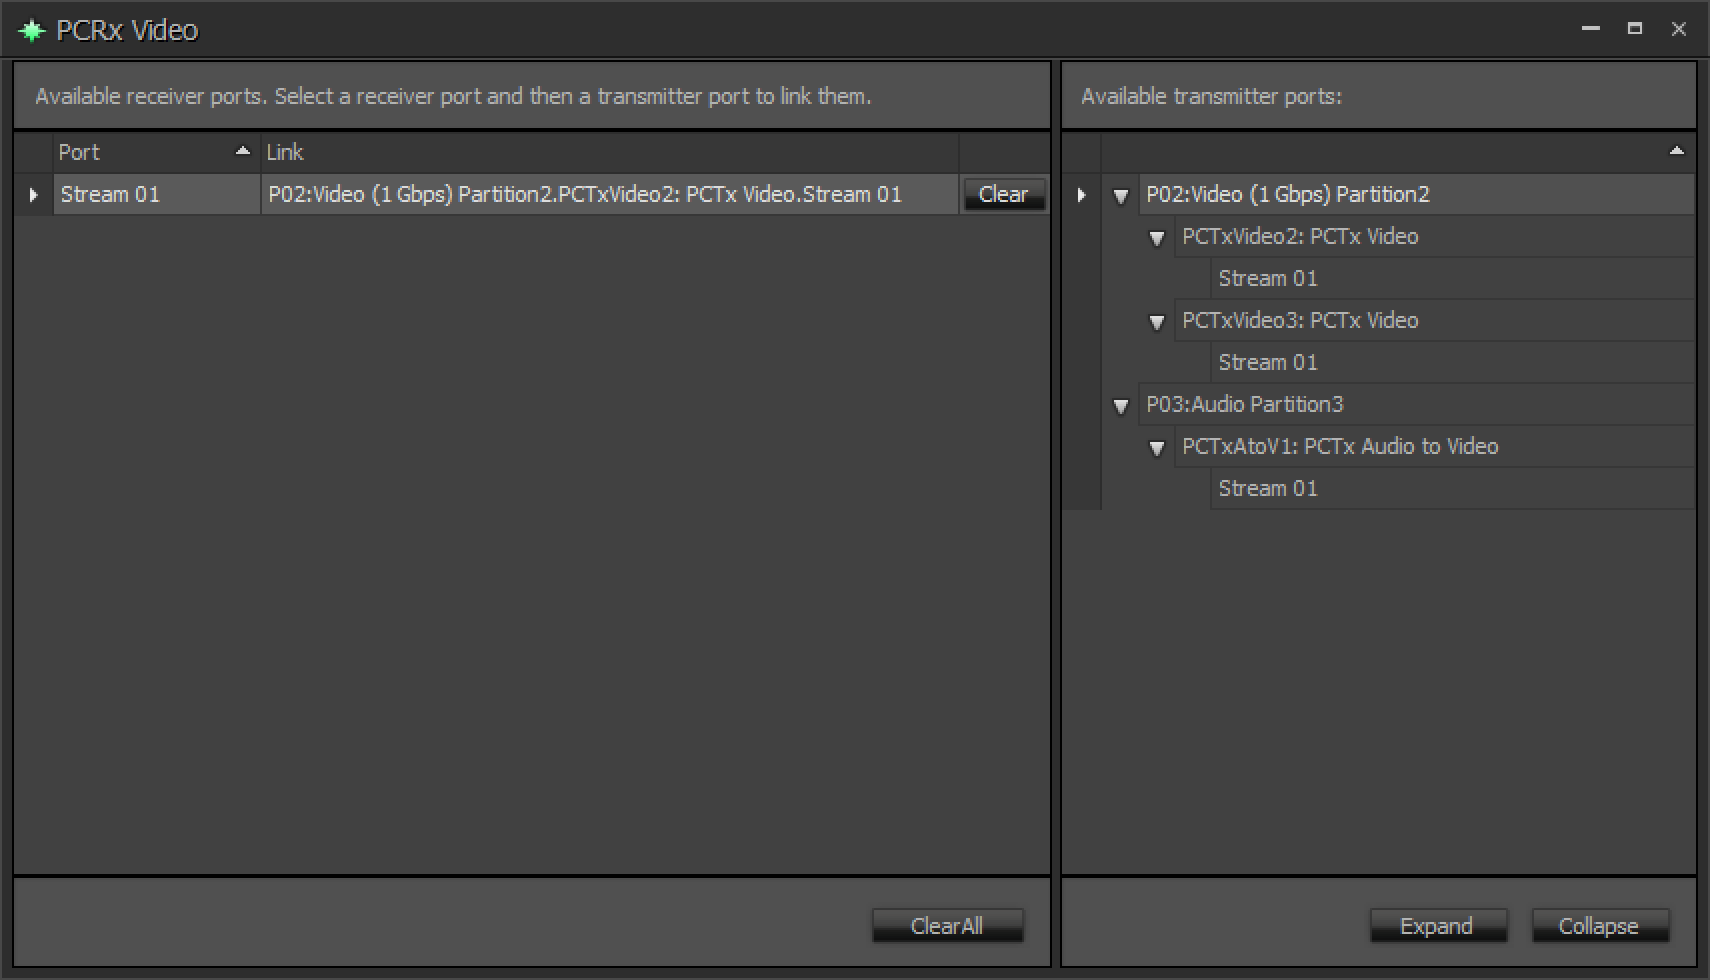
Video Receiver Dialog:

The control dialog of a PCRx AV block shows the number of assignable streams of the block in the left pane and the available transmitter ports across all other partitions in the right pane. Each stream of the PCRx AV block needs to be assigned manually by clicking the receive stream first and a transmit stream next. - Video Partition Connector Logic Transmitter and Logic Receiver: This block is the same as in the Audio partitions.
Managing Partitions - System View
To get an overall view of the system with all its partitions, the System View tab displays all partitions as blocks and shows if a partition is sending or receiving audio from other partition(s). The view is accessed from the View menu→Docking Windows→System View, or by clicking the highlighted button on the Layout toolbar:

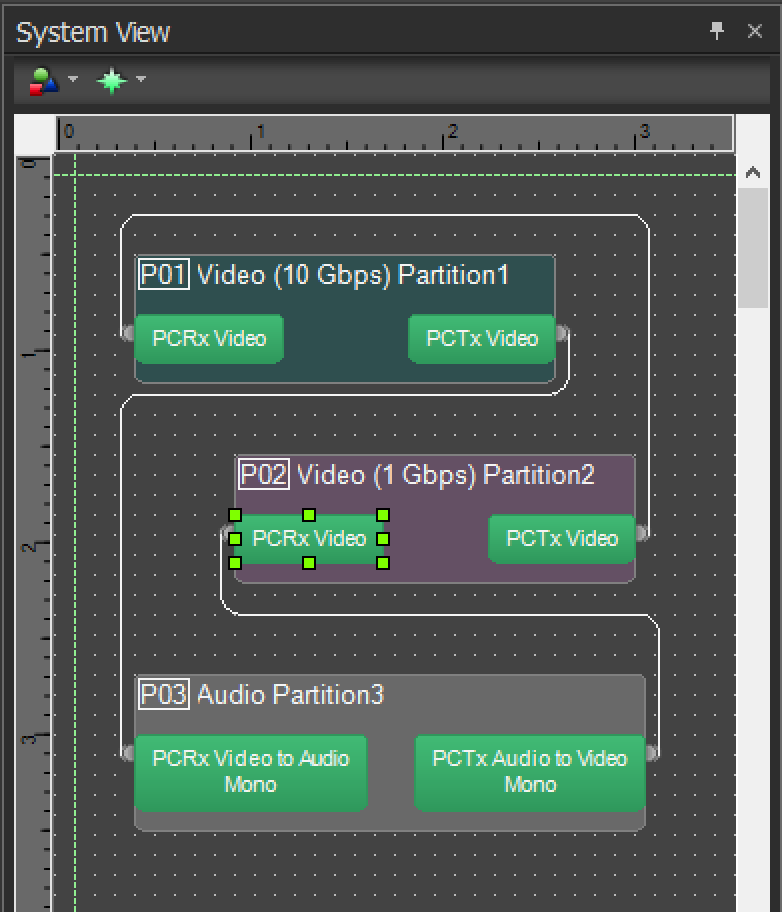 Partition connectors with the output/input nodes are represented within their respective partition blocks.This view represents all the existing audio or logic connections between partitions and potential connections that can be made. System view, much like the workspace in the configuration, is editable. Some ways of editing are: The partition blocks can be re-arranged by dragging, text box can added for labelling, partition names can be edited and connections between partitions can be made by linking the nodes on the partition blocks.
There is also an option to add split pass through connections to visually tidy up inter partition connections.
Double clicking a partition block will open that partition. In systems with several partitions, this allows for quick navigation. Using a signal path identifier on a signal that might flow to other partitions in the main view will also show with a red highlight in the System Navigation view.
Workflow
For a system with phased installations, a file with a partition-based approach offers unique advantages. If a certain area is ready for installation, it can be programmed within a partition and the system commissioned partially. As more areas become available for commissioning, partitions can be added later without affecting existing partitions or causing unnecessary downtime.
When sending an updated configuration file to a Tesira system, only the partitions that have been modified since the last update will be affected. Partitions that haven't been changed since the last update will not lose audio or video functionality during the configuration update. Therefore, it's important to avoid modifying partitions unnecessarily. In some cases, recompiling a partition (even when nothing else has changed) will modify the partition and require it to be updated next time the configuration is sent to the system.
The software offers three ways of compiling a file, to ensure you only compile the partitions you need to compile. The following three options are available in the System menu→Compilation:
1. Compile Active Partition: Only compiles the partition in view
2. Compile All Uncompiled Partitions: Compiles all uncompiled partitions in a numerical order
3. Recompile All Partitions: Compiles all partitions, even if they are already compiled
Option 1 and 2 are particularly useful when a small change is made to one or more (but not all) partitions. This feature can save time during compilation as a large file may take some time to compile. Those options will also not modify partitions that haven't been changed since the last compilation.
Updating Partitions
The image below shows the dialog while trying to upload a file with 4 partitions. Partition 1 is a pre-existing partition which is already running on the system and hasn't been changed. Partition 2 is a pre-existing partition but it has been modified since the last update with the addition of a meter block, Partition 3 is also a pre-existing partition with only settings changes on existing DSP blocks. Partition 4 is a newly added partition.
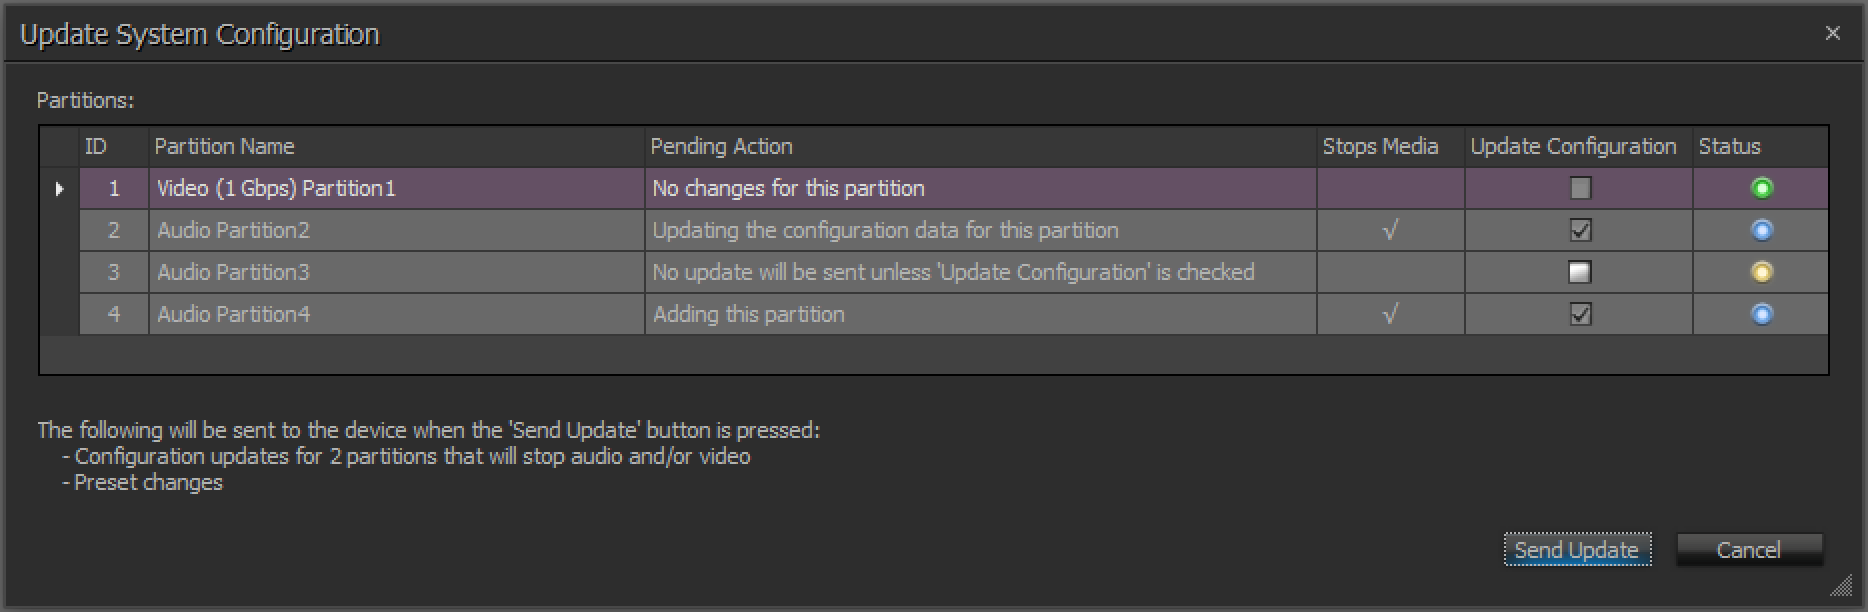
GREEN status indicates that a partition will not be affected in any way during configuration upload.
BLUE status indicates that the partition is new, or that the partition has been modified, and an update is mandatory.
YELLOW status indicates that some changes have been made to the partition but the update is optional. Changes include mute state, cross-point state within a mixer, level changes, IP address or VoIP settings changes, etc. In these cases, the "Update Configuration" checkbox needs to be manually checked for the partition to update. If not checked, the partition will not be updated.
On clicking Send Update, the file is uploaded and the "Manage Partition Media" dialog displays media controls for affected partitions:

The screenshots above are from a 3-room Tesira system wherein each room has its own partition with an additional partition for Video. A programmer can modify and test configuration or even commission a room while other rooms are in use. As shown above, the compiler makes sure that any partition that has not been modified is unaffected. Likewise, the Tesira system ensures that those partitions are not interrupted during a 'send configuration'.
In this example, Partition 1 has a green status in the Update System Configuration window because it has not been modified in any way, and for Partition 3 with the yellow status for the optional update, the 'Update Configuration' option is not checked. When the configuration is updated, the Manage Partition Audio only shows options for Partitions 2 and 4. Partition 1 and 3 audio remain uninterrupted through these actions.
Note: Clear Configuration clears all current system design data from the selected device(s) and resets the System ID to 0 (Zero) including all partitions. Tesira does not support partial configuration clearing across selected partitions.
Compiling Partitions
When hitting the "Compile All' button, Partitions are compiled in a numerical order. Each partition is considered as a separate entity and optimized for processing and I/O allocations. While not usually critical, changing the order in which Partitions are compiled might prove useful in some situations. This can be changed in the software under System→Compilation→Set Partition Compilation Order.
In the same menu, there is also "Perform Global Optimization". This option can be selected after all partitions are successfully compiled. It will analyze the compilation results to find an equivalent, lower-cost equipment allocation, if one exists. This is particularly useful when a Tesira configuration is being built at the system design stage, and the most economical solution to run the configuration is desired.
DSP Resource Usage Per Partition (Audio Partitions Only)
The Compile Status of all the Audio partitions can be viewed in the DSP Resources view accessed from the Layout Toolbar via button pointed out:
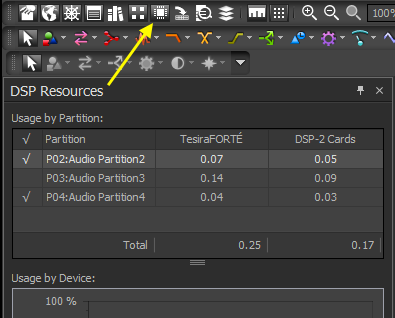
This view shows the DSP usage estimate for both TesiraFORTÉ and DSP-2 card (for Tesira Server) per Audio partition. The check mark denotes the compilation status of the partition. In the image above, Partition P03 needs compilation and P02 will consume 7% of a TesiraFORTÉ's DSP resources.