Avaya IP Office configuration for Tesira using SageVue
Biamp’s VoIP-enabled products have the ability to make and receive phone calls over many different Voice-over-IP (VoIP) systems that adheres to the SIP (Session Initiation Protocol) standard. This article details the steps required to configure an Avaya IP Office VoIP system to work with Biamp's Tesira VoIP products and configuring those products using SageVue.
Please first review the requirements for using the VoIP web interface to configure a Tesira VoIP endpoint.
Avaya creates and maintains application notes for certified products manufactured by Avaya's DevConnect Technology Partners. Avaya's full application note for configuring an Avaya IP Office system to use Tesira VoIP endpoints can be downloaded from this link. Information specific to creating the endpoint is below.
Avaya Configuration
Configure IP Office
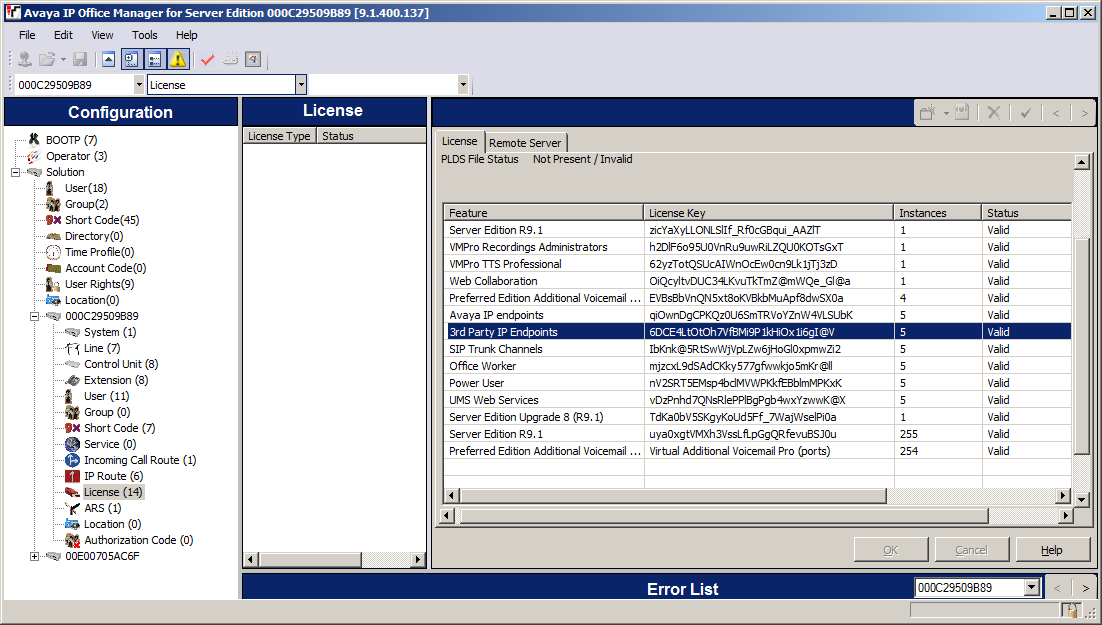
1. Verify IP Office LicensesThis section provides the procedures for configuring Avaya IP Office. The procedures include the following areas:
These steps are performed from the Avaya IP Office Manager.
From a PC running the Avaya IP Office Manager application log in with the appropriate credentials. Once the Avaya IP Office Manager screen is displayed. From the configuration tree in the left pane, select License then 3rd Party IP Endpoints to display the Avaya IP endpoints screen in the right pane. Verify that the License Status field is set to Valid. Once you have confirmed that proceed with the steps below |
 |
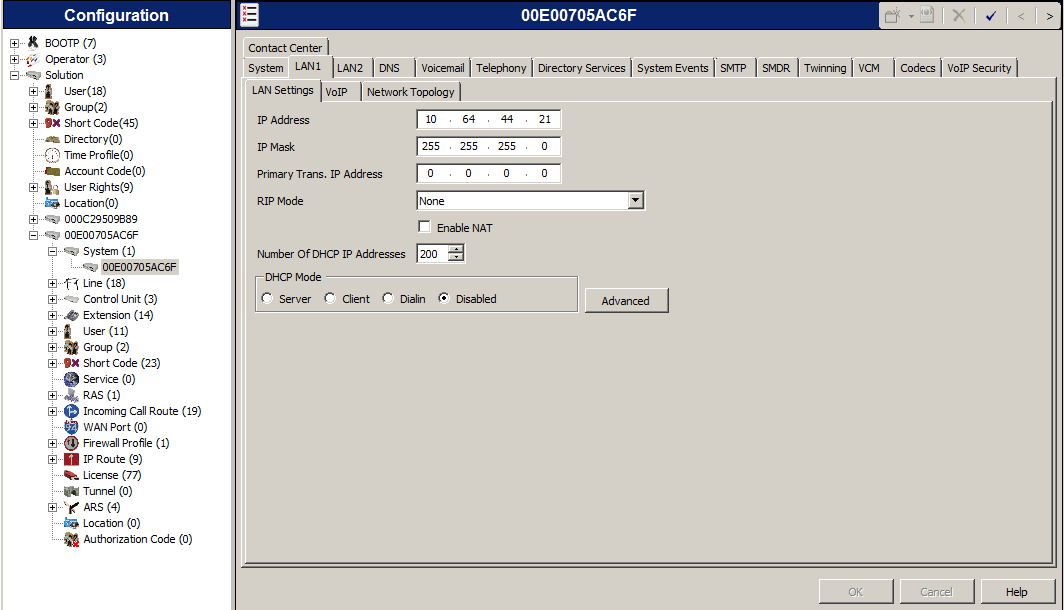
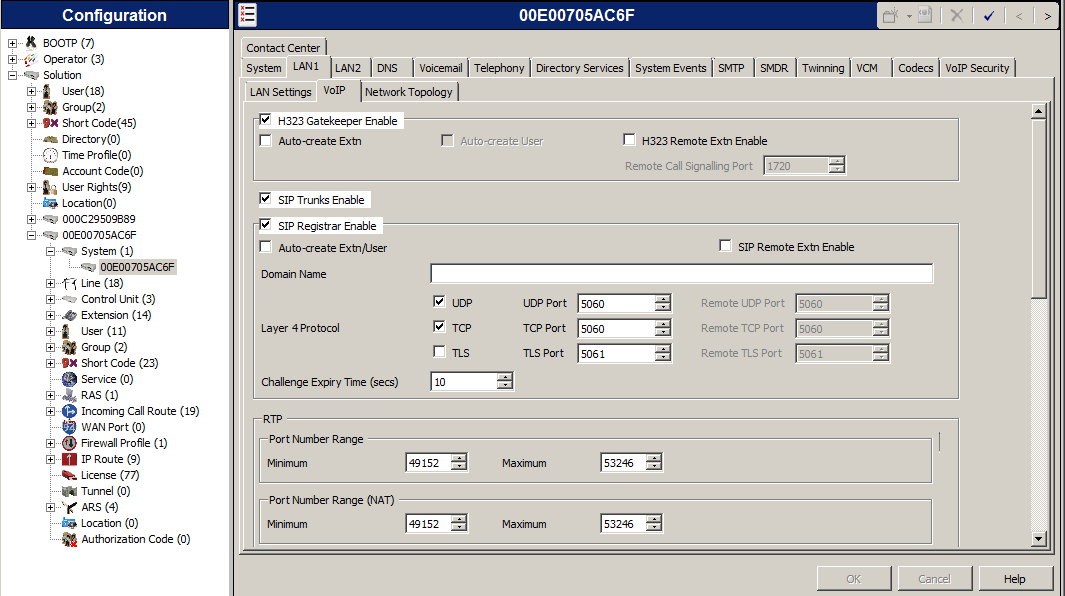
2. Obtain LAN IP AddressFrom the configuration tree in the left pane, select System to display the System screen in the right pane. Select the LAN1 tab, followed by the LAN Settings sub-tab in the right pane. Make a note of the IP Address, which will be used later to configure Biamp Tesira.
Note: During the initial configuration of Avaya IP Office, the LAN1 was configured on the private network side and LAN2 was configured on the public network side. Avaya IP Office can support SIP extensions on the LAN1 and/or LAN2 interfaces, but the compliance test used the LAN1 interface. Thus, only the LAN1 configuration will be shown in Screenshots
|
 |
 |
|
4. Administer SIP Extensions
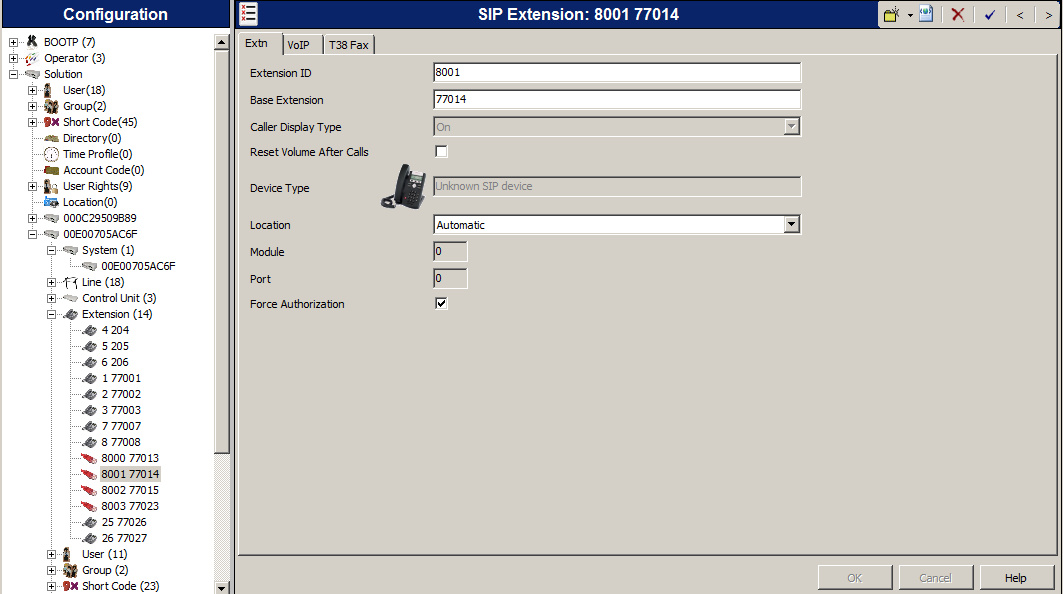
From the configuration tree in the left pane, right-click on Extension and select New SIP Extension from the pop-up list to add a new SIP extension. Enter the desired digits for the Base Extension field.
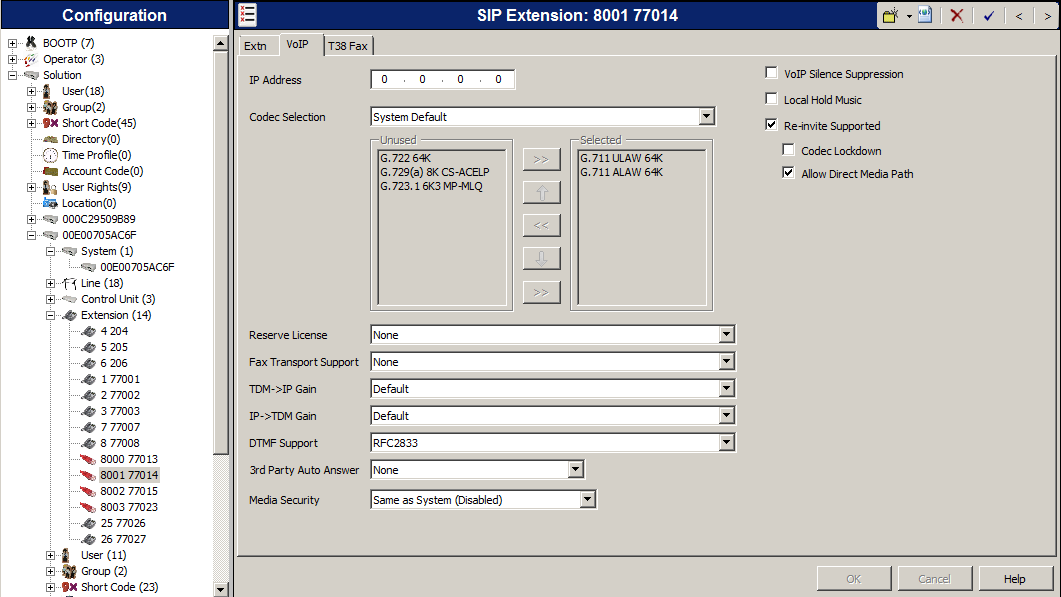
Select the VoIP tab, and select codecs that the Tesira endpoint will be using. (Tesira endpoints support the following codecs: G.722, G.711μ, G.711A, G.729AB, and G.723.1)
Note: Repeat this step to add a new SIP extension for each Biamp Tesira endpoint. |
|
5. Administer SIP Users
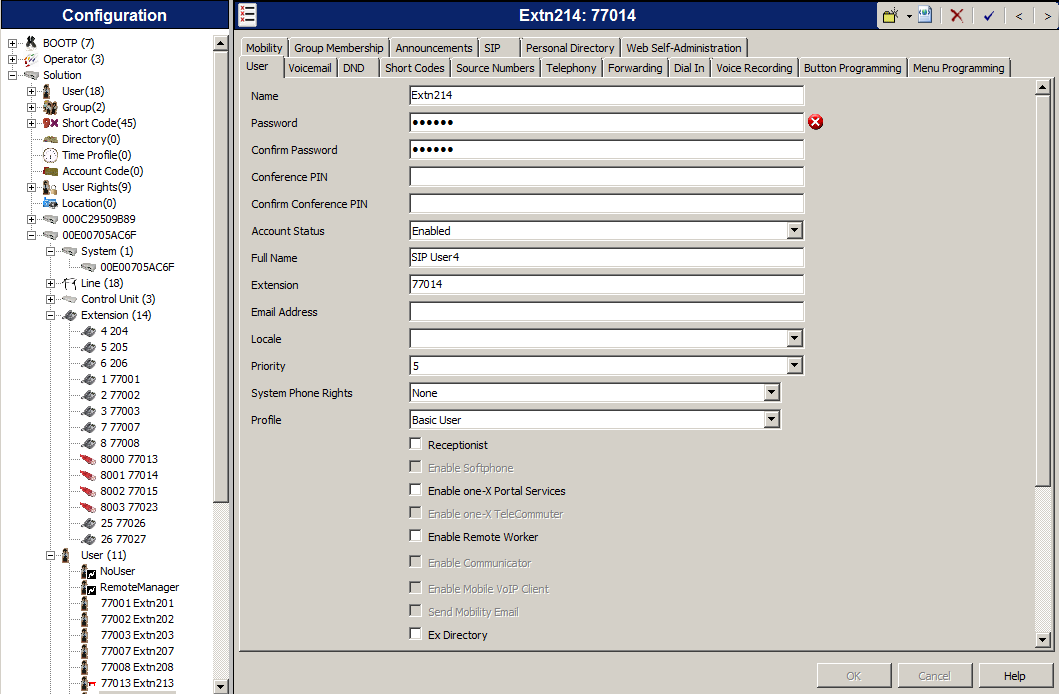
From the left pane, right-click on User, and select New from the pop-up list. Enter desired values for the Name and Full Name fields. For the Extension field, enter the SIP extension created in Step 4 |
|
| Select the Telephony tab, followed by the Call Settings sub-tab. Check the Call Waiting On field, as shown. | 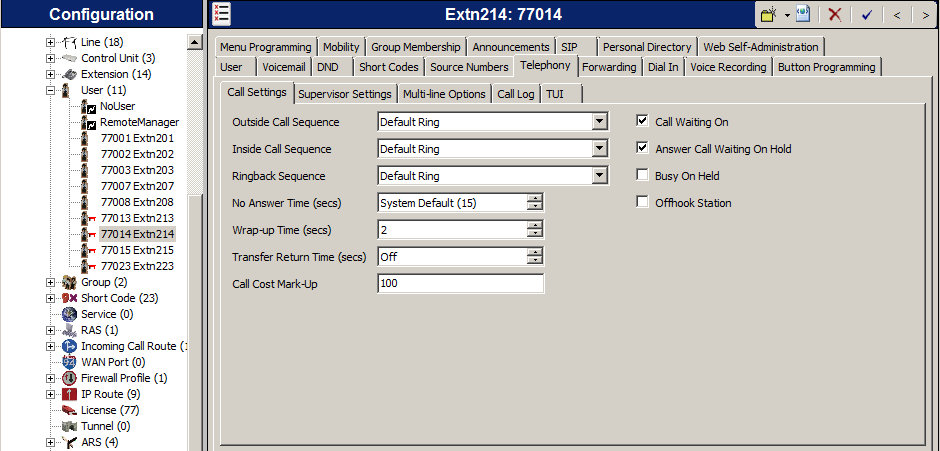 |
|
Select the Supervisor Settings sub-tab, and enter a desired Login Code and Confirm Login Code. Repeat this section for each SIP extension from Step 4 |
 |
Once you have entered this information we can move on to configure the Tesira VoIP endpoint
Tesira Configuration
Accessing VoIP settings in SageVue
|
|
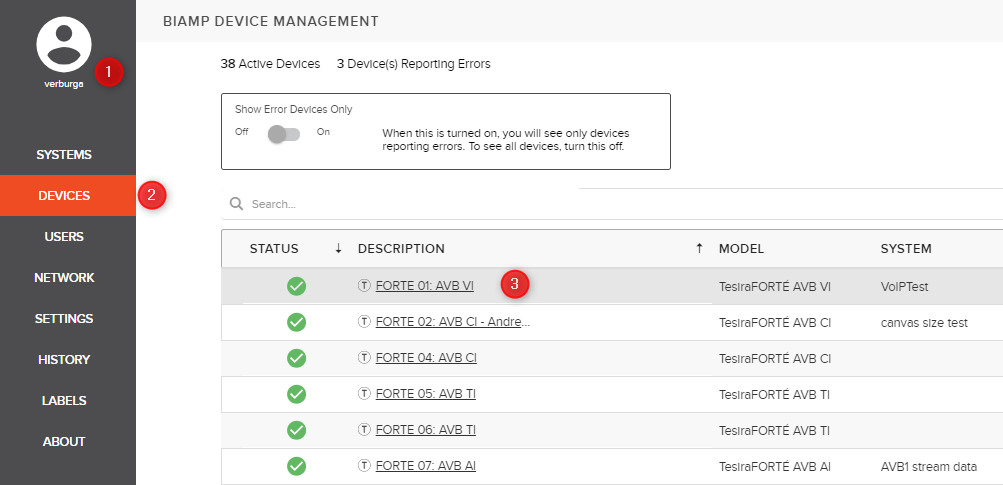

- Open a browser and login to your Sagevue webpage.
- Navigate to "Devices" on the right side of your browser.
- Click on the device description of a device running a configuration that has a VoIP interface
- Navigate to the VoIP configuration tab. (If you cannot access the VoIP settings make sure your account has read/write permissions for VoIP settings. More information on user roles can be found on the online SageVue help page.)
- Select the correct interface that adjustments are going to be made on.
- If you'd like to set the same settings on all VoIP interfaces within this device, enable the "Configure all VoIP cards in this device" option. Note that only fields highlighted in yellow can be updated on multiple endpoints at once.
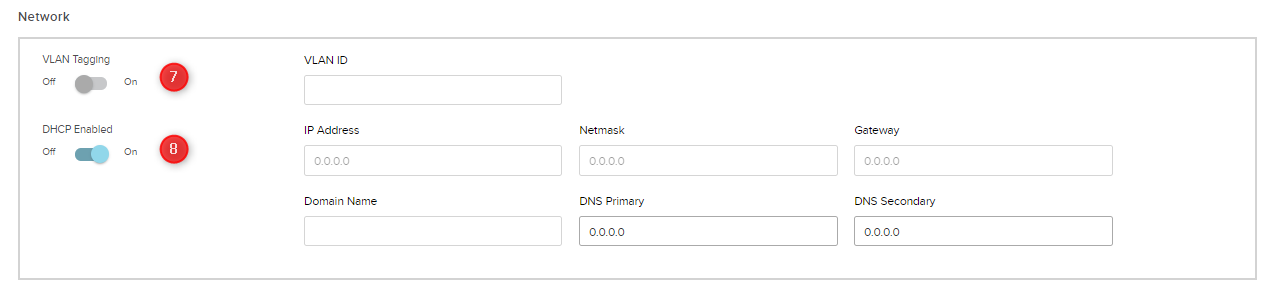
Network Configuration
- Under the Network region of the screen, set “VLAN Tagging” to “Enabled” if your VoIP network uses a tagged VLAN. If the network uses an untagged VLAN or no VLAN, leave this value as “Disabled”. If VLAN is enabled, enter the correct VLAN ID.
- Leave “DHCP” set to “Enabled” if the Tesira endpoint will obtain an IP address automatically from a DHCP server. Otherwise, set “DHCP” to “Disabled”, and manually enter an appropriate static IP Address, Subnet Mask, and Gateway for the Tesira.
Protocol Configuration
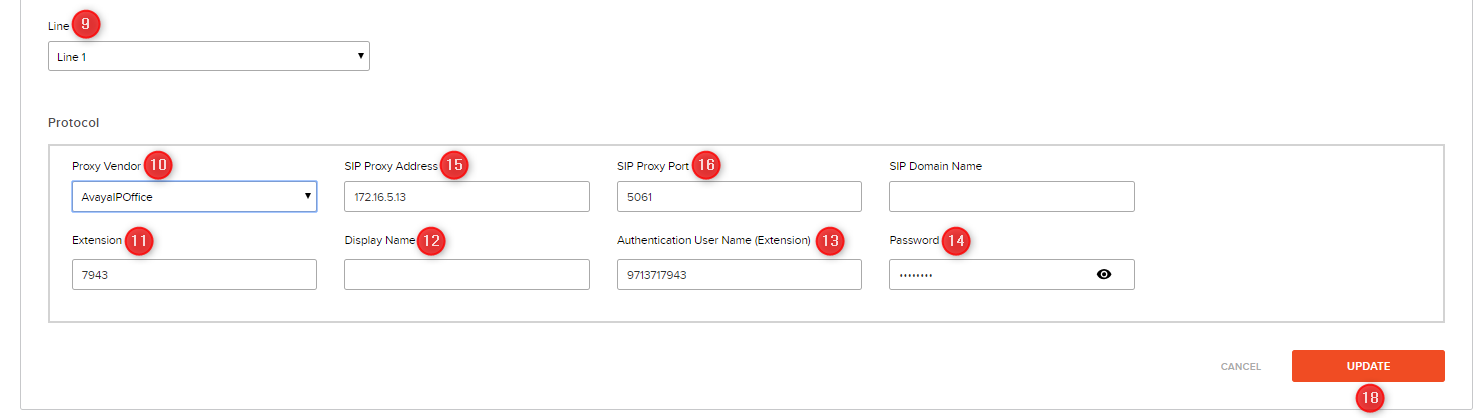
 Select the Line you are editing
- Set Proxy Vendor to Avaya IP Office.
- In the Extension field enter in the number from the Base Extension field. (see "Configure IP Office", step 4)
- In the Display Name field, optionally enter a name for the extension for Caller ID purposes. Note that this name may be overridden by the proxy server, and therefore may not show up as the Caller ID name.
- In the Authentication User Name (Extension) field enter the Extension. (see "Configure IP Office", step 4)
- In the Password field enter the password for the Extension.(see "Configure IP Office", step 5)
- In the SIP Proxy Address Enter the IP address of the Avaya IP Office Server.
- In the SIP proxy Port Field Verify that the port is 5060, 5061, or change it as needed.(see "Configure IP Office", step 3)
- If you’re configuring two lines, select “Line 2" and repeat steps 10-16.
- All other settings can remain at their default values in most cases.
- Once all settings have been added, click the Update button and the settings will be written to the Tesira VoIP interface.
- More Advanced features such as transport type, QoS settings, and Local Dial Plan can only be changed via the Tesira software or the VoIP webpage. These settings are optional and often don't need to be changed from their default values.