Mitel 3300 ICP configuration for Tesira using SageVue
Biamp’s VoIP-enabled products have the ability to make and receive phone calls over many different Voice-over-IP (VoIP) systems that adheres to the SIP (Session Initiation Protocol) standard. This article details the steps required to configure a Mitel 3300 ICP VoIP system to work with Biamp's Tesira VoIP products using Biamp's SageVue management software.
Please first review the requirements for using SageVue to configure a Tesira VoIP endpoint.
Mitel configuration
First, we'll focus on setting up the Mitel server.
Media Gateway Confirmation
Confirm that the Mitel server is using a T1/E1 connection or Mitel MBG.If using T1/E1 proceed to SIP Device Capabilities section or if using the Mitel MBG begin by making the following settings:
On the MBG turn off "icpside port rotation" and from the "Manage Configuration Override" page (from the System Configuration menu), click + to add a new override then fill in these values:
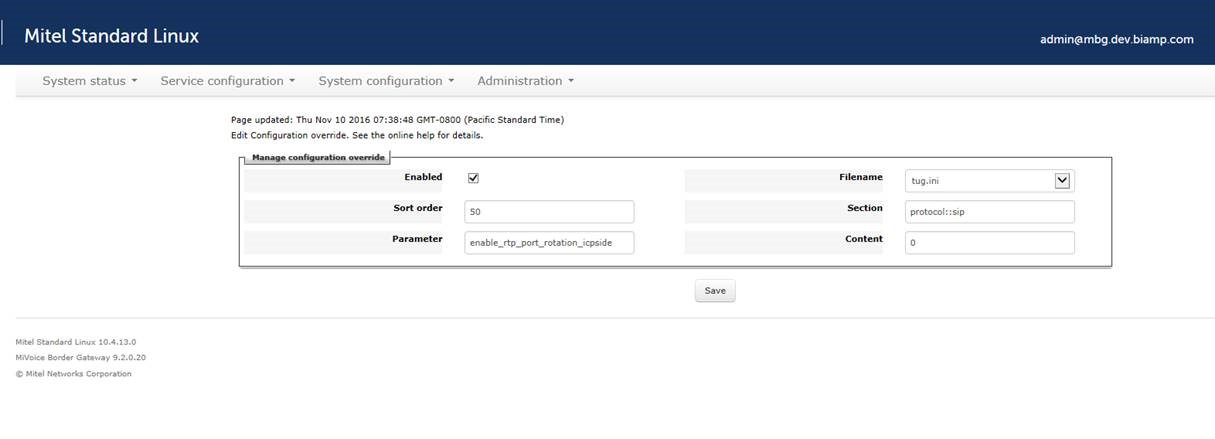
Section: protocol::sip
Parameter: enable_rtp_port_rotation_icpside
Content: 0
SIP Device Capabilities
After logging in to the Mitel server and entering the System Administration Tool, the first step is to ensure that there is a SIP Device Capabilities Number that is compatible to the Tesira VoIP endpoint.
- In the category tree, select System Properties—>System Feature Settings—>SIP Device Capabilities.
- Select an unused SIP Device Capability Number.
- Click on the “SDP Options” tab and ensure that “Prevent the Use of IP Address 0.0.0.0 in SDP Messages” is set to “Yes”. This option is critical to ensure compatibility with a Tesira.
- All other options can remain at their default setting. Take note of the SIP Device Capabilities Number that was used, as it will be needed in a later step.
Add User and Device
The next step is to set up a new user profile for the Tesira VoIP endpoint.
 |
 |
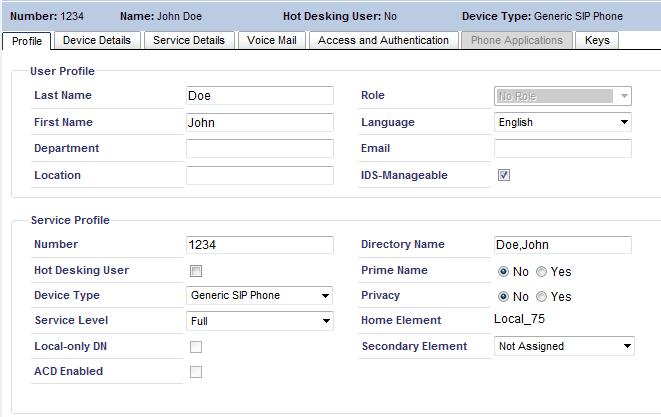
- In the category tree, select Users and Devices—>User and Device Configuration.
- Click the "Add" button and select "Default User and Device".
- In the Profile tab, enter a Last Name and First Name for the user under the User Profile section.
- Under the Service Profile section, enter the desired extension number in the Number field.
- For Device Type, select “Generic SIP Phone”.
- For Service Level, select “Full”.
- All other fields in the Profile tab can remain at their default values.
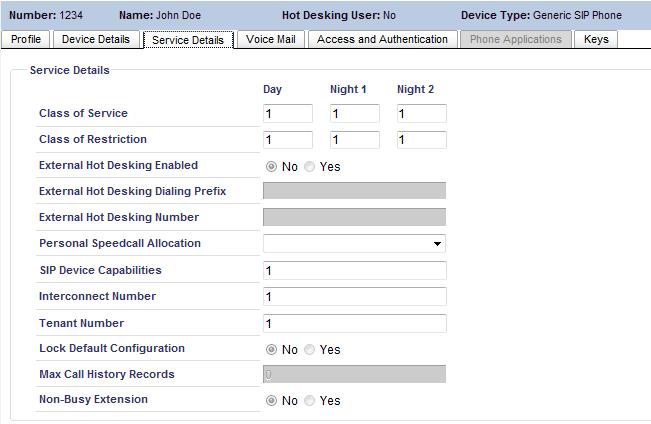
- Select the Service Details tab.
- For SIP Device Capabilities, enter the SIP Device Capability Number that was set up previously (see "SIP Device Capabilities", step 4).
- Select the Access and Authentication tab.
- Enter a PIN code in the “User PIN” and “Confirm User PIN” field. The PIN code must be a number.
- All other fields in the remaining tabs can be left at their default values.
- Click the “Save” button to save the configuration.
Enabling Multiple Call Appearances
A single Tesira VoIP interface can support up to 6 simultaneous call appearances on each line. Not all call appearances can be actively on a call at the same time. If one call appearance is actively on a call (i.e., not on hold), the rest of the call appearances (up to 5) can have a call on hold. Or, two call appearances can actively be on a call simultaneously (i.e., a 3-way call), but in this case no other call appearances can have a call on hold. These restrictions apply independently to each of the two lines on an Tesira VoIP card.
Steps 14-17 are optional. In order for the Mitel system to support multiple call appearances, a few extra steps are required. If this feature is not necessary or desired, please skip to the next section. If the steps on this page are skipped, the Tesira will support one call at a time (per line).
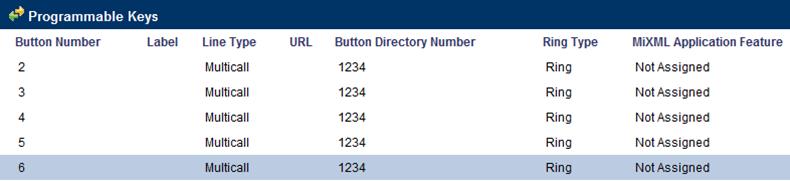
- In the category tree, select Users and Devices—>Advanced Configuration—>Multiline Set Keys.
- Select your extension under the "Multiline Set Keys" heading.
- Under the "Programmable Keys" heading, double-click on button number 2. Set "Line Type" to "Multicall", set "Button Directory Number" to your extension, and set "Ring Type" to "Ring".
- Repeat step 16 for the rest of buttons 3-6. The screenshot below shows the end result if the maximum number of simultaneous call appearances are configured.
Tesira configuration
Accessing VoIP settings in SageVue
|
|
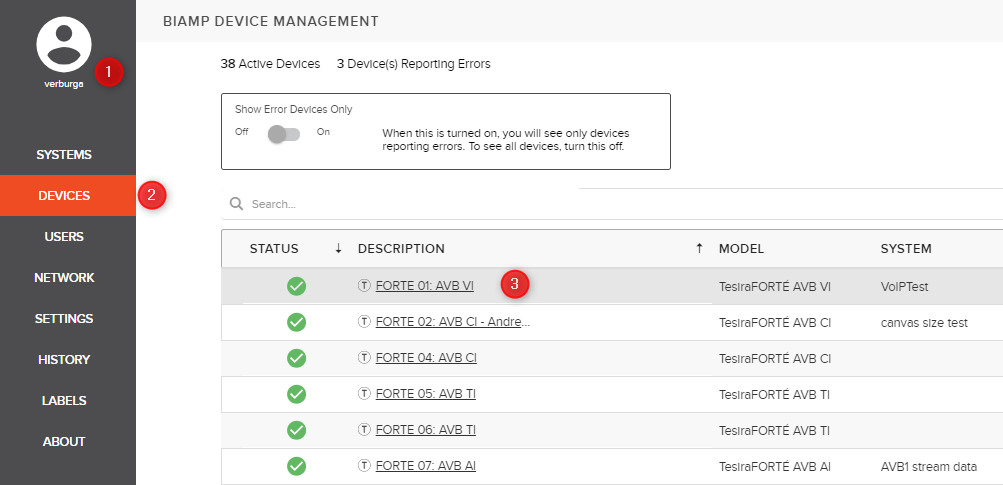

- Open a browser and login to your Sagevue webpage.
- Navigate to "Devices" on the right side of your browser.
- Click on the device description of a device running a configuration that has a VoIP interface
- Navigate to the VoIP configuration tab. (If you cannot access the VoIP settings make sure your account has read/write permissions for VoIP settings. More information on user roles can be found on the online SageVue help page.)
- Select the correct interface that adjustments are going to be made on.
- If you'd like to set the same settings on all VoIP interfaces within this device, enable the "Configure all VoIP cards in this device" option. Note that only fields highlighted in yellow can be updated on multiple endpoints at once.
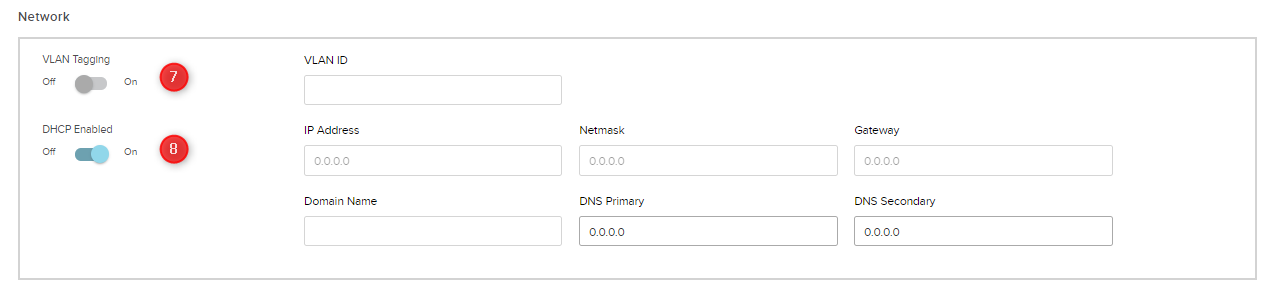
Network Configuration
- Under the Network region of the screen, set “VLAN Tagging” to “Enabled” if your VoIP network uses a tagged VLAN. If the network uses an untagged VLAN or no VLAN, leave this value as “Disabled”. If VLAN is enabled, enter the correct VLAN ID.
- Leave “DHCP” set to “Enabled” if the Tesira endpoint will obtain an IP address automatically from a DHCP server. Otherwise, set “DHCP” to “Disabled”, and manually enter an appropriate static IP Address, Subnet Mask, and Gateway for the Tesira.
Protocol configuration
|
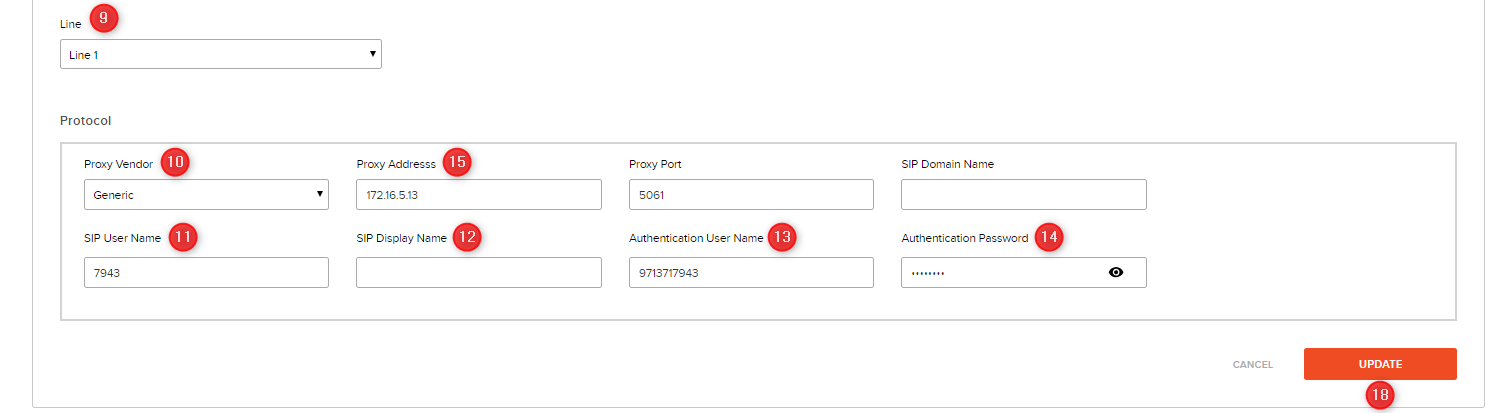 |
- If you’re configuring two lines, select “Line 2" at the left side of the page and repeat steps 9-15.
- All other settings can remain at their default values in most cases.
- Once all settings have been added, click the Update button and the settings will be written to the Tesira VoIP interface.
- More Advanced features such as transport type, QoS settings, and Local Dial Plan can only be changed via the Tesira software or the VoIP webpage. These settings are optional and often don't need to be changed from their default values.