Mitel 3300 ICP configuration for a Tesira using Tesira software
Biamp’s SVC-2 card allows Biamp Tesira digital signal processors to make and receive phone calls over any Voice-over-IP (VoIP) system that adheres to the SIP (Session Initiation Protocol) standard. This document details the steps required to configure a Mitel 3300 ICP VoIP system to work with Biamp’s SVC-2 card.
These instructions also apply to the TesiraFORTÉ VI and VT models.
Mitel configuration
First, we'll focus on setting up the Mitel server.
Media Gateway Confirmation
Confirm that the Mitel server is using a T1/E1 connection or Mitel MBG.If using T1/E1 proceed to SIP Device Capabilities section or if using the Mitel MBG begin by making the following settings:
On the MBG turn off "icpside port rotation" and from the "Manage Configuration Override" page (from the System Configuration menu), click + to add a new override then fill in these values:
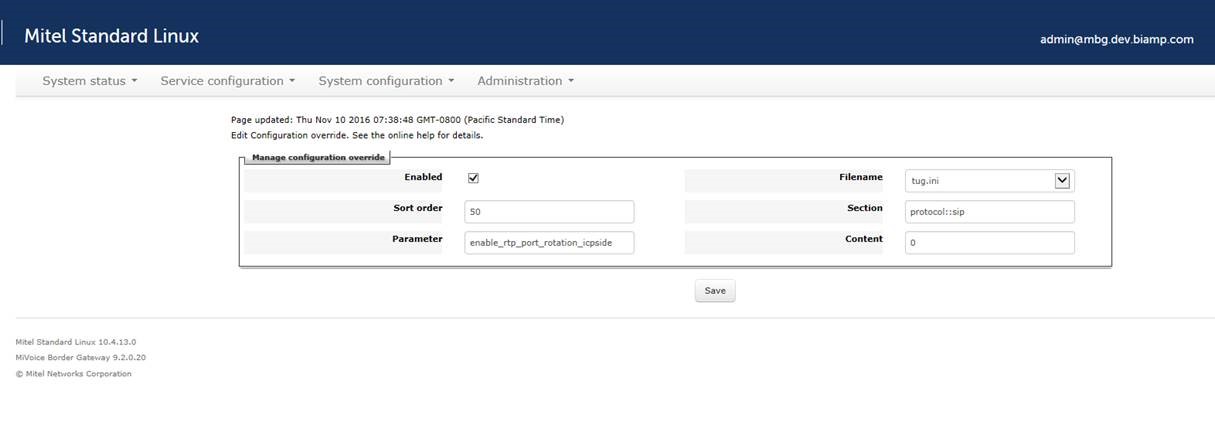
Section: protocol::sip
Parameter: enable_rtp_port_rotation_icpside
Content: 0
SIP Device Capabilities
After logging in to the Mitel server and entering the System Administration Tool, the first step is to ensure that there is a SIP Device Capabilities Number that is compatible the Biamp SVC-2 card.
- In the category tree, select System Properties—>System Feature Settings—>SIP Device Capabilities.
- Select an unused SIP Device Capability Number.
- Click on the “SDP Options” tab and ensure that “Prevent the Use of IP Address 0.0.0.0 in SDP Messages” is set to “Yes”. This option is critical to ensure compatibility with the SVC-2 card.
- All other options can remain at their default setting. Take note of the SIP Device Capabilities Number that was used, as it will be needed in a later step.
Add User and Device
The next step is to set up a new user profile for the VoIP-2 card.
 |
 |
- In the category tree, select Users and Devices—>User and Device Configuration.
- Click the "Add" button and select "Default User and Device".
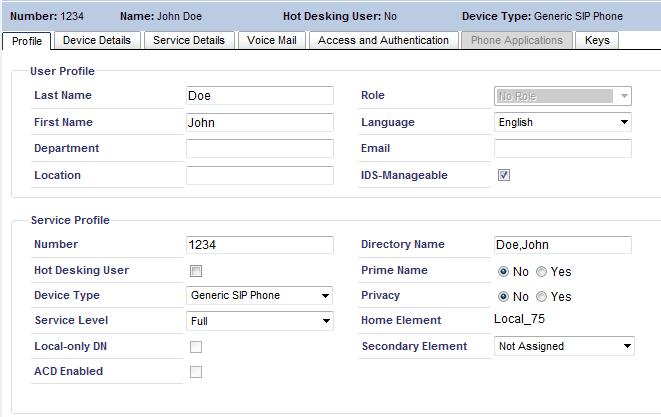
- In the Profile tab, enter a Last Name and First Name for the user under the User Profile section.
- Under the Service Profile section, enter the desired extension number in the Number field.
- For Device Type, select “Generic SIP Phone”.
- For Service Level, select “Full”.
- All other fields in the Profile tab can remain at their default values.
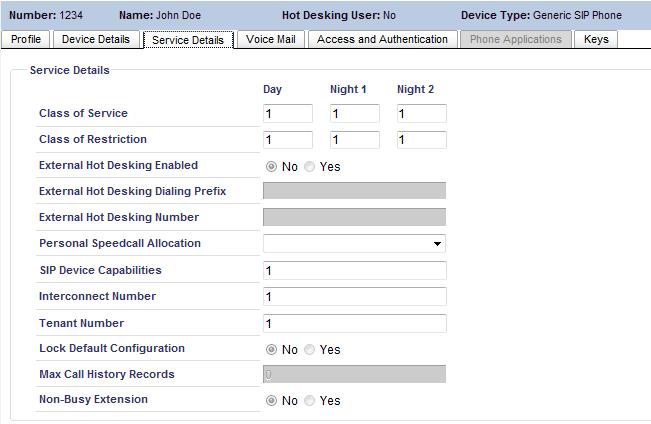
- Select the Service Details tab.
- For SIP Device Capabilities, enter the SIP Device Capability Number that was set up previously (see SIP Device Capabilities, step 4).
- Select the Access and Authentication tab.
- Enter a PIN code in the “User PIN” and “Confirm User PIN” field. The PIN code must be a number.
- All other fields in the remaining tabs can be left at their default values.
- Click the “Save” button to save the configuration.
Enabling Multiple Call Appearances
Biamp's SVC-2 card can support up to 6 simultaneous call appearances on each line. Not all call appearances can be actively on a call at the same time. If one call appearance is actively on a call (i.e., not on hold), the rest of the call appearances (up to 5) can have a call on hold. Or, two call appearances can actively be on a call simultaneously (i.e., a 3-way call), but in this case no other call appearances can have a call on hold. These restrictions apply independently to each of the two lines on an SVC-2 card.
Steps 14-17 are optional. In order for the Mitel system to support multiple call appearances, a few extra steps are required. If this feature is not necessary or desired, please skip to the next section. If the steps on this page are skipped, the SVC-2 card will support one call at a time (per line).
- In the category tree, select Users and Devices—>Advanced Configuration—>Multiline Set Keys.
- Select your extension under the "Multiline Set Keys" heading.
- Under the "Programmable Keys" heading, double-click on button number 2. Set "Line Type" to "Multicall", set "Button Directory Number" to your extension, and set "Ring Type" to "Ring".
- Repeat step 16 for the rest of buttons 3-6. The screenshot below shows the end result if the maximum number of simultaneous call appearances are configured.

Tesira configuration
Next, we'll focus on setting up the Tesira configuration to match the settings that were used in the Mitel setup.
VoIP Control/Status block
Finally, after the Mitel configuration is complete, follow the steps below to set up the SVC-2 card: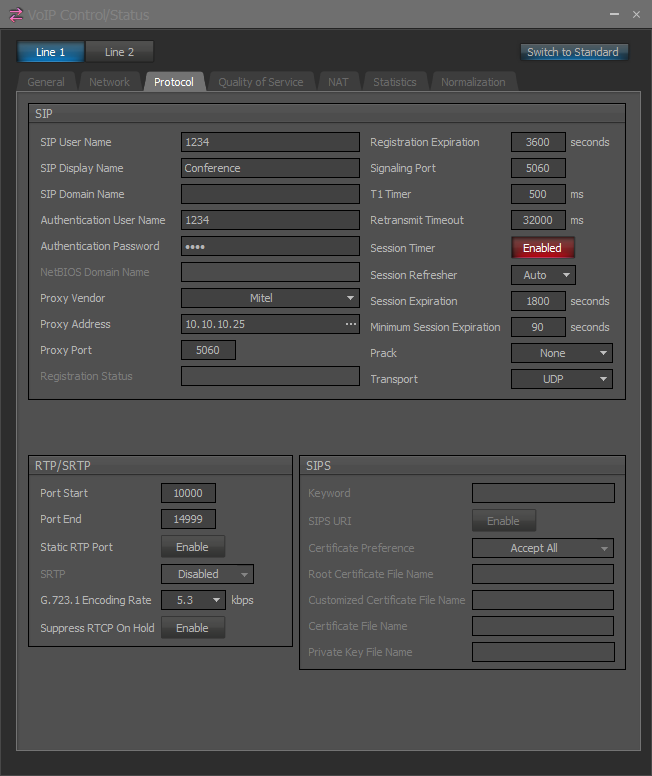
- Open the Tesira software, and open the .tmf file for your project. Do not connect to the Tesira system yet, because the information below cannot be entered while you are connected to the Tesira system.
- Double-click on the VoIP Control/Status block to access configuration tabs.
- Under the “Network” tab, set “VLAN” to “Enabled” and enter the VoIP VLAN number if your VoIP network uses a tagged VLAN. If the network uses an untagged VLAN or no VLAN, leave this value as “Disabled”.
- Under the “Network” tab, leave “DHCP” set to “Enabled” if the SVC-2 card will obtain an IP address automatically from a DHCP server. Otherwise, set “DHCP” to “Disabled”, and manually enter an appropriate static IP Address, Subnet Mask, and Gateway for the SVC-2 card.
- Select the Protocol tab.
- In the SIP User Name field, enter the extension number used in the Mitel setup (see Add User and Device, step 4).
- In the SIP Display Name field, optionally enter a name for the extension for Caller ID purposes. Note that this name may be overridden by the proxy server, and therefore may not show up as the Caller ID name.
- In the “Authentication User Name” field, enter the extension number again. This field must match the “SIP User Name” field.
- In the “Authentication Password” field, enter the PIN code that was used in the Mitel setup (see Add User and Device, step 11).
- Select “Mitel” as the “Proxy Vendor”.
- In the “Proxy Address” field, enter the IP address of the Mitel server.
- If your network prioritizes VoIP traffic using Quality of Service (QoS), select the “Quality of Service” tab and enter the appropriate settings for your network. Otherwise, skip this step. By default, only the Diffserv attributes are available. If you prefer specifying QoS using TOS, select TOS as the QoS mode in the Properties Sheet and return to this page.
- If you’re configuring two lines, select “Line 2” at the top of the page and repeat steps 6-12.
- All other settings can remain at their default values in most cases.
- Send the system configuration to the Tesira server (File—>Network—>Send Configuration). Once the configuration is loaded, the SVC-2 card will attempt to register with the proxy server. If you have a Dialer block associated with your SVC-2 card, you can see status messages returned from the SVC-2 card at the bottom of the Dialer block’s control dialog. See SVC-2 status messages for a description of the possible status messages and their meanings.
Further reading
If you've followed these steps and the VoIP card isn't registering, check to see if a SVC-2 status message is indicating a problem.
Additional line information is available in the device's Event Logs (go offline, open Device Maintenance, select your device and choose "Retrieve Event Logs")