Using the WaveWare STG SIP to TAP Gateway with Vocia TTS-1nc(e) and TTS-2
This article covers how to connect and configure the WaveWare STG SIP to TAP Gateway for use with a Vocia TTS-1nc, TTS-1nce and TTS-2. It has been written with the intention of being useful to both audio system integrators and Nurse Call system programmers.
Requirements
The following equipment is required to connect and configure the WaveWare STG with a Vocia TTS-1nc(e) and TTS-2:
- Rauland Responder 5
- WaveWare STG SIP to TAP Gateway
- Belkin USB-to-Serial adapter (Provided by WaveWare)
- RS232 Female DB9 to Female DB9 crossover cable
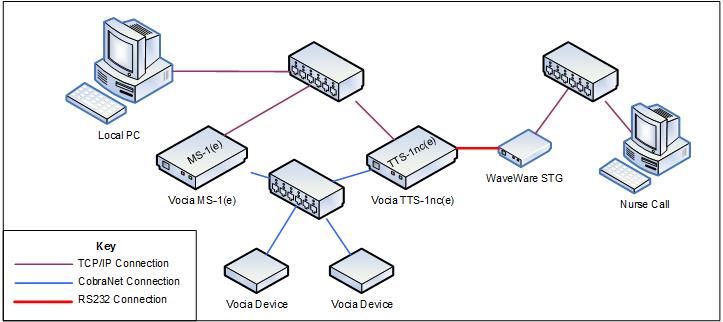
Below is a typical topology for a system that integrates these technologies:
WaveWare STG configuration
-
Use the WaveWare Discovery Tool to discover the STG's IP address.
-
From the WaveWare Discovery Tool, reset the STG device.
-
Connect to the Web Console Interface using the following credentials:
-
Default user: admin
-
Default password: STGpass1234
-
-
From here, you can configure the STG's serial settings as desired using the options shown below:
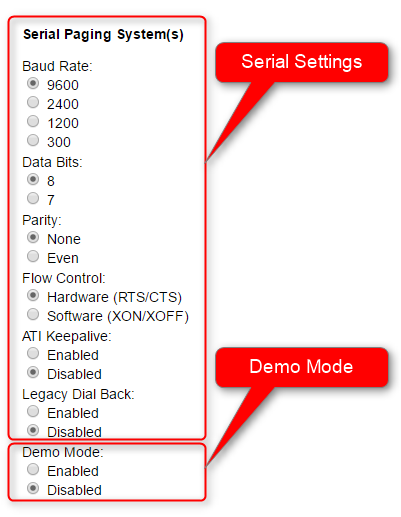
- Note: Record the settings you've selected! You will need to duplicate them in the Vocia software.
-
This is also where you can Enable or Disable "Demo Mode" -- we'll do this a little later in this article.
- Note: Record the settings you've selected! You will need to duplicate them in the Vocia software.
-
Toward the bottom of the page, Click "Save Configuration" to save your settings.
-
Toward the bottom of the page, Click "Update STG Software" to update STG Software.
-
While at the bottom of the page, also verify the software/firmware version that is running on the STG.
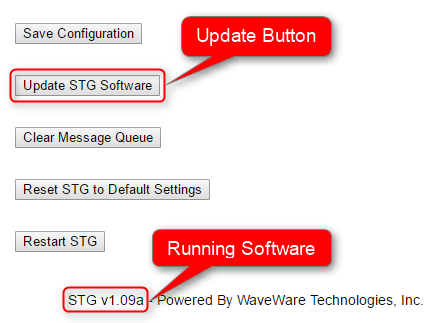
- We have tested this integration using STG Software V1.09A and STG Software V1.2c. If your device is running an older version of software/firmware, please update to either V1.09A or V1.2c.
Vocia configuration
-
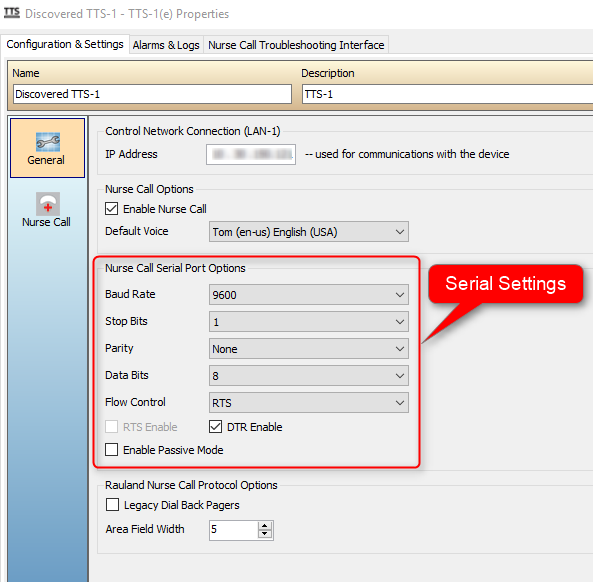
In the Vocia software, double-click on the TTS-1nc(e) or TTS-2 to open its Properties window
-
Locate Nurse Call Serial Port Options on the default tab (Configuration & Settings)
-
Ensure that these settings are the same for the Text to Speech and the WaveWare STG. For them to properly communicate, their serial port configurations must match each other exactly.
With the above settings, the connection between the Vocia Text to Speech processor and the WaveWare STG unit is being monitored.
An alarm in the Vocia system will be triggered if this connection is interrupted.
Checking connectivity
-
From the WaveWare STG Web Console Interface, enable Demo Mode.
-
This will cause the WaveWare STG to send demo messages to the Vocia TTS-1nc(e) or TTS-2.
-
-
In the Vocia software, double-click on the TTS-1nc(e) or TTS-2 to open its Properties window.
-
Select the Nurse Call Troubleshooting Interface tab.
-
Confirm that demo messages are being received from the WaveWare STG. You should see something similar to the following:
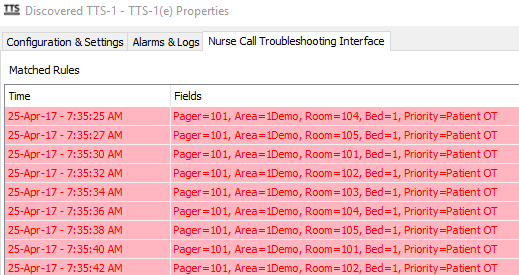
- Make sure you disable Demo Mode in the WaveWare STG Web Console Interface once you have completed your testing
Troubleshooting connectivity
Connection status messages can be viewed on the WaveWare STG Web Console Interface.
The USB > Serial Interface is the connection to the Vocia TTS-1nc(e). Looking at the status fields to the right of it will provide information about the state of our connection and message queue. Below are three potential statuses one might find:
- Successful Serial Connection - No faults with connectivity.

- Serial Lead not connected or correct - Check serial cable.

- Serial-to-USB interface not connected or correct - Check serial-to-USB interface.
