Updating firmware on QtPro 300 and 600 control modules
PLEASE NOTE: These instructions are for updating firmware on legacy QtPro 300 and 600 controllers. To update firmware on the new Qt X 300 and 600 controllers, please reference this tech note.
Firmware updates are occasionally released for QtPro control modules, to introduce new features and/or fix issues. Applying these updates will update the firmware installed on the control module and also the software/user interface (a.k.a. the MCS, or Monitoring and Control Software). This article explains the firmware update process for QtPro 300 and 600 control modules.
A switch may be needed while updating the firmware to keep the connection alive. If the boot socket error message appears, place a switch between the QT controller and the PC. Ensure that the switch does not have Energy Efficient Ethernet (EEE) or similar settings enabled or it may interfere with the discovery of the QT controller.
Verification of firmware update compatibility
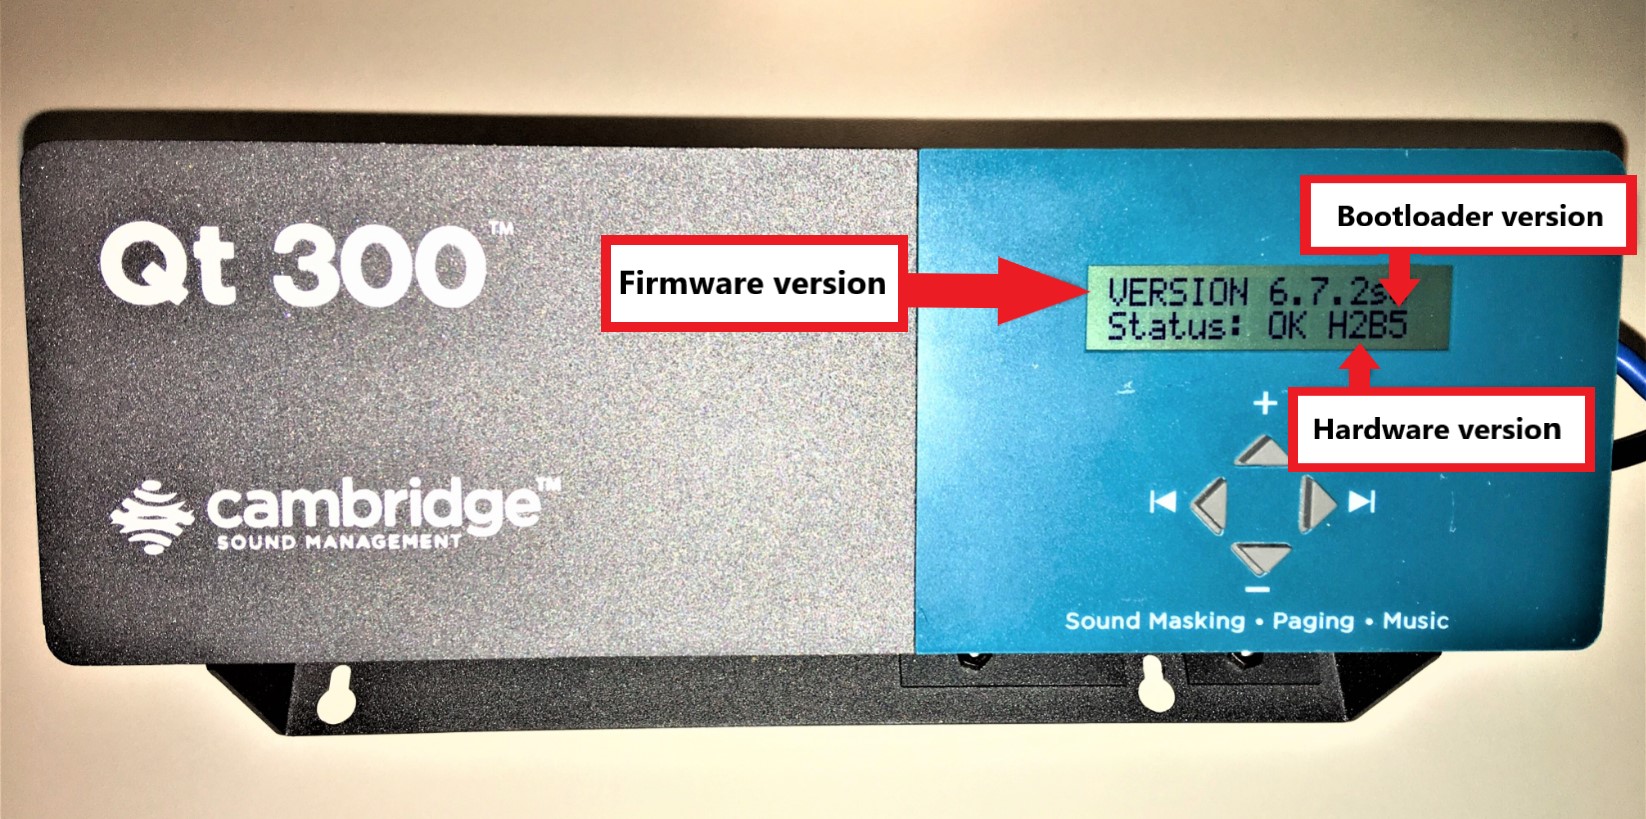
When the control module is first powered on, the current firmware, hardware and bootloader versions are displayed on the front LCD display of the unit.
If the LCD is displaying information other than these version statuses, you can cycle forward or backwards through the control module statuses (MAC address, IP address, Zone masking levels, etc.) using the left and right arrow keys on the front panel.
Please verify the following on the control module:
- Firmware version must be 5.0.0 or newer
- Hardware version must be 2 or newer
- Bootloader version must be 2 or newer
- Viewing firmware version number:
- On the LCD screen, the version of firmware is displayed as a three-part numerical value (e.g. 5.0.0, or 6.7.2)
- Viewing hardware and bootloader version numbers:
- The same screen also shows 'HxBy' where 'x' represents the hardware version number and 'y' represents the bootloader version number
If the firmware, hardware and bootloader versions on your control module are less than the version numbers listed above, please contact Biamp Support by phone at 877-242-6796 or via email at support@biamp.com.
Download the firmware update package
All of the files required for updating firmware on the control module are available in a zip folder that can be downloaded here. After downloading, extract all the files in the zip folder. The folder will include (at a minimum) the following files:
- Updater.exe
- QtPro_vx.x.x.cry (x's will be replaced with the current firmware version number in the actual file)
IMPORTANT NOTE:
Updating your Qt control module firmware will reset your system settings!
Print out a hard copy of your current settings and then re-enter the same settings manually after completion of the update process.
Capture the current configuration settings
-
Power down the Qt control module
-
Connect your PC’s Ethernet port directly to the control modules's Ethernet port
NOTE: You may need to turn off the WiFi interface of the PC -
Power up the control module, then open a web browser on your PC. Enter the IP address that is configured on the control module in
the browser address bar. This will bring up a prompt for you to enter your user name and password
Note: The IP address of the control module is viewable on the front panel, using the right arrow button to scroll through the system status information -
Enter your user name and password (default user name is: admin, default password is: secret)
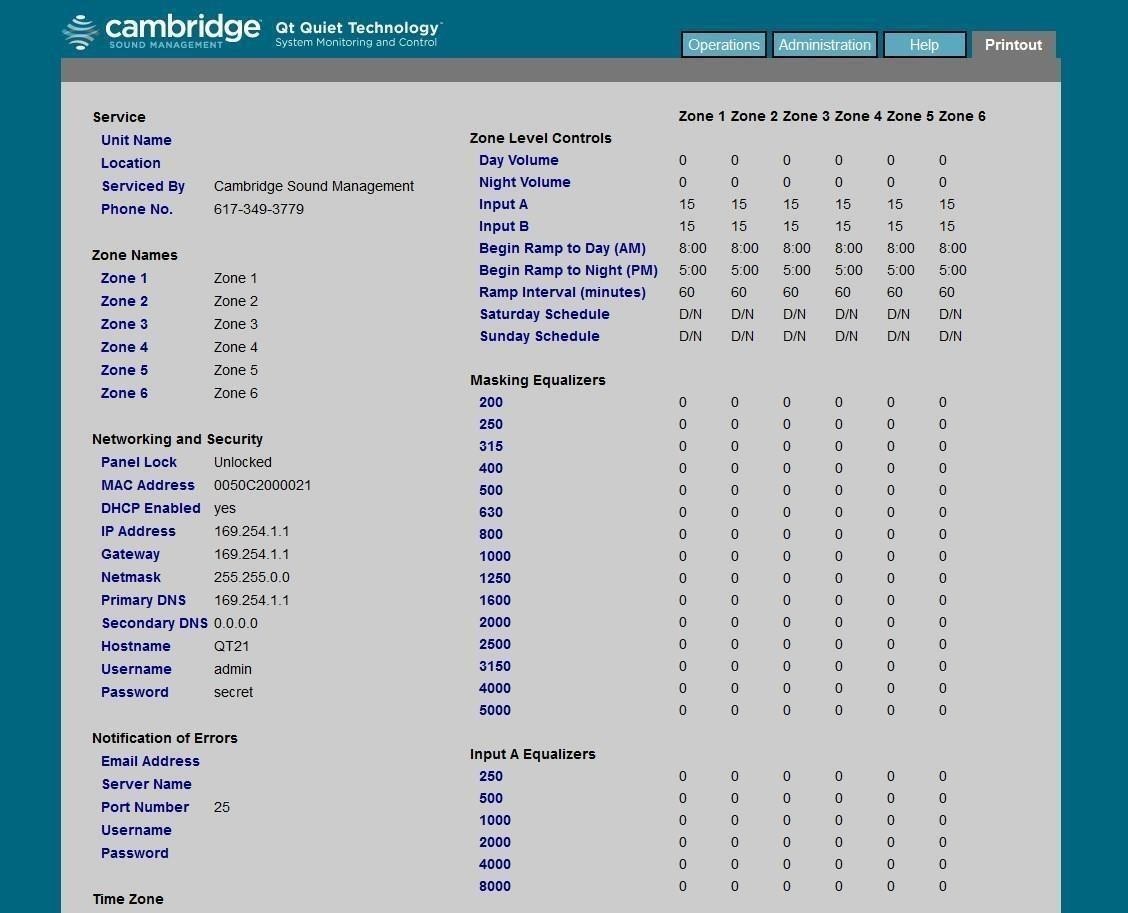
-
After logging into the QtPro web interface (Monitoring and Control Software), print out the settings that the control module is currently configured with by clicking on the Printout tab in the menu, then either print the settings or save as a PDF/screenshot
Update the Qt control module to the latest firmware release
-
Double click Updater.exe on your PC to launch the Updater application. You may be asked to validate the program, be sure that you click ‘run’.
-
Disconnect power from the Qt control module at this time
-
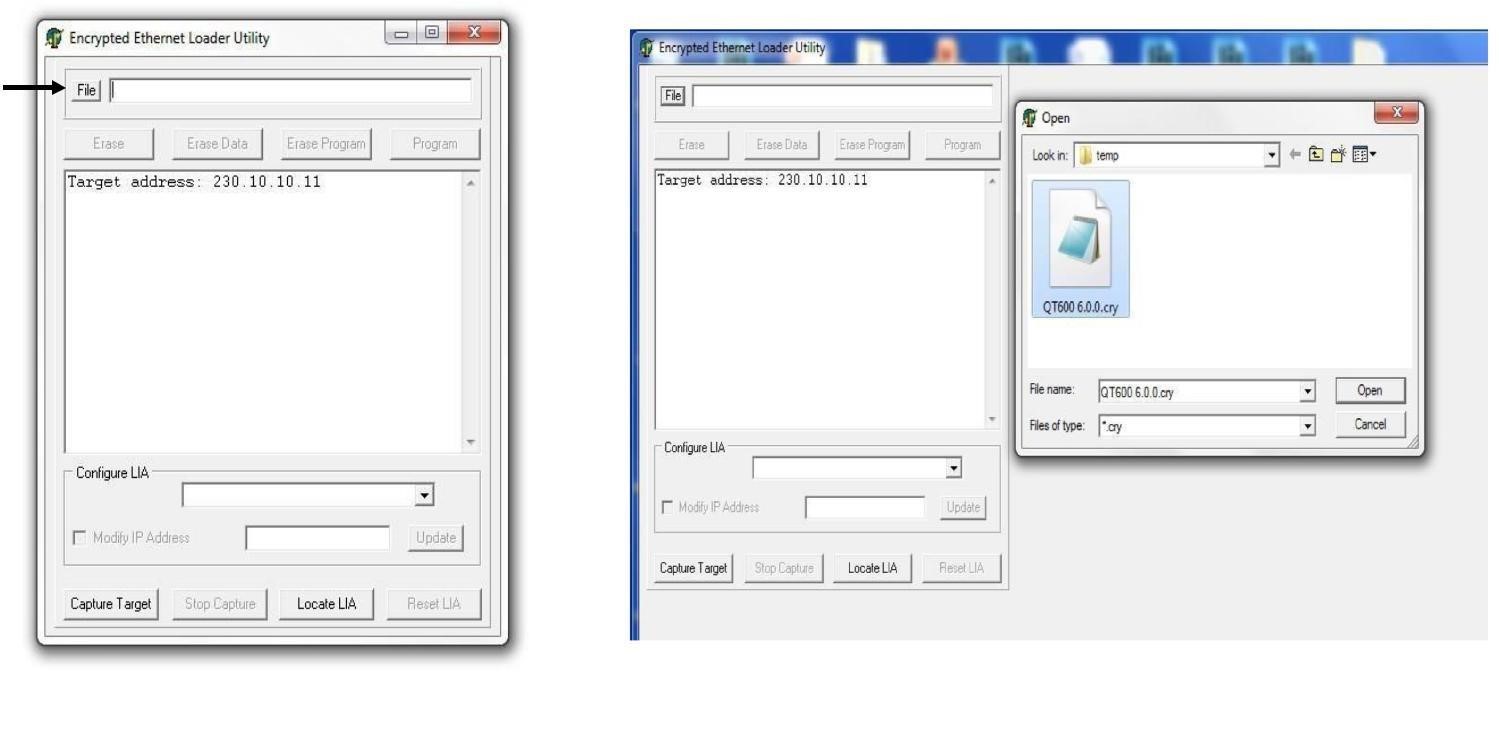
In the Updater, click on the 'File' button, then browse to and select QtPro_vx.x.x.cry (i.e. QtPro_v6.7.2.cry - the x's will be replaced with the version number of the most recent firmware release in the actual file)
-
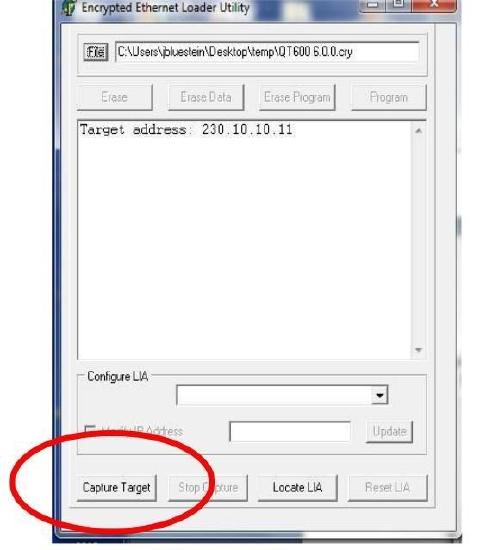
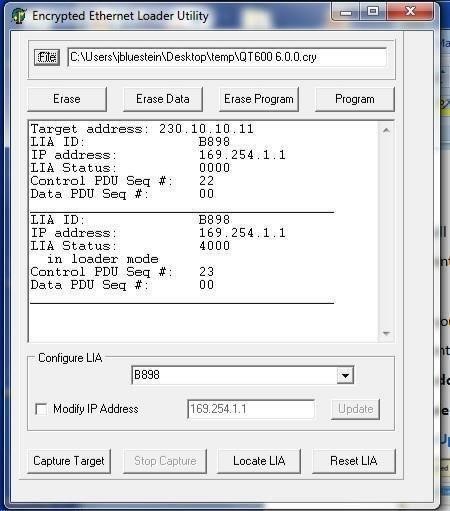
Next, while still in the Updater, click on the 'Capture Target' button, and immediately go to the next step
-
Connect power to the control module
-
You will see text similar to the following displayed in the Updater’s dialog window.
Once you see this text in the Updater, move on to the next step. The LCD screen of the control module may continue to say ‘booting,’ or it may be blank

-
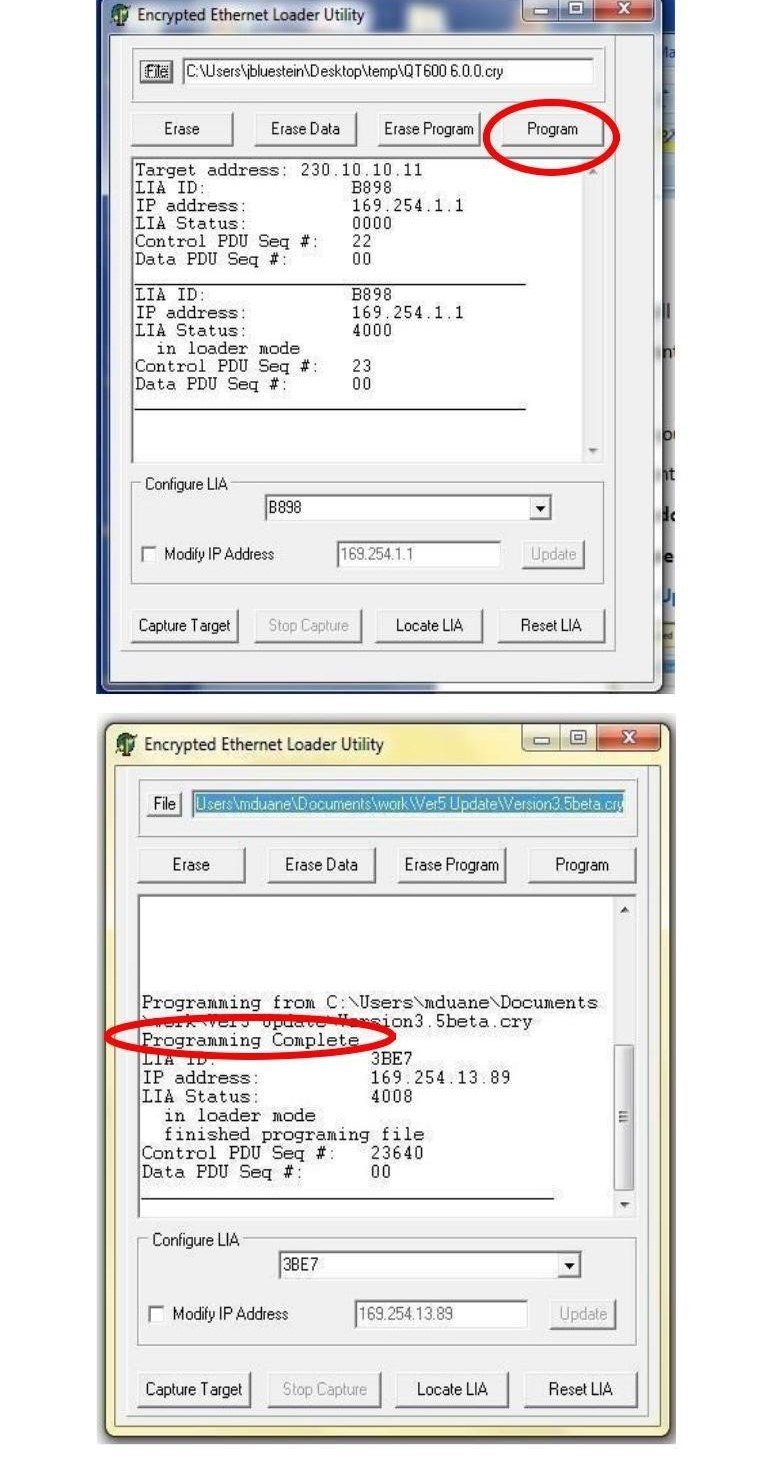
In the Updater, click on the 'Program' button (be patient for the response, it may take 10-60 seconds), and observe that the programming completes without error. If the programming completes successfully, you will see "Programming Complete" displayed in the Updater’s dialog window:

-
After programming is complete, disconnect power to the control module, as the next step is a hard reset. You can now close the Updater program.
-
Complete a hard reset of the control module by doing the following:
- pushing the '+' button and holding it in while you apply power back to the unit
- continue to hold the button for at least 15 seconds during the reboot
- to confirm that the reset took, check the masking levels for the zones, these should all be set to "Mute"
-
Confirm that the updated firmware version number and Status: OK appear on the control module LCD


Restoring the system configuration settings
- Log back into the QtPro web interface, and re-enter the system configuration settings, as listed on the Printout that you obtained prior to beginning the update (see "Capture the current configuration settings" above)