Sonet Qt primer
This article discusses the Sonet Qt hardware, a masking solution that is best suited for small spaces and single rooms. Sonet Qt is based on the same sound masking technology found in our more extensively featured QtPro systems, while giving individuals the flexibility to install sound masking where and when they need it.
Components of Sonet Qt
A Sonet Qt system uses the same sound masking found in other Biamp product lines, but uses different hardware intended for a smaller, personal space. Below are the design specifications for a Sonet Qt system.
.png?revision=1&size=bestfit&width=550&height=275)
Specifications:
| Coverage area type | Personal workspace up to 400 ft2 (121.9 m2) |
| Maximum No. of emitters | 4 (with optional extension kit) |
| Zones | 1 |
| Controller dimensions | 6”x 3”x 1.5" (15.2 cm x 7.6 cm x 3.8 cm) |
| Power source | DC power supply that plugs into a standard electrical outlet. The control module then powers all emitters. |
| Controller weight | 5.2 oz. (148 g) |
| Total system weight | 1.1 lbs. (499 g) |
Mounting options:
| Wall mount | The Sonet Qt individual sound masking system comes complete with Velcro™ attachments for easy installation on hard surfaces, like office walls. |
| Fabric panel mount | The Sonet Qt individual sound masking system includes attachments for fabric-covered surfaces, like cubicle panels. |
Design and use of Sonet Qt
Sonet Qt can help to reduce distractions and improve speech privacy in a variety of locations including:
- Individual cubicles or office
- Home offices
- Nurseries
- Bedrooms
- Hotel rooms
- Any personal space
Sonet Qt for sound masking
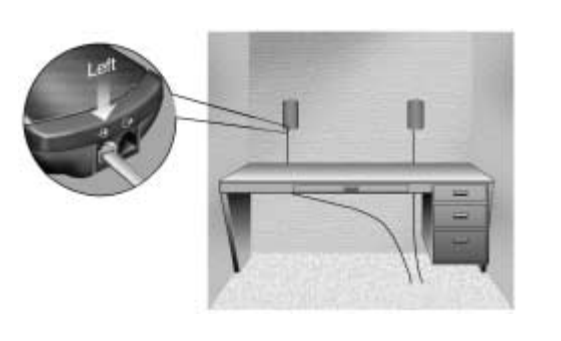
Sonet Qt was designed for use in small spaces not exceeding 400 square feet (121.9 square meters), where Sonet emitters can be installed on two walls so that they project sound directly to both ears, masking sound coming into the cubicle. This enables the occupant to more easily ignore the surrounding conversations and concentrate on their work. The control module should be mounted in an easily accessible location where it can be adjusted by the occupant to address the current noise conditions.
For office sizes up to 200 square feet (60.9 square meters), one Sonet base system, consisting of a control module and two speakers may be used. Installing the controller near the occupant, on a wall or the side of a desk for example, allows the user easy access to the volume control. The two emitters should be mounted at ear height and separated by 2 to 3 feet (0.6 to 0.9 meters). Emitters can be placed facing inward toward the unintentional listener to help alleviate the distraction of others conversations .
Sonet Qt for speech privacy
Much like the QtPro Conference Room hardware, the Sonet Qt can be used to enhance speech privacy in smaller locations. Sonet Qt provides flexibility as the emitters can be physically moved, where others are designed for permanent installation. When used as a speech privacy system, Sonet emitters must be installed in the area where the listener is located rather than in the area where the conversation to be protected is occurring. As the listener experiences Sonet sound, they will be less able to clearly understand the words spoken in the adjacent space.
Installation guide for Sonet Qt
Verify your system components
Your kit should include the following:
- Emitters - x2 (x4 if the extension kit was purchased)
- Controller - x1
- Line cord/transformer - x1
- Mounting plates - x3
- 12' cable - x2
- Wiring clips - x6
- Mounting plate pins - x8
- Spare Velcro™ pairs - x2
Installation
- Place an emitter on either side of the wall in front of your regular working position. The emitters should be at about ear height and 2 to 3 feet (0.6 to 0.9 meters) apart.
- Mounting the emitters:
- For hard surfaces
- Remove adhesive guards from the Velcro on the back of the emitter.
- Place the emitter (with connectors down) in the desired position on the wall and press.
- For fabric covered walls:
- Place a mounting plate with the rounded edge up at the location where you wish to hang the emitter.
- Push two mounting pins through the slots in the mounting plate at a steep angle so that the mounting plate lays flat on the wall.
- Remove the Velcro™ adhesive guard from the emitter.
- Place the emitter (with connectors down) on the mounting plate and press.
- For hard surfaces
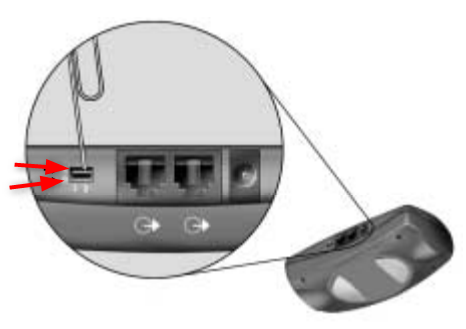
- Connect a cable to the left-hand connector on each emitter. Run the cables down behind the work surface and pull them to the area where you plan to mount the controller. The signal from the controller should be connected to the connector labeled with this icon:
 . The other connector feeds an expansion kit emitter if one is present.

- Note: Sonet is adjusted at the factory for optimum performance in an open workspace, such as a cubicle. If the Sonet system is being installed in a high ceiling office, a single adjustment is required prior to mounting the controller. With a paper clip, move switch 2 from position A to position B.
- Note: Sonet is adjusted at the factory for optimum performance in an open workspace, such as a cubicle. If the Sonet system is being installed in a high ceiling office, a single adjustment is required prior to mounting the controller. With a paper clip, move switch 2 from position A to position B.
- Connect the cables from the emitters to a connector on the side of the controller.
- Insert the plug from the line cord/transformer into the receptacle on the side of the controller. Plug the transformer into a standard AC wall outlet.
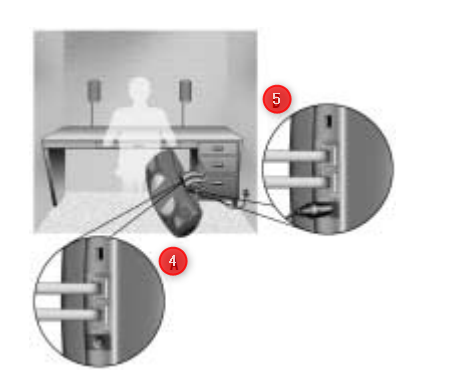
- Mount the controller so the volume control is easy to reach.
- Wait until you are comfortable with the emitter locations. You may wish to reposition the emitters or the controller after the initial installation. Use the enclosed cable clips to fasten the wires to the wall and underside of the work surface.
- Allow clips to stay in position for about 8 hours before attaching cables.
- If you are wiring an Extension Kit of emitters, you can daisy-chain two emitters together before feeding the emitter to the controller. When feeding out of an emitter you connect the icon that looks like this,
 to the receiving icon that looks like this
  .
.