Evoko Home Overview Screen
The Overview screen is a great way to get a quick look on the status of meeting rooms or finding your way to a specific meeting.
By using a large screen to display an overview of certain meeting rooms of your choice you are providing a way for guests/employees to easily find their way to your meeting or find an available room for instant meetings.
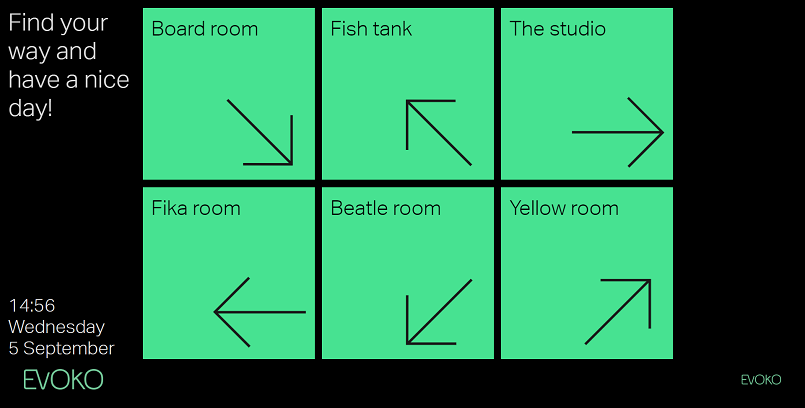
The overview screen displays the status of each room using the same familiar Liso colors (green/amber/red) as well as in which direction it is located.

Every few seconds, the tiles flip to display meeting details. And then back to displaying the direction again.

To use the Overview Screen you need to setup a server. The Overview Screen server is written as a separate Node.js application from Evoko Home which runs on it's own dedicated port (default 4000) that utilizes the Evoko Home API to fetch meeting room data. Since the Overview Screen server is separate from Evoko Home you get to decide for yourself if you want to run it on the same server as Evoko Home or on a separate server.
Another thing, it runs in a web browser! Meaning that you don't need to have any particular media player or screen. As long as you can get a fairly modern web browser with a connection to your Overview Screen server running on your screen, you're good to go.
Install the Evoko Overview Screen sever on Windows
This part will go through how to install Evoko Overview Screen server on a Windows server.
Windows server prerequisites
- A server running a Windows server 2008 R2 (or later).
- A free and accessible application port (default
4000). - Access to the Evoko Home server running
v2.Xon the application port (default3000/3002). - SSL/TLS certificate to use HTTPS (recommended). HTTP can be used however is discouraged for accessing the Overview Screen admin portal from anything other than localhost as Evoko Home admin credentials will need to be submitted to login to the admin portal.
Windows Installation Steps
- Download the latest version of the Overview Screen for Windows here: https://download-liso.evoko.se/
- Run the executable
evoko-overview-screen-server-v2.x.y.exe. - Select where to install.
- Make sure to install the Overview Screen server as service so it always will run in the background.
- Once complete, press "Finish" and open the configuration file.
- Edit the configuration file (
C:\ProgramData\Evoko\config.toml) according to your environment and then save. See below table for more details.
-
Tip! If copying the password from the credentials email sent by Evoko Home, make sure not to include the period at the end. If unsure, please verify the credentials by logging on to Evoko Home.Value Description uriURL for the Evoko Home server. - Use
"ws://localhost:3000/websocket"if Evoko Home runs on the same host. - Use
"wss://evokohomeserver.tld:3002/websocket"if Evoko Home runs on another host.
emailEmail address of an Evoko Home admin account to use for API authentication. passwordPassword for the Evoko Home admin account. portThe Overview Screen server listen port (default 4000).keyPath to SSL/TLS key. Both *.pemand*.keyformats are valid. If left empty the Appconnector will check for a key in the default Evoko Home install folderC:\Program Files\EVOKO\EvokoHome\liso_files\certificates\server.key.certPath to SSL/TLS certificate. Both *.pemand*.crtformat should be accepted. If left empty the Appconnector will check for a certificate in the default Evoko Home install folderC:\Program Files\EVOKO\EvokoHome\liso_files\certificates\server.crt. - Use
- In order for changes in
config.tomlto be applied we need to restart the service underservices.msc. - Look for a service named
Evoko Overview Screenand restart it. - If there are no errors in the configuration nor any firewall blocking you should be able to access the Overview Screen admin portal via a web browser (e.g.
https://localhost:4000/admin).


Ubuntu Installation Steps
- Download the latest version of the Overview Screen for Ubuntu here: https://download-liso.evoko.se/
- Make sure that Node.js and npm is installed, you can do this by checking the version:
If not, then you can install Node.js/npm using the below command:nodejs -v && npm -vcurl -sL https://deb.nodesource.com/setup_8.x | sudo -E bash - sudo apt install -y nodejs - Install using npm with the below command:
sudo npm install -g evoko-overview-screen-server-v2.*.tgz - Once the installation is finished, to test that it was successful and to view available commands run:
evoko-overview --help - To proceed, generate a configuration file using:
Note! The Overview Screen server and Get A Room Appconnector share the same configuration file so no need to run the above command if you already have a configuration file generated.sudo evoko-overview config - Open the configuration file with a text editor (we're going to use nano):
sudo nano /etc/evoko/config.toml - Edit the configuration file according to your environment and save (
ctrl + x>y>enter).
-
Value Description uriURL for the Evoko Home server. - Use
"ws://localhost:3000/websocket"if Evoko Home runs on the same host. - Use
"wss://evokohomeserver.tld:3002/websocket"if Evoko Home runs on another host.
emailEmail for an Evoko Home admin account to use for API authentication. passwordPassword for the Evoko Home admin account. portThe Overview Screen server listen port (default 4000).keyPath to SSL/TLS key, both *.pemand*.keyformat should be accepted. If left empty the Appconnector will check for key in the default Evoko Home install folder/home/$USER/Evoko Home/liso_files//certificates/server.key.certPath to SSL/TLS certificate, both *.pemand*.crtformat should be accepted. If left empty the Appconnector will check for certificate in the default Evoko Home install folder/home/$USER/Evoko Home/liso_files//certificates/server.crt. - Use
- To make sure the configuration checks out, temporarily start the overview server by running:
If started successfully you should get a similar output to the below:sudo evoko-overview start
If successful you should be able to access the Overview Screen admin portal via a web browser (e.g.Starting Evoko Overview Screen 2.0.0 * Loading config from /etc/evoko/config.toml: OK - Found Evoko Home installation - SSL certificates found. Using secure HTTPS.https://localhost:4000/admin). - Press
Ctrl + Cin the shell once done with the temporary test to stop the Overview Screen server. - We want the Overview Screen server to run as a service so it will continue running even after we close our shell, we can accomplish this using systemd by running:
sudo evoko-overview install - Enable the Overview Screen server to start on boot:
sudo systemctl enable evoko-overview-screen - Start the Overview Screen server:
sudo systemctl start evoko-overview-screen - Now that the installation is finished you may remove the installation package:
sudo rm evoko-overview-screen-server-v2.*.tgz
How do I use the Overview Screen?
Once you got the Overview Screen server installed you can start creating Layouts and connecting Screens (i.e. web browsers). The Overview Screen is rather simple and consists of two web pages:
/overview- where you display/admin- where you administer
Web browser support
Before jumping straight into a web browser, consider which one to use. Use the below list as a general guideline when picking a web browser (we of course recommend running the latest version available).
- Mozilla Firefox 32+
- Microsoft Edge 15+
- Google Chrome 51+
- Apple Safari 11+
Internet Explorer 11 (and below versions) are known to be incompatible and is not supported.
Note! The Overview Screen uses web browser local storage (similar to cookies) to store configuration details, if these details are cleared then the screen will return to unconfigured state.
/overview - where you display
To get started, open the web browser you've decided to use on your screen and enter your Overview Screen server URL followed by /overview (e.g. https://localhost:4000/overview).
If successful, a page similar to the below image should be displayed along with a unique screen name, in our case "Remarkable meeting".

That's it! It's that simple to register a new screen. To configure the screen move on to the admin portal.
If you want to register several screens then you can do so by entering the same Overview Screen URL (e.g. https://localhost:4000/overview) in the web browser running on the other screens and each screen will get their own unique screen name.
/admin - where you administer
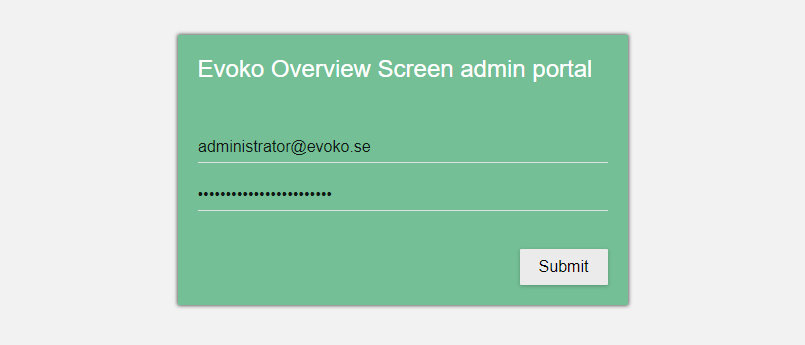
Now that we have a screen registered and connected to the Overview Screen server we can configure it from the admin portal by entering the Overview Screen server address followed by /admin (e.g. https://localhost:4000/admin).
This will prompt a login form, sign in with an Evoko Home admin account.
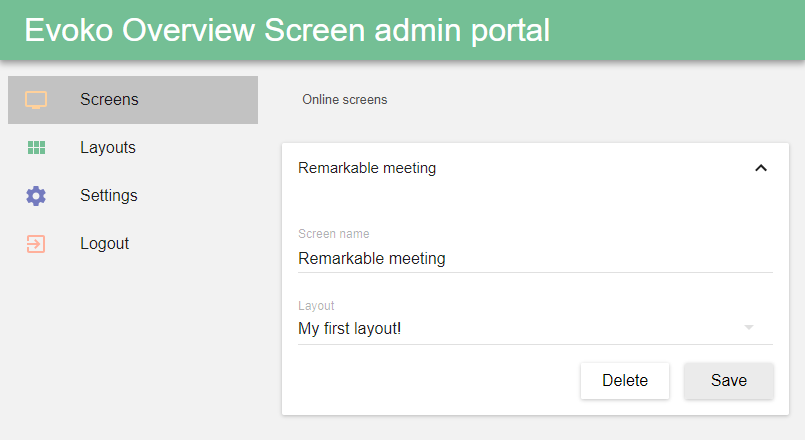
Once signed in, we can now see our our screen "Remarkable meeting" under Online screens.

Navigate to Layouts and press the blue button in the bottom right corner to create a new layout. There are a few options that goes into a layout, mainly setting up your grid of rooms by declaring the number of columns/rows you want followed by selecting the appropriate room for each tile.

Now navigate back to Screens and select the newly created layout for the screen, then press Save.
Once we've saved our layout for our screen it will start to be display on our screen.
Optionally under Settings a logo in .png format can be uploaded to be displayed on our screens.

Once uploaded the logo will be displayed in the bottom left corner.

Note! Time, date and time zone displayed on the Overview Screen will be fetched locally from the Overview Screen server it's running on. Meaning you will currently not be able to have multiple overview screens in different time zones all displaying the correct time.