Microsoft Entra Preparation for Evoko Workplace
This guide will walk you through the process of setting up the Evoko Workplace Application within Microsoft Azure. This will allow for your Evoko Workplace Organization to communicate with M365. This provides Meeting Room syncing with your Resource Calendars in M365.
There will be [3] Steps to follow to register the App and you will need Administrator Access to the Microsoft Entra Center:
- Register a New Application in the Entra Admin Center
- Add API Permissions to New Application
- Create a Secret Value for the New Application
At the end of this guide you will have [3] values that you will need to copy down for future use. These [3] Values are:
- Microsoft Tenant ID
- Microsoft Client ID
- Secret Value (Not Secret ID)
Register New Application in Entra Admin Center
- Navigate to the Microsoft Entra Admin Center here: https://entra.microsoft.com/
- Navigate to Applications -> App Registrations
- You will now click on + New Registration
- Give the App Registration a Name. In this guide we will use BEWP (Biamp-Evoko Work Place).
- Keep the permissions for a Single Tennant Only
- There is no Redirect URI needed.
- Press the Register button.
- Once your New Application is registered you should see the newly created Essentials Information as shown below.
- Make note of the [2] following IDs as they will be needed to link your M365 instance to the Biamp-Evoko Work Place at a later step.


- Tenant ID (Directory)
- Client ID (Application)
Add API Permissions to New Application
- Navigate to the Overview of your New Application
- Click on API Permissions
- Click on + Add a permission
- Select Microsoft Graph
- Select Application Permission
-

-
- The following permissions will need to be added to the New App Registration:
- User.Read
- Enabled by Default
- Calendar.ReadWrite
- Click +Add a Permission --> Microsoft Graph --> Application Permissions
- Scroll down to Calendar and add Calendar.ReadWrite
-

-
- Press Add Permissions
- Place.Read.All
- Click +Add a Permission --> Microsoft Graph --> Application Permissions
- Scroll down to Place and add Place.Read.All
-

-
- Press Add Permissions
- User.Read.All
- Click +Add a Permission --> Microsoft Graph --> Application Permissions
- Scroll down to User and add User.Read.All
-

-
- Press Add Permissions
- MailboxSettings.Read
- Click +Add a Permission --> Microsoft Graph --> Application Permissions
- Scroll down to MailboxSettings and add MailboxSettings.Read
-

-
- Press Add Permissions
- User.Read
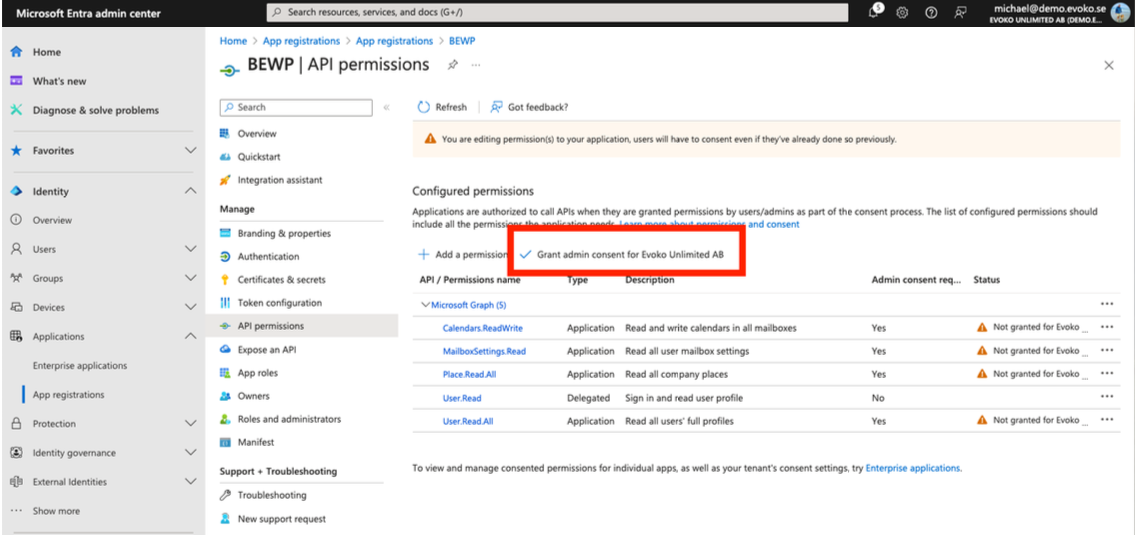
- When complete you should see 5 Permissions added to your New Application Registration as shown here:
- Lastly you will need to Grant Admin Consent for your New Application within your Organization.
- Press Yes
- Nice job! Proceed to Create a Secret Value for the New Application


Create a Secret Value for the New Application
- Navigate to Certificates & Secrets
-

-
- Select + New Client Secret
- Add a description for your Secret and press ADD
-
Make note of the Secret Value shown here:
-


Recap
You now have the following information copied to a document so it can be used to connect Biamp Workplace to your Microsoft 365 Instance.
- Microsoft Tenant ID
- Microsoft Client ID
- Secret Value (Not Secret ID)