MPX 250 - Updating the video IC firmware
Overview
EasyConnect MPX 250 and MPX 250 DC contain an internal Synaptics integrated chip that manages video signal distribution to connected displays. There are a few combinations of MPX 250 / MPX 250 DC / MPX 250 EXT with different UC devices and MacBook Pro devices that require a firmware update to the internal video chip, which cannot be deployed through a standard firmware update.
The currently known issues / combinations are solved by this firmware:
- MacBook M4 Pro / Max in daisy-chain or room kit configurations: no video
- Cisco Room Bar / EQ: video flickering on Intel Xe Iris based laptops
- Yealink CTP25 / VCH51 USB-C based video ingest: no video
This firmware has the following differences from the default version:
- If you have dual displays connected, content on both displays will be always mirrored, not extended
- Workaround for specific Android-based UC system with USB-C video ingest
- HDCP is disabled
Prerequisites
- Install VmmDPTool64 from Microsoft Store on a Windows laptop (Parallel on MacOS is not supported)
- Download the new firmware file v119
- Ensure all hubs, docking stations, adapters or USB peripherals NOT associated with the MPX250 system are disconnected from the Windows laptop
- Ensure a display is connected to the MPX 250 or MPX 250 EXT HDMI output
Note: the update is required for each MPX 250 and MPX 250 DC in the setup, not MPX 250 EXT units.
Procedure
Follow the next steps.
- Connect the Windows laptop to the MPX 250 through one of the four USB-C cables
- Tap the controller to select the Windows laptop as the source
- Check that the system is correctly passing video to the display
- Start VmmDPTool64 with Administrator rights:

- Are you seeing this warning? Go back to Step 1 and verify the Window PC is selected and actively passing video through MPX250!
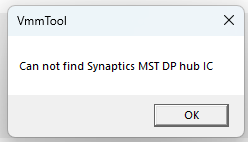
- Are you seeing this warning? Go back to Step 1 and verify the Window PC is selected and actively passing video through MPX250!
- Once started, you should see this output under the Debug tab, showing version 6.05.107:

- Click the tab “FLASH”, click “Load to FLASH”, and navigate to the firmware file downloaded earlier to initiate the process:

- Once the update is complete, power-cycle the MPX 250 unit. The Debug tab should now indicate version 6.05.119:

- Repeat the procedure for all MPX 250 / MPX 250 DC units in the setup