Getting Started with Canvas
Canvas software is used to create end-user control surfaces This is especially useful for integrators tasked with giving end users access while preventing the users from making potentially catastrophic changes to the system. Canvas offers a pick-and-choose approach for granting system access.
Open a new Canvas surface file
Download Canvas software from the biamp.com downloads section.
- NOTE: The version of Canvas Software sending the control surface must match the version of Tesira Software sending the configuration. Different versions will result in an error.
- In the top left corner, click the New button to start a new Canvas surface.
- You should see a blank surface file, similar to that of a Tesira configuration file.
- The next step is to make sure we have a Tesira system that is already configured on the control network.
- In Canvas, select the System Connect icon or go to the System tab at the top and then select Connect to System. This brings up a dialogue window showing the available systems and devices on the network.
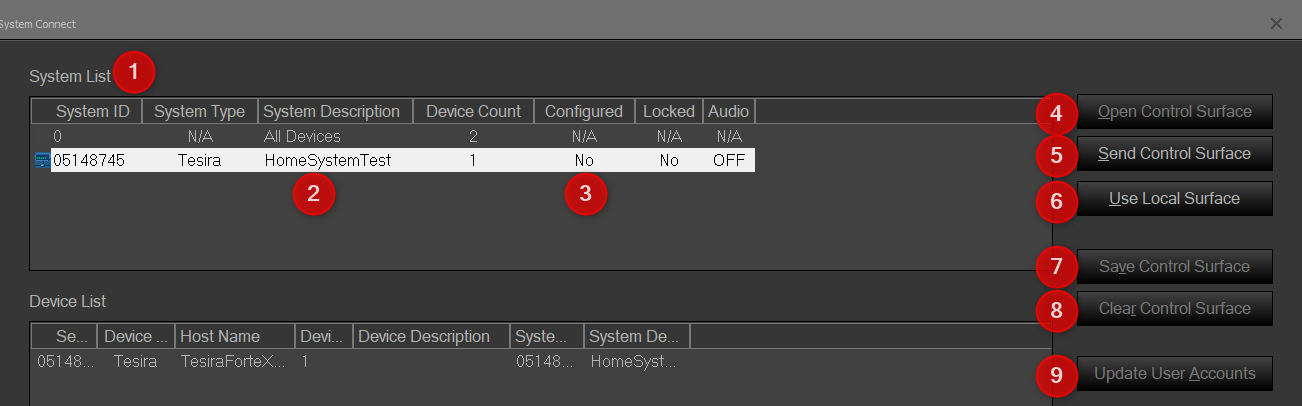
System Connect overview
- The System List - shows what Tesira systems are available on the control network
- System Description - gives the user an idea of which system is which. This is named in the Tesira software
- The Configured field - shows if there has been a Canvas surface sent to this system yet. Once we click "Send control surface" this field will change to Yes
- Open Control Surface - Retrieves the Biamp Canvas file that has already been sent to the system, and starts a live control session.
- Send Control Surface - Sends the currently open/active Biamp Canvas file into the system, and starts a live control session.
- Use Local Surface - Starts a live control session with the selected system using the currently open/active Biamp Canvas file. This option does not send the Biamp Canvas file to the system to be permanently stored.
- Save Control Surface - Retrieves the Biamp Canvas file that has already been sent to the system, and saves it to the specified directory. This option does not start a live control session.
- Clear Control Surface - Erases the Biamp Canvas file that is stored on the system.
- Update User Accounts - Allows changes to the Biamp Canvas file User Account to be sent to the system.
Adding blocks
There are a few ways to add blocks or objects to a Canvas surface file. The first is using the object bar to add input/output, mixers, filters, or an assortment of other blocks to the file. These blocks must also be in the Tesira configuration file for the system. In other words, we cannot add something that is not already part of the Tesira configuration.
- Open the Tesira software and open the local configuration file offline for the system.
- Select an input block or the block, then right-click and select Copy. Place the copied block in an empty space in the Canvas surface, right-click, and then select "Paste".
This should paste in an object that can be used to control the input block in the Tesira configuration file. Copying and pasting directly from the Tesira configuration file creates a direct link to the block's instance tag in Canvas.
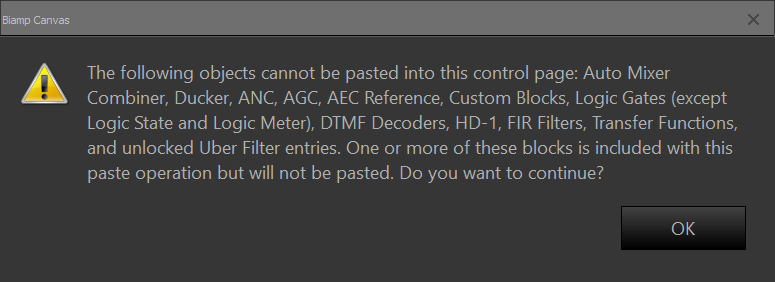
While most blocks can be copy/pasted into the surface file, there are certain blocks Canvas does not support. Always check that the Canvas Software matches up with the Tesira Software version. If a block is not supported in Canvas, you will receive a message similar to the one below:
Sending the Control Surface
Before you start, there must be a configured Tesira system on the control network. Next, at least one object must be added to the Canvas control surface before it can be sent.
In this example, we'll add a level block from our Tesira configuration file.
Right-click on the level block and select Copy, then right-click in a blank area on the control surface and select Paste. This should automatically add a Level control and tie it to the block we selected from the Tesira file. To confirm, we can check the instance tags.
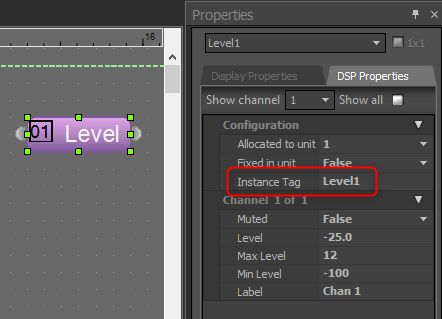
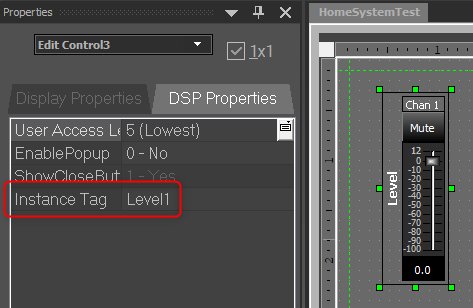
On the left, we have the Level block from the Tesira configuration file with an Instance Tag of "Level1". Since we copy/pasted it straight into the Canvas file, it is already associated and we can verify that by seeing the Instance Tag on the right also set as "Level1".
Next is to send our newly created Control surface. This process is nearly the same as sending a Tesira configuration file. One way is to go to System > Connect to System > Select your system > Send Control Surface.
Another way is to find the Network Bar and click the "Send Control Surface" button. 
Both options prompt you to save before sending and then open a live session. As in Tesira, the grid dots in the background disappear, indicating you are now online with a live system.
Disconnect to make additional changes to the control surface. Resend the control surface to the system after each change.
Examples
In this example, we have an EX-UBT in the Tesira file, but there are no EX-UBT blocks supported in Canvas. However, we can add peak meters, signal present meters, mute blocks, and others that surround the EX-UBT signal.
An audio signal is being played via Bluetooth to the EX-UBT input. A level block, peak meter, and signal present meter are used to reflect in Canvas and provide level/mute control to the signal.
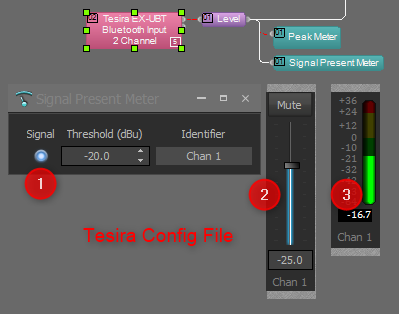
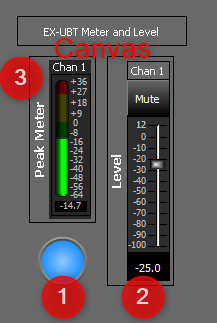
- 1 - Signal Present Meter:
- Tesira - We see an LED turn on when the signal hits the set threshold of -20db.
- Canvas - We can add an "LED Control" and set it to the Signal Present Meters Instance Tag in the DSP Properties. On the Display Properties side, the ON/OFF Color will tell the LED how to show when the SPM is active or not. NOTE: There is a Signal Present Meter block you can copy/paste into Canvas or add straight from the Canvas Object Bar, similar to Tesira.
- 2 - Level Block - Copy and Paste the level block from the Tesira file to the Canvas surface. This should give us the ability to change the level and mute status of this block from our Canvas surface and see the immediate change in Tesira
- 3 - Peak Meter - Gives the user visibility of the meter activity for monitoring.
There are too many little functions, buttons, and objects that you can add to a Canvas file to include everything in this example. Going down the list on the Control Bar and adding objects to the surface to experiment with is a good way of learning the system.
The surface file can be customized in multiple ways, including changing fonts, background colors, adding pictures, text, and more.