Tesira AVer Configuration

This article provides guidance covering steps required for configuring your Tesira TCM-X or TTM-X system alongside the AVer MT300 PTZ Link camera controller. It is intended for readers who are familiar with Biamp Tesira and AVer products. This includes setting up the AVer MT300 PTZ Link with suitable AVer cameras.
Tesira configuration
Using Tesira Software you can configure your Tesira system for one of two camera tracking modes.
- The Parlé Azimuth mode (Requires Tesira FW 4.11.2 or newer)
- The Tesira Logic mode
Each mode is selectable in the AVer MT300 PTZ Link controller. However, both modes require different Tesira configurations.
AVer MT300 PTZ Link controller does not support multiple rooms; room combining.
This is designed using single Tesira configuration with an AVer MT300 PTZ Link controller per room.
Parlé Azimuth mode
This mode requires TCM-X or TTM-X Parlé microphones as it subscribes directly to the Parlé TCM-X block(s) and optional Logic Meter block from the Parlé Processing active microphone output. The Tesira configuration block that follows provides example logic for stabilizing the Parlé Processing active microphone output. These combined outputs enable AVer MT300 PTZ Link to determine the best channel to use from the available data.
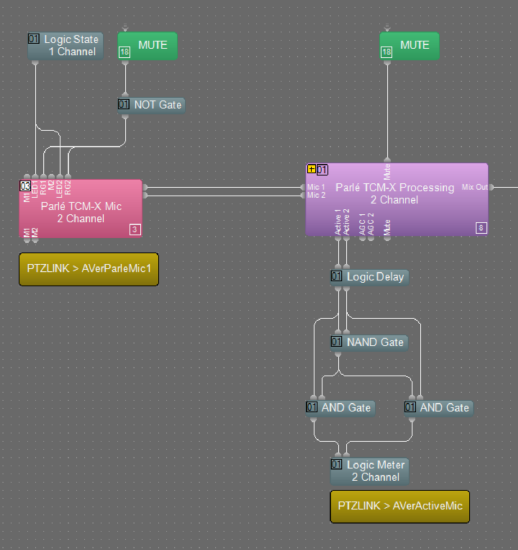
The above example uses the following Tesira instance tag naming schemes:
- Parle TCM-X Block(s) = Parlé microphone block up to 4x Parle blocks maximum 8x Parles: AVerParleMicX (X=1-4)
- Logic Meter Parle Processing active mic output = Logic Meter block maximum 8 channels: AVerActiveMic
NOTE: Maximum support is 2x Parle TCM-X; future planned up to 8x Parle TCM-X.
Tesira Logic mode
This mode subscribes directly to a Logic Meter block connected to a Gating Auto Mixer for use with traditional microphones.
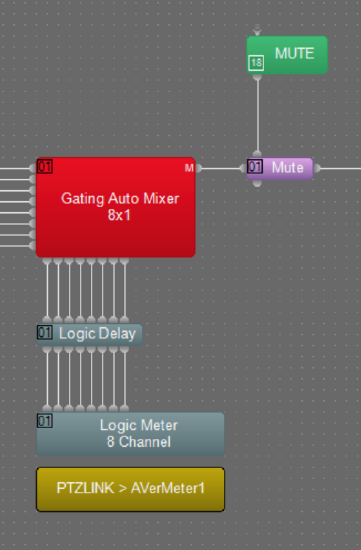
The following Tesira instance tag naming schemes are used:
- Logic Meter Gating Auto Mixer output = AVerMeterX (X= 1 to 4 starting with 1)
Tesira example downloads
Download the Tesira configurations templates here:
- TesiraAVer_ParleAzimuthActiveMicExample_473_CS_18March2024.tmf
- TesiraAVer_ParleAzimuthActiveMicExample_2024-10-16.tmf
- TesiraAVer_RegularMicsExample_473_CS_18March2024.tmf
Setup Notes
- Tesira Control by AVer MT300 PTZ Link is via SSH.
- Enable Tesira > Device Maintenance > Network Settings > Control Network > Enable SSH.
- If your system is unsecured default password for Tesira SSH is Username = default and Password = default.

AVer MT300 PTZ Link Configuration for Parlé Azimuth mode
The AVer MT300 is a Matrix Tracking Box designed to manage Aver cameras, switch video, composite video, and your tracking controller. The MT300 must use FW v0.0.0000.60 or newer for best performance.
Accessing the AVer MT300 is done via the web user interface. The AVer MT300 must be on the same network to control the Tesira.
This guide assumes you have configured everything except for the connectivity to the Tesira platform.
In this example, the Conference Room has two AVer Cameras configured, and the Tesira Forte X with 2x Parle TCM-X Beam Tracking microphones.
Procedure
Once you've connected to the AVer MT300 go to the settings options.
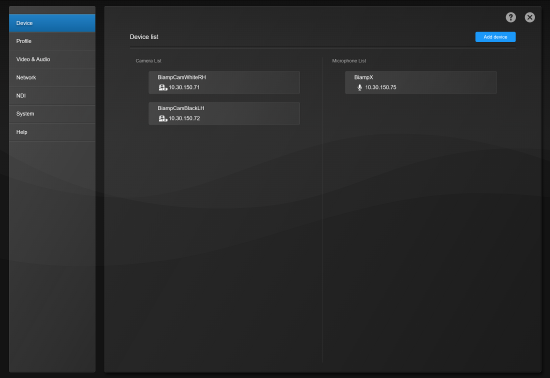
Step 1 - Add the Tesira platform to the Devices.
- Select the Device tab to access the Device list. This contains your Camera and Microphone inputs list.
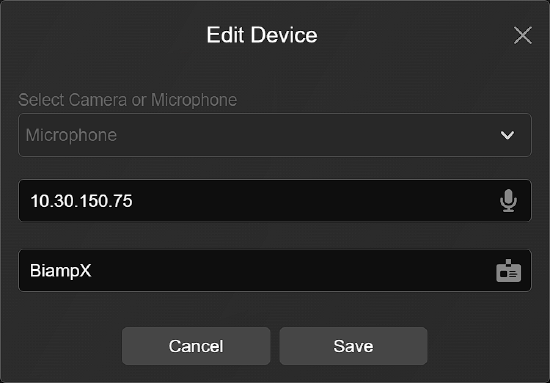
- Select Add device;
- Select Microphone;
- Enter the IP Address of the Tesira system you wish to connect
- Give it a friendly, easy-to-identify name such as "BiampX"
- Select Save
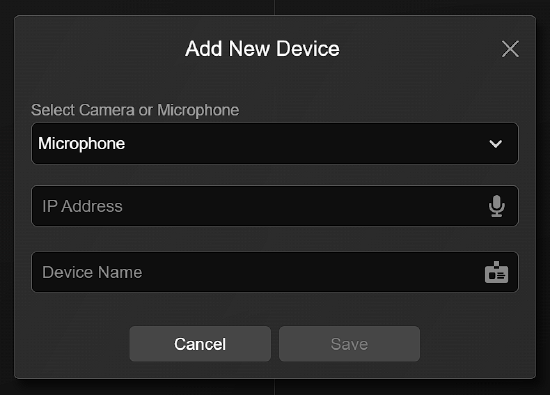
You can edit the device options later at anytime.
This is the overview of the AVer MT300 web user interface > Device settings.
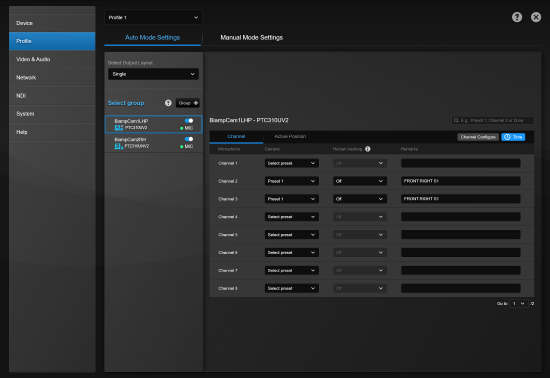
Step 2 - Create a Profile.
Select the Profile tab to access options configuring how the final video output will perform.
- The tab contains your Group devices, Channel, and Time configurations.
- It also contains the last step assigning channels to camera presets.
- In example Profile 1, the output layout is Single and Auto Mode Settings is selected.
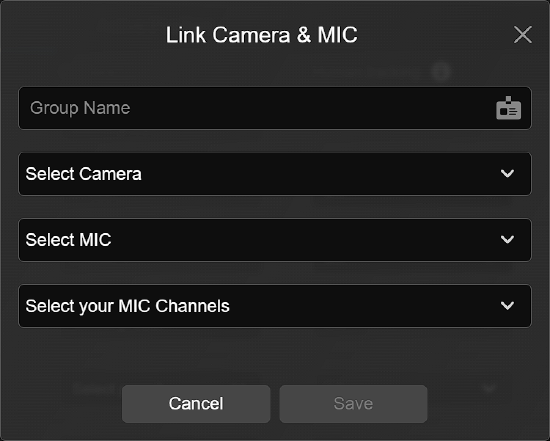
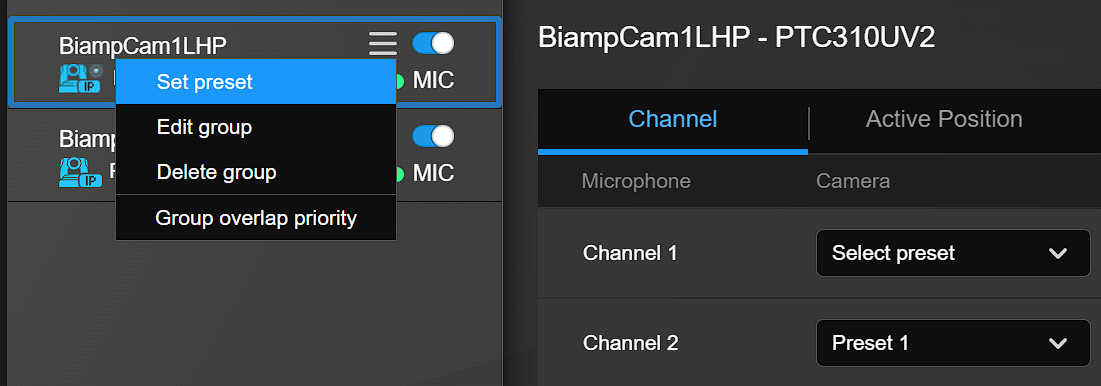
Step 3 - Add Groups.
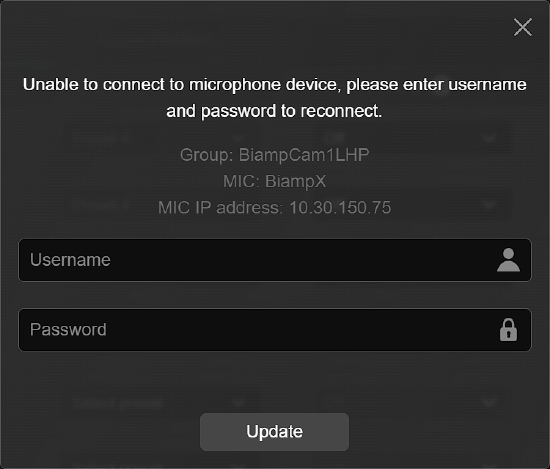
Add Groups for each Camera and Enable the connection. During this stage, the system will prompt you for any credentials required to connect to the Tesira platform.
- The Camera option selects one of the cameras from the device list.
- MIC selects the microphone from the device list.
- MIC Channels is the number of channels to poll.
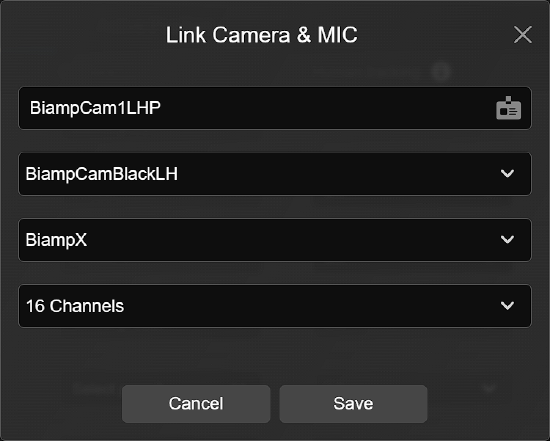
- The default is 8 channels for 1x Parlé TCM-X Beam Tracking microphone. Channels increment in 8 ch amounts.
In this example we are using x2 Parlé TCM-X Beam Tracking microphones, so we we select 16 channels.
Reminder: You create a Group for each camera.
You can edit the group options later at anytime. This is the group for camera one.
You can edit the group options later at anytime. This is the group for camera two.

Step 4 - Group Channel and Time configuration.
Each Group must have Channel and Time configurations set. These will be the same for each group. 
Channel Configure options
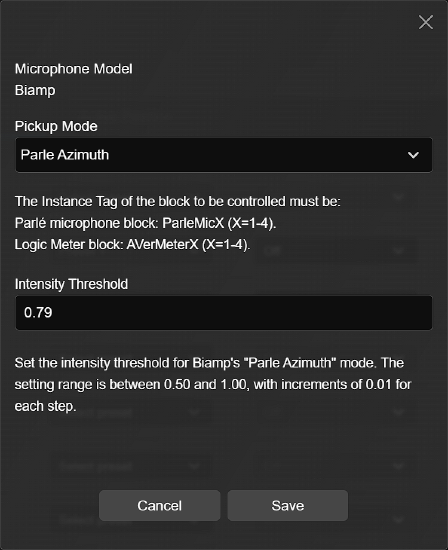
- Pickup Mode: The mode the Tesira configuration based on.
- The Tesira Logic mode or the Parlé Azimuth mode
- Intensity Threshold: This value is a calculated intensity value the Parlé Azimuth data provides.
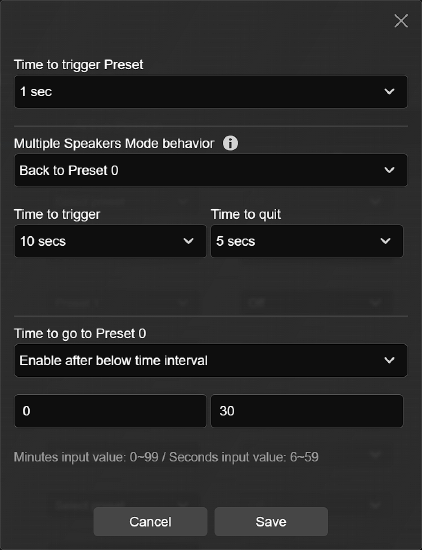
Time options.
- Time to trigger preset: Sets how long before changing to the preset once detected.
- Multiple Speaker Mode behavior: This preset is triggered when 3 different voices are detected. It follows the time parameters before quitting.
- Time to go to Preset 0: If there's no voice detection within the time parameters, preset 0 will be selected on the last camera source.
This is the overview of the AVer MT300 web user interface > Profile settings.
If you are challenged by Tesira for credentials, a popup will appear. The challenge only appears if the password has changed since the previous challenge.
Plan and assign camera preset shots
If not already completed, creating the room layout in Conference Room Designer will guide placement of Parle microphones. This layout becomes an excellent map to work with during setup and commissioning. That said, hand sketches can be used instead. The main point is to document the room furniture to plan and set camera preset shots. The following is a common layout built with the Conference Room Designer:

Now, plan and mark the camera preset shots. The following is one concept that captures two seats per camera preset:

- Notice the preset numbering starts with 21. This is strategic as AVer recommends reserving 0-20 for internal reserved uses.
- Also be aware that this linear string of preset numbers 21-27 are to be shared across the cameras.
- If the system utilizes three cameras, the following may make sense:
- Cam 1 - Center - Covers presets 21, 24 & 27.
- Cam 2 - House Left - Covers presets 22 & 23.
- Cam 3 - House Right - Covers presets 25 & 26.
- Experience indicates each camera preset should frame three participants with one seat/participant overlap between presets.
- If the system utilizes three cameras, the following may make sense:
Channel and preset mapping relating to the Parle-X series
Once you have configured the Camera Groups and saved camera presets, you will be presented with channels that will correlate with audio channels from the Tesira configuration for each group.
- You need to consider which Camera Group is best for audio channels.
- For example, the House Left camera is used for presets 22 & 23 on the right side of the table.
- The House Right camera is used for presets 25 & 26 on the left side of the table.
- The Center camera will cover presets 21, 24 & 27 with video tracking as an option.
- You must not assign the same audio channel to multiple Camera Groups. You can not have two groups trigger different presets based on the same active audio channel. This mechanism decides which camera to switch to.
- Less is more. Not every channel will be used for presets. For example, 1 zone 45 degrees from the Parle-X is a reasonable area
- Potentially the size of a seating position at the head end of the table in a medium conference room.
- Camera preset 0 on each Camera Group is used for the home position. The home position is always engaged on the last active camera.
- The number of channels is determined by the way the camera groups are configured initially.
Example scenario
The typical scenario will be 2 Parlé TCM-X Beam Tracking microphones.
- You will be presented with 16 channels subscribed from 1 Parlé TCM-X 2 ch block.
- The Biamp logo on the microphones always facing the same direction as those on the others.
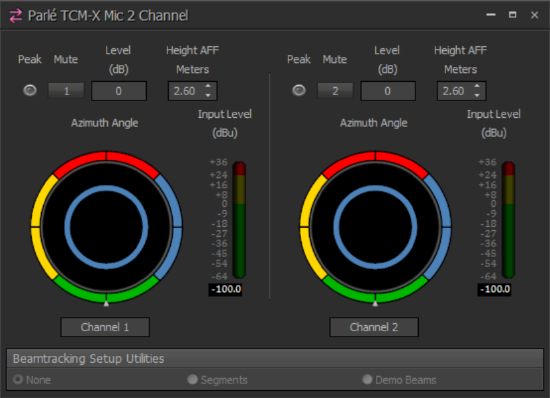
In the images below, the AVer MT300 is mapping the 16x channels. The Parlé Azimuth zones have shifted to align with practical in-room seating locations,

Now, if we apply this to the room concept, the association between audio channels as defined in AVer GUI and the orientation of the Parlé TCM-X microphones:

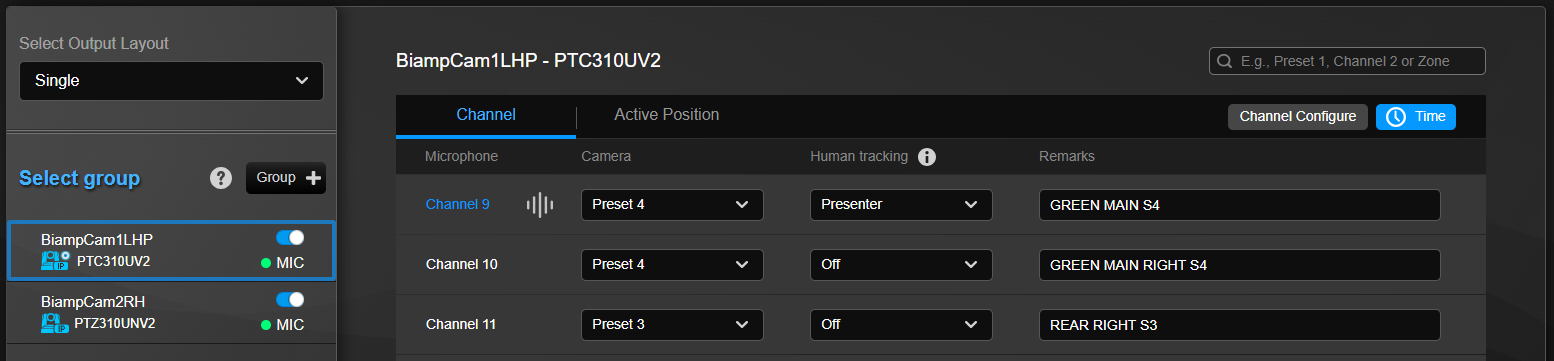
Setting camera presets
To set camera presets using the AVer MT300 Matrix Tracking Box, click on the three-line menu button of the group you wish to create camera presets for.
To assign camera presets to audio channels, talk in the desired zone or zones. An audio icon and highlight will identify which channel or channels are active. Use this as a guide to help assign camera presets to the your intended channels. Add notes in the Remarks field to identify the location.

Human tracking options.
AVer MT300 Matrix Tracking Box enables you to supplement audio tracking with video tracking. These options are built into specific AVer Cameras. We recommended minimizing the use of this feature to areas of specific importance such as the main talker position or stage position in conference spaces. For example in the main talker position in a conference room.
Typically, when a channel becomes active, the camera preset will switch; human tracking enables; and the camera locks onto the talker in the video. When another channel becomes active, the camera preset will switch, and human tracking is disabled. .
Human tracking modes:
- Presenter.
- Zone.
- Hybrid.
More information regarding these options can be found in the AVer Guides.
To enable Human tracking, select the option in the drop-down.
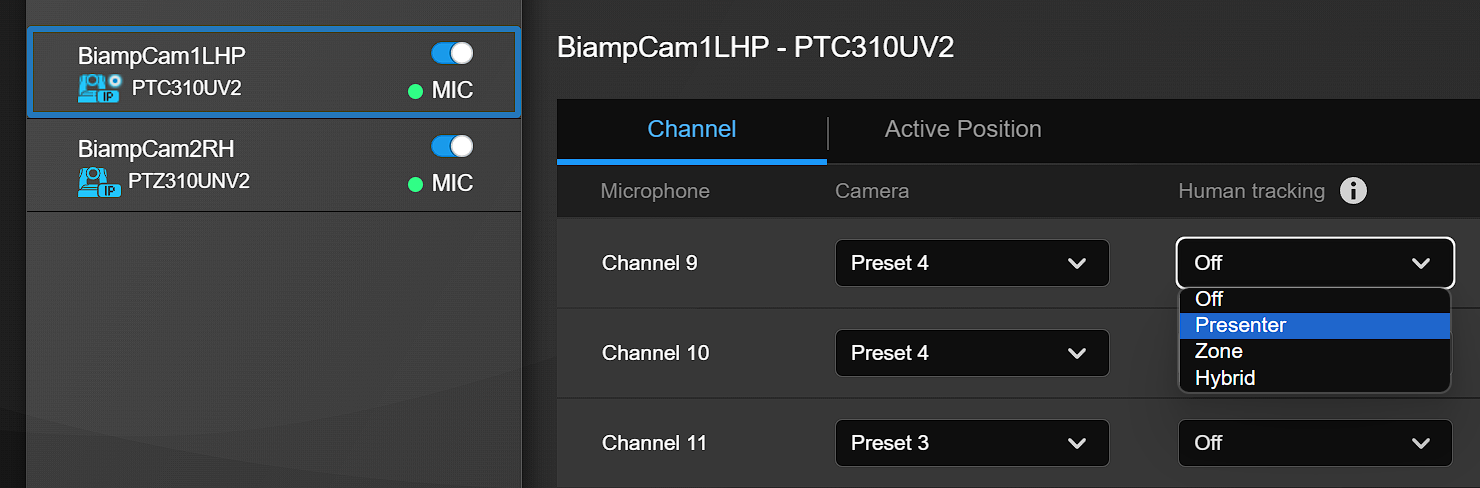
Again, we recommend only enabling Human tracking in one channel.