Tesira device discovery methods
In this article, basic networking concepts will be summarized to better understand how Tesira servers are discovered over networks. We will also go into detail about each discovery method for Tesira software. It is our objective that by the end of the article, you will understand how devices are discovered by the software and which network protocols are used for device discovery and communication.
Basic theory on device communication
What communication protocols are used to discover Tesira servers on a network?
- TCP for connecting using the Device List
- UDP Broadcast for Auto Discovery
What type of data is sent over the Ethernet network in Tesira?
AVB and CobraNet interfaces transmit audio only, whereas the control ports on a server’s SNC-1 or SNC-2 card are used for:
- Discovering units on a network.
- Loading new DSP programs.
- Remote monitoring.
- Control communication between servers and expanders.
- 3rd Party control communication.
In order to control, load new DSP programs, or just monitor a Tesira system, an established communication path between the software and the server(s) is required.
In Tesira, the communication between the software and any device is established automatically when:
|
 |
|
 |
|
 |
|
 |
We are able to choose how the software connects to a system. The available methods will be explained below.
Basic networking concepts
TCP
TCP stands for Transmission Control Protocol and is one of the core protocols of the Internet Protocol (IP) suite. There are many aspects of the protocol that won’t need to be discussed in detail, but here is a summary of what is relevant to know about:
- TCP creates reliable connections from one IP node to another. An acknowledgement is sent upon data reception.
- The 3 phases of the TCP connection are 1) Establish Connection, 2) Send Data, 3) Terminate Connection upon completion.
- In order to establish communication, the IP address of the destination is needed. In this case it’s the IP address of the Server or Server I/O to which we would like to connect.
To better illustrate how TCP works, think of TCP as registered mail. The sender first needs to know the address of the recipient and because it is a reliable service, it will get confirmation whether the letter was received or not.
- The process of sending a registered letter is analogous to sending a data packet.
- The mailing address is analogous to the IP address of the device you want to connect to.
- Finally, the confirmation upon delivery is analogous to the data packet sent back to the PC to acknowledge the presence of a device on the network.
UDP broadcast
UDP stands for User Datagram Protocol and is also one of the core protocols of the IP suite. As for the broadcast term, it describes the process of broadcasting packets to an entire subnet. (e.g., 192.168.1.001 to 192.168.1.254).
- UDP does not provide the reliability of TCP.
- UDP broadcast may be bandwidth usage intensive if you have a large network.
- UDP may be blocked by firewalls or managed switches.
Going back to the mailing analogy, think of UDP broadcast as a large mail advertising campaign in the state of Oregon. In this case the sender doesn’t know if a potential client will receive it or not and it is uncertain how many clients will reply to the advertisement.
- The process of doing a mail campaign is analogous to broadcasting a data packet over the network.
- The state of Oregon is analogous to the IP address subnet.
- Finally, the potential clients are analogous to the devices on the network that start communicating with the PC once the communication path is established.
Host names
In large network environments, host names can help to make life easier when a large number of devices need to be connected and managed. Obviously it is easier to remember a domain name like: “biamp.com”, “google.co.uk” or even “ServerIO-7.local”, than a cryptic IP address. But since all communication between these network devices is still based on IP addresses, a link between host name and IP address is required. This process is called domain name resolution, which can be provided by a Domain Name Server (DNS). A DNS server can be configured with the hostnames and IP addresses of each device on its network, and the server distributes that information to any network device that asks for it.

Figure 1 – Host Name and DNS settings in Device Maintenance
mDNS
Devices that support multicast DNS (mDNS) can resolve hostnames into IP addresses without the need for a Domain Name Server. The client machine (e.g. your PC), looking for the given host's IP (Tesira server), sends an mDNS multicast (UDP port 5353) query message to all the hosts sharing its local network. Then the corresponding host replies with a multicast message that announces itself. With this reply, all machines in the subnet (other Tesira servers) can update their mDNS cache with the given host's information (Host Names, IP addresses, etc.). The Hosts Table is also useful when a Tesira system spans multiple subnets, and the Tesira servers in each subnet need to resolve each other’s hostnames without the help of a DNS server. Note that the Hosts Table is only useful if IP addresses are static; if they are dynamic (because they are being assigned by a DHCP server), then the information in the Hosts Table will become incorrect when a Tesira server is assigned a different IP address by DHCP.
Using DHCP for servers and expanders
By default, Tesira devices are configured to obtain an IP address automatically from a DHCP server. Given that, connecting a new Tesira device to a network will result in one of two situations: if a DHCP server is present on the network, the Tesira server will be assigned an appropriate IP address automatically; or, if a DHCP server is not present on the network, the Tesira server will assign itself an available IP address in the “Link-Local” IP range (169.254.1.0 through 169.254.254.255). In either case, all new Tesira servers connected to the same network should obtain IP addresses that are in the same subnet, and therefore they should all be able to communicate with one another. Additionally, a computer that is connected to the same network (and is also set to obtain an IP address automatically) should obtain a compatible IP address and be able to discover any new Tesira devices.
Note that Tesira expander devices are discovered by proxy through server devices. When a Tesira server is discovered, it reports the presence of any expander devices it knows about to Tesira software. Tesira expander devices cannot be discovered if there is not a Tesira server on its local network.
Discovery methods in Tesira
Auto detect
By default, Tesira software discovers new devices on local networks independently. In the description above, it has been established this is done by broadcasting UDP data packets to all IP addresses on the PC’s subnet. Please make sure that both the PC’s NIC (Network Interface Card) and the device to be discovered are in the same subnet or that both have been addressed by a DHCP server.
When not to use auto detect discovery method?
- If a router is used to connect across subnets in the network. Remember that data packets will be broadcasted across a single subnet and will not reach devices on a different subnet.
- UDP broadcast method can take longer than TCP to discover units on the network.
- If the network is firewall-protected, UDP broadcast may not be permitted unless Port 61451 is opened.
Auto detect method (default) in Tesira software:
- Set the IP address of the PC’s Network card to the same subnet as the Server (IP Address can be displayed in front panel display) or use DHCP.
- Make sure the correct Network Interface Card is selected in Tesira software. Please note that it is possible to select multiple NIC’s, so please select only the interface(s) connected to Tesira network.
- Go to Tools > Options > Application Settings > Network > Device Discovery, and make sure Automatically detect devices on local segments is selected.

Figure 2 – Change device discovery options, Auto detect
- Connect to System or perform Device Maintenance to discover Tesira server(s).
Device List (TCP discovery)
We previously established that a TCP connection requires the user to supply the hostname(s) or the IP address(es) of the device(s) connected to the network.
When to use Device List?
- If a connection to remote systems/servers is required instead of local connected servers.
- If fixed IP addresses need to be used.
- If the Auto detect method was unsuccessful, TCP connect may allow passing through software/hardware firewalls.
Step by Step Device List set up in Tesira software:
- If connecting to a device on the same subnet, the IP address of the PC’s network card must be set to the same subnet as the server. If connecting across subnets with a router, the PC must be on the same subnet as the router, and both the PC and the server must have the correct Default Gateway specified.
- In Tesira software, go to Tools > Options > Application Settings > Network > Device Discovery
- If devices in both local and remote subnets shouldn’t get discovered simultaneously, please uncheck “Automatically detect devices on local segments”.

Figure 3 – Change device discovery options, Device list
- Click on Device List – in this window, the IP address(es) or hostname(s) of any device(s) can be entered. A local DNS server or mDNS is required if using hostnames.
Note that every Tesira server stores a host table of all Tesira servers in the same subnet. Whenever Tesira software discovers a server device, that server device will report the presence of any other Tesira devices on that subnet. Even if the software is set to connect to only one Tesira server in the device list, it will always discover all devices in the same subnet.
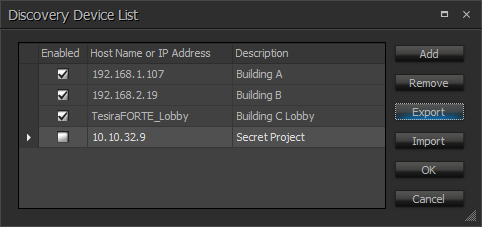
Figure 4 – Discovery Device List
- As of Tesira 3.13, the Discovery Device List allows:
- Enabling/disabling entries for discovery as needed.
- Import/Export option which allows the Discovery Device List to be a portable .csv file.
- This enables sharing among Tesira users or team members on a project.
- This could also be part of the post-project documentation that is handed over to the client/end-user or service team.
- Discover the device(s) via Device Maintenance or Connect To System.
Troubleshooting
- If Auto detect is unsuccessful, try connecting with TCP. There may be firewalls or routers preventing proper communication.
- If trying to connect via VPN or from outside the building, remember to open port 61451 in the firewall setup for TCP connection method.
- With TCP discovery method, if an error message similar to “…failed to connect to device 192.168.2.107” appears, it indicates that no units were found at the specified address. Always make sure that only IP addresses are entered into the device list when the corresponding Tesira server is currently connected to the network.
- While connecting across different subnets with a router, make sure a Default Gateway IP address (IP address of the router) is specified in the settings of the Network Interface Card of the computer and in the network settings of all Tesira devices on the remote subnet.
- In case there’s no DHCP Server present, please be aware that Tesira servers will self-assign an IP address in “Link-Local” IP range (see “Using DHCP…” above). Please make sure your PC’s Network card is set up to “Obtain IP address automatically” to ensure that the connected PC obtains an IP address in the “Link Local” range as well.