Adding a Tesira expander to an existing system
This article explains how to add a Tesira Expander-class device (EX-IN, EX-OUT, EX-IO, EX-MOD, EX-LOGIC) to a live Tesira system without interrupting audio in the existing portions. The article begins assuming that you have a computer with the Tesira software that is on a compatible subnet with the existing Tesira system.
Identify system type
First, we need to determine if the rest of your Tesira devices use static IP addresses or obtain IP addresses automatically via DHCP.
Start by identifying the network parameters of the existing system. This is done by starting the Tesira software and choosing device maintenance under the System→Network→Perform Tesira Device Maintenance menu (or the wrench icon in the Network Toolbar). This brings up the Device Maintenance dialog:

Select a Server-Class device in the Device List and click on the Network Settings button.
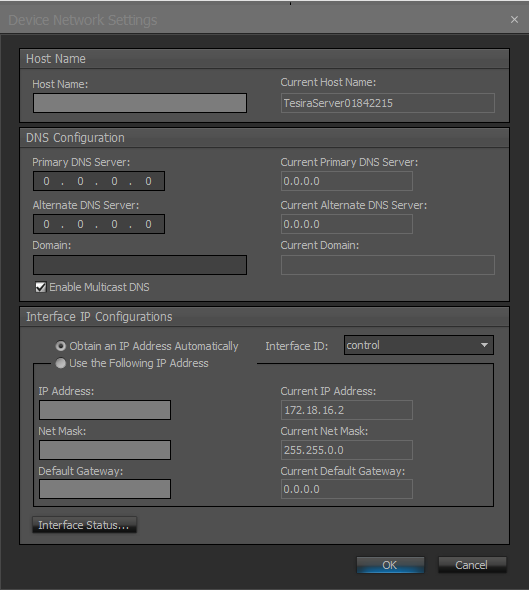
Look at the Interface IP Configurations section (bottom) of the resulting dialog to determine your system type:
- If the radio button for "Use the Following IP Address" is selected, proceed to the next section of this article, Configure a Temporary DHCP Server.
- If the radio button for "Obtain an IP Address Automatically" is selected, skip the next step and proceed to the Add new device to Equipment Table section.
Discover new device
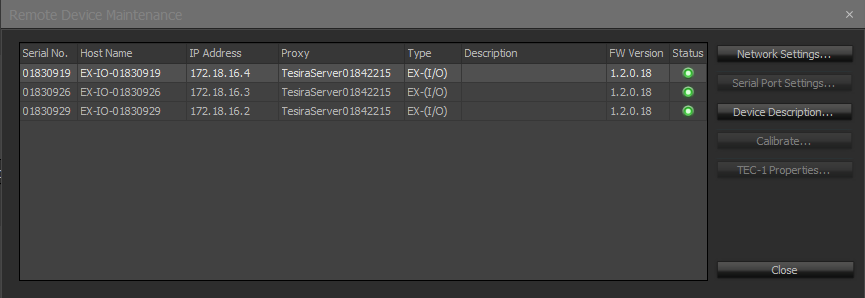
Once the new device has a compatible IP address, a Server-class device can discover and configure it. This can be confirmed by returning to the Tesira Device Maintenance dialog. Click the Remote Devices button and the new Expander-class device(s) should be seen on the network:
Since the other Tesira devices in your system have static IP addresses assigned, you'll want to assign static IP addresses on the new expander(s). You can do this from the Remote Device Maintenance screen shown above. Click the Network Settings button to assign a static address to each new device:

Add new device to Equipment Table
At this point, your new expander(s) should have an IP address that is compatible with the other Tesira devices on the network. You should be able to discover your Tesira devices in Tesira software.
Once discovered, now the new device can be added to the Tesira system. With the Tesira configuration file open, choose the System→Equipment Table menu item:
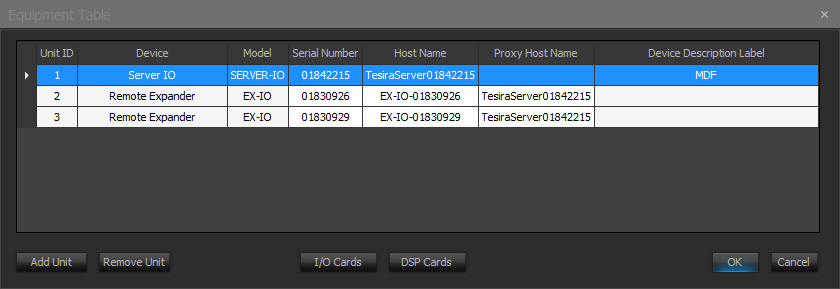
Click the Add Unit button. Click on the new entry in the table in the Device column. Choose the device type from the drop-down menu:
- Remote Expander - EX-IN, EX-OUT, EX-IO
- Rack-mount Expander - EX-MOD
- Logic Box - EX-LOGIC
Now click in the new entry in the table under the Serial Number column. Select the serial number of the new device here. Finally, select a Proxy Host Name for the unit by clicking in that column in the table. The complete entry should resemble this:

Click OK to confirm the assignments. Now DSP Input/Output blocks can be inserted for this device into the Tesira signal flow. Once the updated configuration file is sent to the system, the new expander device(s) should be active.
Any partitions of your partitions that are modified will briefly suspend their audio while their configuration file is updated. Any other unmodified partitions will have uninterrupted audio while the other partitions are updated.