Vidi Content Cam 250
Designed specifically for the Microsoft Teams Room Content Camera feature, the Vidi Content Cam 250 delivers crystal-clear whiteboard sharing with automatic keystone correction and translucent layering technology, enabling remote participants to see content clearly even when presenters are writing on the board.
The Vidi Content Cam 250 offers a variety of mounting options that make it effective for whiteboards ranging from a standard 6 feet wide all the way up to very large 12 foot whiteboards.
Features
- 4K Resolution Vidi 250 camera w/ adapter cable
- Wall mounting for 6-foot whiteboards
- Wall mounting with extension arm for up to 8-foot whiteboards
- Ceiling mounting for up to 12-foot whiteboards
- 50-foot USB extension cable included for flexible installation
- Optional TB-1 tile bridge accessory for suspended ceiling installations
- Seamless integration with any MTR system, including the Lenovo UC compute from Biamp.
Contents

Placement Information
The camera should be centered on the width of the whiteboard and no more than 6" [13mm] above the top of the whiteboard. It should be aimed at the vertical center of the board. Refer to the table for camera mounting details based on the width of the whiteboard.

Installation
The Vidi 250 camera can be mounted on either a wall or a ceiling, depending on your room layout and whiteboard size. Use the summaries below to guide your installation choice, and refer to the Content Cam Installation Guide PDF for diagrams, measurements, and step-by-step visuals.
- The current version of the user manual is available for download as a PDF on the biamp.com Downloads page.
Wall Installation (Quick Summary)
- Mount the baseplate to the wall above the center of the whiteboard.
- Choose arm length: Use the long arm alone or add the short arm for extended reach.
- Attach the hinge plug and screw the camera to it.
- Thread the USB-C cable and optional safety cable through the arm and base.
- Mount and align the camera on the whiteboard’s vertical center.
- Secure everything, tighten the hinge, and test using Biamp Camera Controller software.
For exact screw placements, cable routing, and assembly visuals, see pages 3–5 of the PDF.
Ceiling Installation (Quick Summary)
Two ceiling options are supported:
1. Drywall Ceiling
- Follows the same method as wall installation but mounted overhead.
- Maintain proper distance from the whiteboard as noted in the guide.
2. Drop Ceiling (Tile) – With 1 or 2 Tile Bridges
- Drill a hole in the ceiling tile at the correct offset.
- Assemble and secure the mounting arm with collar(s) and tile bridge(s).
- Route and drop the USB cable through the arm.
- Attach and align the camera as with wall mounting.
- Use safety cables to prevent falling in case of mount failure.
For ceiling mounting layouts and hardware placement diagrams, see pages 6–12 of the PDF.
Operation
Download and install the Biamp Camera Controller software on the room computer / compute device.
- Open the Biamp Camera Controller (BCC) app and enable the Flip option in the settings. This ensures the camera image is correctly oriented when mounted upside down using the included bracket in relation to the whiteboard.
- Choose the appropriate UC profile for the camera.
- Zoom in/out to capture the width of the whiteboard, and update any video settings to see the content clearly.

- Select the Correct Camera: Use the platform’s device settings (Teams or Zoom) to choose the Vidi 250 camera connected to UC system.
- Enable Content Camera Mode: Activate the “Content Camera” or equivalent option so the platform optimizes the view for whiteboards or physical documents.

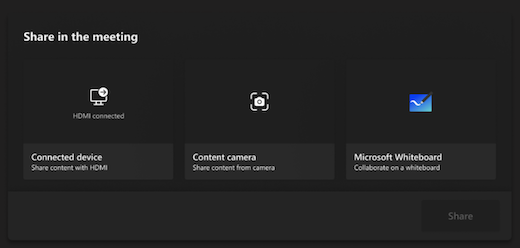
- Once you have joined a call, you can share the whiteboard camera by selecting Share
> Content camera > Share on the room console. The content camera will then be visible to both local and remote participants and will automatically frame the whiteboard area with proper keystone correction.