Avaya IP Office configuration for Vocia MS-1
The Biamp Vocia Message Server (MS-1) includes a feature that allows pages to be initiated over any VoIP system that adheres to the SIP (Session Initiation Protocol) standard. This article details the steps required to configure an Avaya IP Office VoIP system to work with the Biamp Vocia MS-1.
Avaya configuration
First, we'll focus on setting up the Avaya IP Office server.
Verifying SIP license
The first step in setting up the Avaya IP Office system is to verify that the proper amount of SIP licenses are in place. The Vocia MS-1 connects to the IP Office system via a SIP Trunk. In order for this trunk to be setup, there must be a license assigned in the Avaya system. The steps to verify the license count are detailed below. If it is discovered that there are not enough licenses available, contact the VoIP Admin. 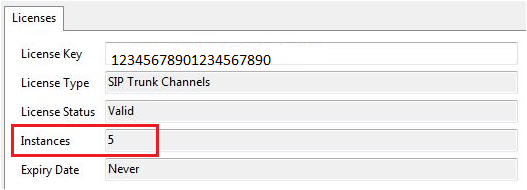
- Open the IP Office Manger software.
- Click on the Open Configuration from System selection.
- Select the server that will house the SIP Trunk line from the list and log in.
- In the IP Office Directory Tree expand the server's menu then select License => SIP Trunk Channels.
- Ensure that there is at least one License Instance available to assign to the SIP Trunk. This license will be used to facilitate the MS-1 SIP Trunk connection.
Creating a SIP Line
Add SIP Line support to the VoIP system.
- In the Directory Tree right click on the Line menu then select New => SIP Line.
The following steps detail the settings on each individual tab for the SIP line settings. Any settings not specifically mentioned can be left at default.
 |
 |
 |
 |
 |
- The Line Number will automatically select the next number in sequence.
- Enter the IP Address of the VoIP port of the Vocia MS-1 in the ITSP Domain Name Field.
- All other values may be left at default.
Transport Tab
- Enter the IP Address of the VoIP port of the MS-1 in the ITSP Proxy Address filed.
- Set the Layer 4 Protocol to UDP.
- Set the User Network Topology Info to None
- Ensure the Send and Listen ports are set to 5060.
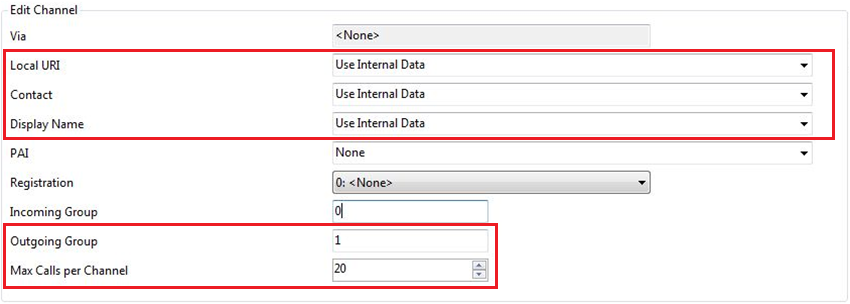
- Click Add to create a new SIP Channel.
- Set Local URI to Use Internal Data.
- Set Contact to Use Internal Data.
- Set Display Name to Use Internal Data.
- Set the Outgoing Group to any valid group number not used in this particular IP Office setup. Note the Group number used as it will be used later. Incoming Group is not required.
- Set the Max Calls per Channel to the represent the number of simultaneous calls that will be allowed to the paging system. The maximum number supported in Vocia is 20.
- Click OK to save the SIP URI settings.
VoIP Tab
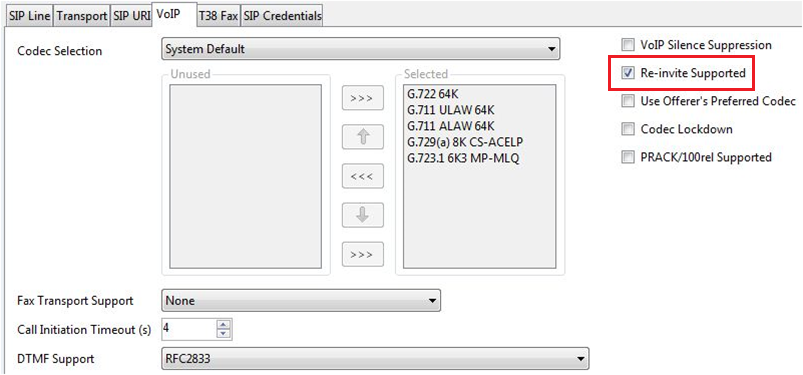
- Check the Re-invite Supported checkbox.
The MS-1 supports Digest Authentication and can challenge the IP Office system for a User/Password when a call is placed. Note that these settings must match between IP Office and the MS-1 exactly or a call will not be established. This step is optional and if this feature is not desired proceed directly to the Short Code Settings section.
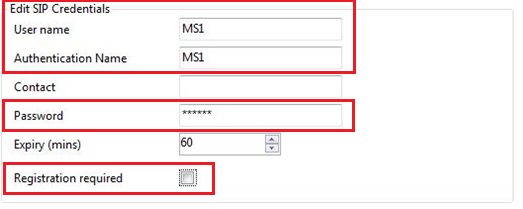
- Click Add to create a new SIP Credentials entry.
- Enter a User name.
- Place the exact same entry in the Authentication Name as was used in the User Name filed.
- Enter a Password.
- Uncheck the Registration required box.
- Click OK to save the SIP Credentials.
Short Code settings
Short Codes are used in IP Office to define the rules by which extensions are routed to the MS-1 via the SIP Trunk. There are a number of variables that can be put into place to setup proper call routing, this document will touch on the basics. For more information on setting up Short Codes consult the IP Office documentation or contact Avaya.
Short Code example
Short Codes allow you to setup a routing trigger from the phone system that is based off of a specific dial sequence. In the following example the assumption is made that all paging extensions will start with the number 7. The numbers after the leading 7 will define the specifics of the page (zone assignment, type of page, priority, ect.) and will be included in the packets sent to the MS-1. As an example a phone user could enter 7123 to trigger IP Office to send a call to ext. 123 in the MS-1. 7321 would trigger ext. 321 to the MS-1.
 In the IP Office Directory Tree expand the server's menu then select the Short Code menu.
- Either modify an existing Short Code that meets your needs or right click on the Short Code entry and create a new Short Code.
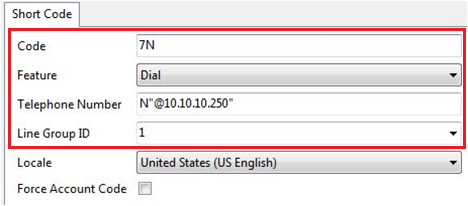
- Enter a code. In the example shown, the leading route trigger is a 7 followed by an N which represents any other number after a 7.
- Select Dial in the Feature field.
- In the Telephone Number field enter N"@xxx.xxx.xxx.xxx" where the X's must represent the IP address of the Vocia MS-1. Note that everything after the N is contained within double quotes.
- Select the Line Group used on Page 2, SIP URI Tab, Step 5 of this document.
- Click OK.
- Repeat these steps for any additional routing rules needed.
Vocia configuration
After completing the configuration of the Avaya server, several options in the MS-1 will need to be set to match the Avaya settings.
General tab
- In the Vocia software, open the MS-1 dialog.
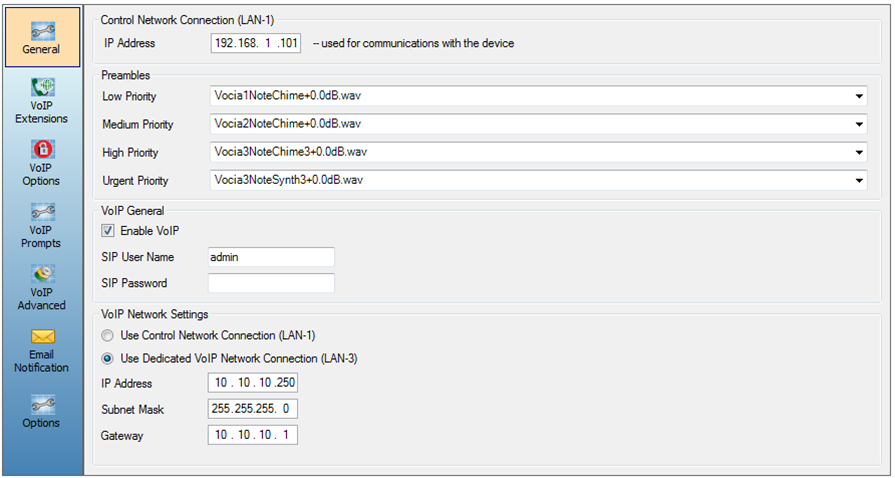
- In the General tab, check the checkbox for "VoIP Enabled".
- Check the checkbox for "Use Dedicated VoIP Network Connection (LAN 3)".
- Enter the IP Address for the MS-1 VoIP Port. The IP address entered here must match the IP address entered into IP Office (see SIP Line Tab, step 2).
- Enter an appropriate Subnet Mask & Gateway. If you’re not sure what this should be, contact the VoIP system administrator.
- Follow one of the two following steps, depending on the whether Digest Authentication is used in your VoIP system:
- If Digest Authentication is not used in IP Office, enter any information in the SIP User Name field. The actual value of these field is unimportant, it simply needs to be populated in order to save the MS-1 configuration.
- If Digest Authentication is used in IP Office, enter the Username and Password used for IP Office’s SIP Credentials in the SIP User Name and SIP Password fields of the MS-1. The values used here must match exactly or the connection will fail.
VoIP Extensions tab
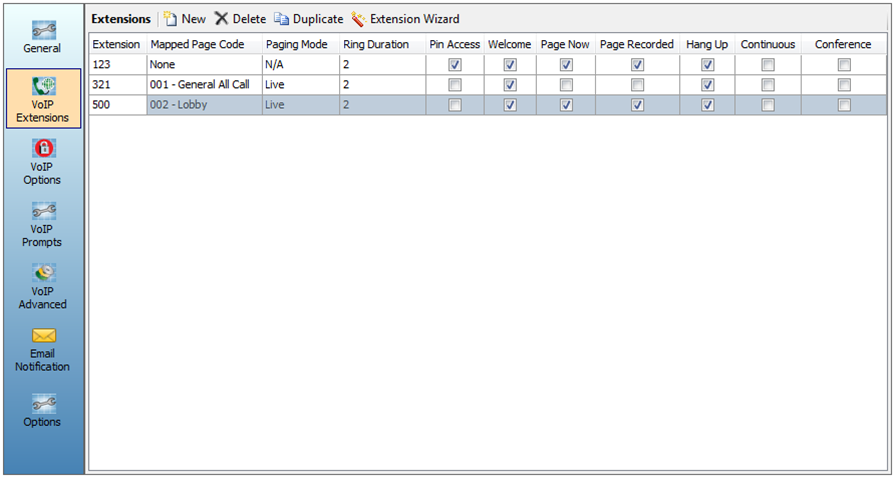
Extension mapping is required in the MS-1. A minimum of 1 extension must be setup in the MS-1 for proper operation. Additional extensions can be added to map extensions to specific page codes. For more information of the setup of individual MS-1 extensions reference the Vocia Help System.
- Select the VoIP Extensions tab.
- Enter an extension number in the Extension Field. The extension is base is based from the Short Code routes setup in IP Office. In the example used in the IP Office setup the user would dial 7123 and extension 123 would be routed to the MS-1. The MS-1 would then follow the page code setup show for extension 123 below. Additionally, the phone user could dial 7321 and 7500 to access the other page code options below.
- Enter additional extensions as required by clicking “New”.
- Note that the MS-1 VoIP paging feature supports the use of PIN groups. To enable this, first create the PIN Group(s) in the Universe Properties window, and then select the appropriate PIN Group(s) in the VoIP Options tab of the MS-1. If PIN Access to the paging system is not desired, leave the PIN Access box unchecked for all extensions.
VoIP Advanced tab
This section of the article describes the security settings that need to be set. The settings listed here are dependent on whether Digest Authentication was enabled in IP Office (see SIP Credential Tab settings). All other settings are normally left at default.
Settings if Digest Authentication is NOT enabled in IP Office: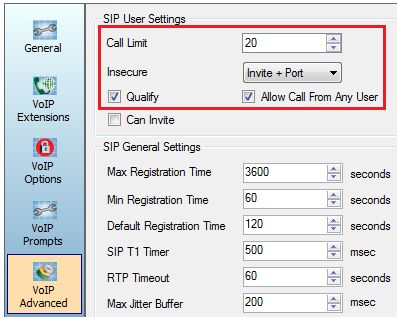
If Digest Authentication is DISABLED in IP Office, follow these steps.
- Select the VoIP Advanced tab.
- Set the Call Limit to be equal to the Max Calls Per Channel setting on Step 6 of the SIP URI Tab.
- Set the Insecure pull down menu to Invite + Port.
- Check the box labeled Allow Call From Any User. *
- Click Save. **
* If you do not see this option you need to upgrade Vocia to version 1.5 or higher.
** The Vocia Configuration must be loaded to the MS-1 in order for changes to take effect.
Settings if Digest Authentication is enabled in IP Office:
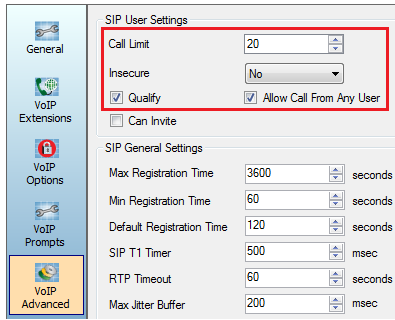
If Digest Authentication is ENABLED in IP Office, follow these steps.
- Select the VoIP Advanced tab.
- Set the Call Limit to a equal to the Max Calls Per Channel setting on Step 6 of the SIP URI Tab.
- Set the Insecure pull down menu to No.
- Check the box labeled Allow Call From Any User. *
- Click Save. **
* If you do not see this option you need to upgrade Vocia to version 1.5 or higher.
** The Vocia Configuration must be loaded to the MS-1 in order for changes to take effect.