ShoreTel VoIP configuration for Vocia MS-1
The Biamp Vocia Message Server (MS-1) includes a feature that allows pages to be initiated via a VoIP system that adheres to the Session Initiation Protocol (SIP) standard. This document details the steps required to configure a ShoreTel VoIP system to work with the Biamp Vocia MS-1.
ShoreTel configuration
Verifying SIP licenses
The first step in setting up the ShoreTel system is to verify that the proper amount of SIP licenses are in place. The Vocia MS-1 can accept up to 20 simultaneous calls placed to the paging system. The ShoreTel system will require a SIP Trunk License for each call placed at once. For example if the requirement is a capacity of 4 phones making a page at the same time it would need to confirmed that there are at least 4 SIP Trunk Licenses. The steps to verify the license count are detailed below. If it is discovered that there are not enough licenses available, contact the VoIP Admin.
- Go to Administration→System Parameters→Licenses→Requirements.
- ShoreTel SIP Trunk License Purchased must be equal or greater than the number of simultaneous calls to be placed to the paging system. Purchased Licenses will move to Configured Licenses after the Trunk has been setup.
SIP Trunk port
Add SIP Trunk support to an existing switch.
- Go to Administration→Platform Hardware→Voice Switches/Service Appliances→Primary.
- Select the switch that you'd like to configure with the SIP Trunk.
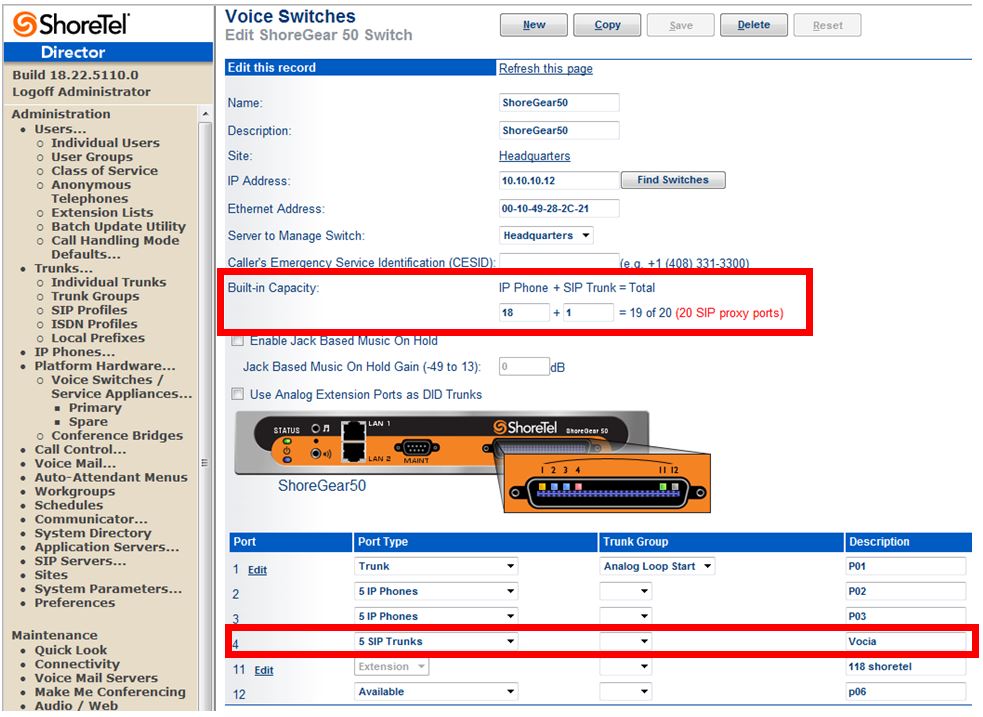
- Update the Built-in Capacity to include a SIP Trunk. A single trunk is all that is necessary. Note that SIP proxy ports cannot equal 0. If the SIP Proxy Ports do equal 0, reduce the IP Phone count by 1.
- Choose an available port and select 5 SIP Trunks from the pull down menu.
- Add a description for the SIP trunk.
- Click the "Save" button.
Trunk Group
The steps below outline the process of creating a new SIP Trunk Group. Note that any configuration settings not explicitly detailed in this section can be left at the default value.

- Go to Administration→Trunks→Trunk Groups.
- Select the site you would like to add a new Trunk Group to.
- Change the type of trunk to SIP.
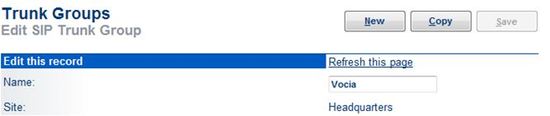 Click "Go".
- Create a Name for the new Trunk Group.

A note about system security
VoIP systems can offer additional security by enabling Digest Authentication. If Digest Authentication is enabled, the Vocia MS-1 will require an encrypted password to be sent when a call is being setup. If the passwords between ShoreTel and the MS-1 match, the call will move forward. If they do not, the call will be denied. Digest Authentication is not required by the MS-1 and its use should be determined by the security requirements of the VoIP network. This Tech Note outlines the steps that need to be taken for both circumstances, however the system will only be configured for one option or the other. Digest Authentication steps are valid for Step 6 only, all steps on the following pages should be performed whether Authentication is used or not.
- Setup For systems NOT using Digest Authentication

- Set Digest Authentication to None.
- Leave the Username and Password field empty.

- Setup For systems using Digest Authentication
 Set Digest Authentication to Outbound Only.
- Enter a Username.
- Enter a Password (case sensitive and must contain a minimum 6 positions).


- The Number of Digits from CO field must contain a number in order to create the Trunk Group, however the value of this number is not important. Enter a number in this field.
- Enter an Access Code for the Trunk. The Access Code will not be used when dialing the Trunk, however ShoreTel will not allow you to save the Group settings without a value. This value must be in line with the ShoreTel dial plan already in place.
- Enter the Local Area Code.
- Click “Save”.
- A Popup will occur asking if you want to make this Trunk available to all User Groups.
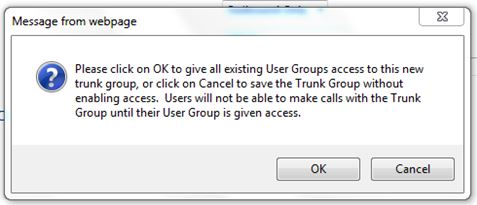 Clicking OK will assign the Trunk to all groups and is the focus of this Tech Note. If you click Cancel you will need to assign the Trunk to individual User Groups in ShoreTel.

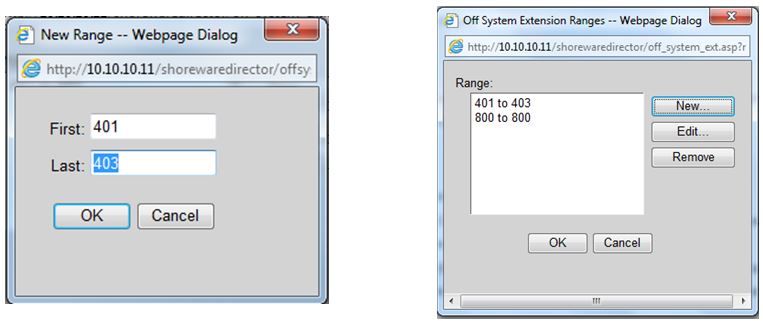
Setting the Off System Extensions
After the Trunk Group has been saved, the Off System Extensions must be set. The range of numbers must cover all extensions that will be reserved for paging. Vocia allows Page Codes to be mapped directly to extensions so a different extension could page a separate zone of the facility. The minimum number of extensions in Vocia is 1, the maximum is 1000.
- Remain on the Administration→Trunks→Trunk Groups page.
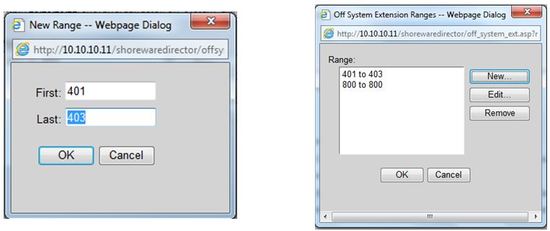
- Find the Off System Extensions parameter at the bottom of the page and click "Edit".
- Select New to create a new Range of extensions.
- Enter the First and Last extensions of the range and click “OK”.
- Repeat these steps as necessary for any other ranges to be included. When all ranges are defined click “OK”.
Adding the Trunk
- Go to Administration→Trunks→Individual Trunks.

- Select the Site and Trunk Group created in the previous section.
- Click “Go”.
- Enter a Trunk Name.
- Enter the IP Address of the Vocia MS-1’s VoIP port in the IP Address field.
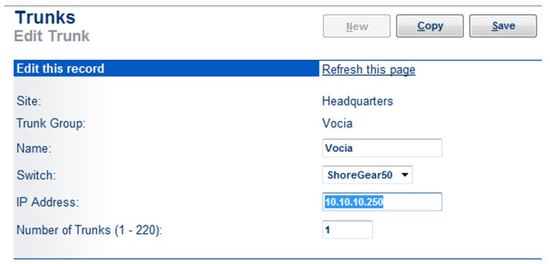
- Set the Number of Trunks to the number of simultaneous pages that can are expected to take place at the same time. As mentioned above, there must be enough SIP Trunk Licenses to cover this number. The maximum setting in this case would be 20. If the number of active calls equals this number, any further incoming calls will receive a busy signal.
- Click “Save”.

Trunk Setup in ShoreTel is now complete.
Vocia MS-1 setup
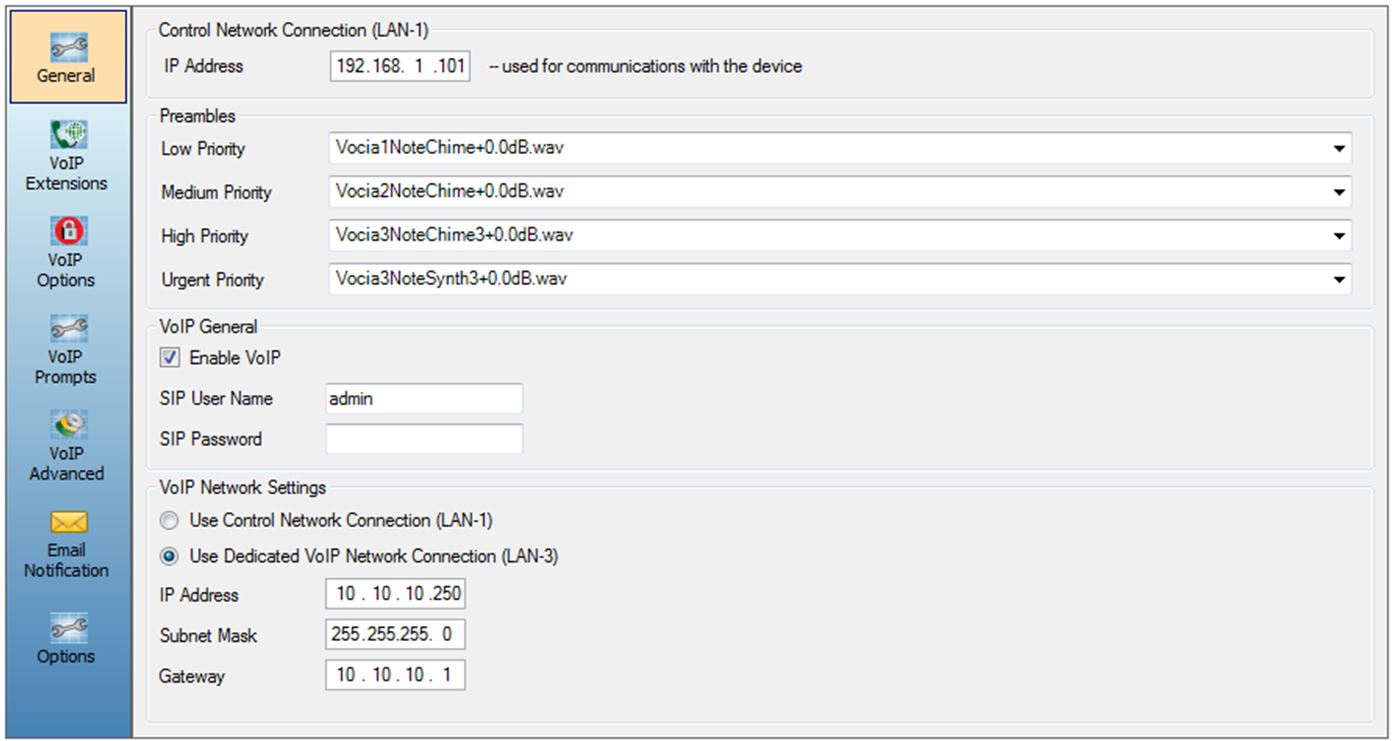
General Tab settings
After completing the configuration of the ShoreTel server, several options in the MS-1 will need to be set to match the ShoreTel settings.
- In the Vocia software, open the MS-1 dialog.
- In the General tab, check the checkbox for "VoIP Enabled".
- Check the checkbox for "Use Dedicated VoIP Network Connection (LAN 3)".
- Enter the IP Address for the MS-1 VoIP Port. The IP address entered here must match the IP address entered into ShoreTel (See Adding the Trunk Step 5)
- Enter an appropriate Subnet Mask & Gateway. If you’re not sure what this should be, contact the VoIP system administrator.
- If Digest Authentication is NOT used in ShoreTel (See Trunk Group Section Step 6a) enter the following:
- Enter information in the SIP User Name field. The actual value of these field is unimportant, it simply needs to be populated in order to save the MS-1 configuration.
- If Digest Authentication IS used in ShoreTel (See Trunk Group Section Step 6b) enter the following:
- Enter the Username and Password used in the SIP User Name and SIP Password fields. The values used here must match or the connection will fail.
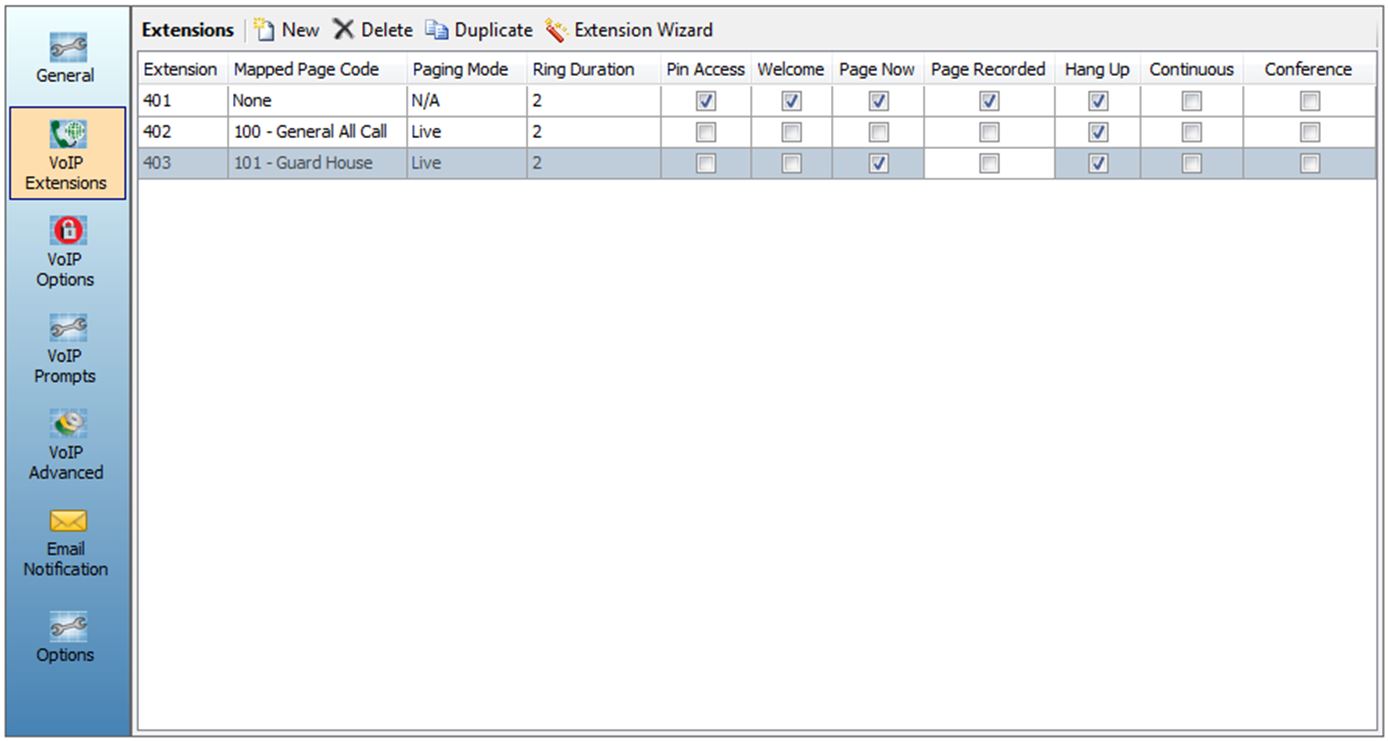
VoIP Extensions Tab setup
Extension mapping is required in the MS-1. A minimum of 1 extension must be setup in the MS-1 for proper operation. Additional extensions can be added to map extensions to specific page codes. For more information of the setup of individual MS-1 extensions reference the Vocia Help File or contact Biamp Applications Engineering.
- Select the VoIP Extensions tab.
- Enter an extension number in the Extension Field. This number must be included in the Off System Extensions range in ShoreTel. (See the Off System Extensions section of this document).
- Enter additional extensions as required by clicking “New”.
- Note that the MS-1 VoIP paging feature supports the use of PIN groups. To enable this, first create the PIN Group(s) in the Universe Properties window, and then select the appropriate PIN Group(s) in the VoIP Options tab of the MS-1. If the entry of a PIN Code to place a page is not a requirement of this system simply leave the Pin Access box unchecked.
VoIP Advanced Tab setup
This section of the Tech Note describes the security settings that need to be set. The settings listed here are dependent on whether Digest Authentication was enabled in ShoreTel (See Trunk Group Section Step 6). All other settings are normally left at default.
If Digest Authentication is NOT used in ShoreTel:
- Select the VoIP Advanced tab.
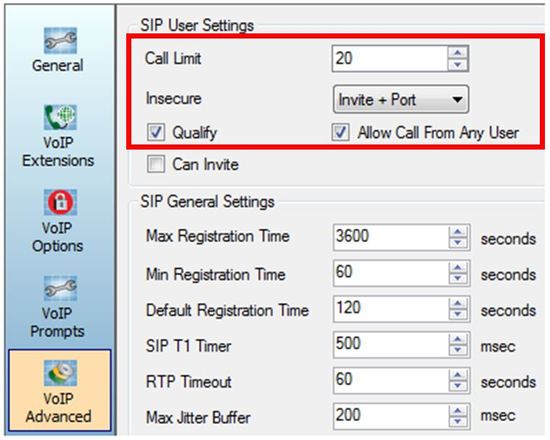
- Set the Call Limit to a number higher than the Number of Trunks setting in Step 6 of the Adding The Trunk section.
- Set the Insecure pull down menu to Invite + Port.
- Check the box labeled Allow Call From Any User. *
- Click Save. **

* If you do not see this option you need to upgrade Vocia to version 1.5 or higher.
** The Vocia Configuration must be loaded to the MS-1 in order for changes to take effect.
If Digest Authentication IS used in ShoreTel:
- Select the VoIP Advanced tab.
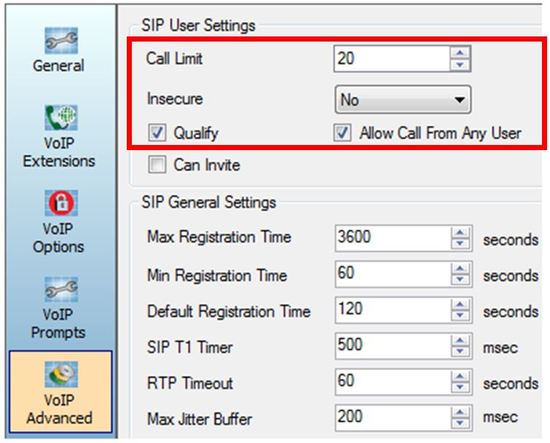
- Set the Call Limit to a number higher than the Number of Trunks setting in Step 6 of the Adding The Trunk.
- Set the Insecure pull down menu to No.
- Check the box labeled Allow Call From Any User. *
- Click Save. **

* If you do not see this option you need to upgrade Vocia to version 1.5 or higher.
** The Vocia Configuration must be loaded to the MS-1 in order for changes to take effect.