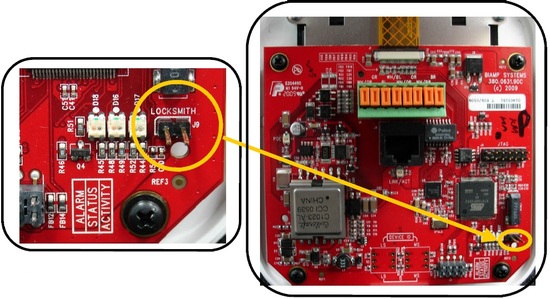
Configuring a RED-1 from its configuration menu
This article explains how to configure the RED-1 remote controller, from the remote's own configuration menu.
Accessing the configuration menu
An on board configuration menu can be enabled by briefly shorting the two pins of the "locksmith" header found in the bottom right corner of the printed circuit board.
Edit device ID
For the RED-1 remote controller to communicate with the corresponding block in an Audia/Nexia system, the ID of the remote must match that of the corresponding block. Multiple remotes can have the same ID as a single block in the Audia/Nexia configuration. To name the unit, scroll to the ID tag icon and press the select button. Then, use the scroll and select buttons to choose and set the desired characters.
Edit network settings
The default network settings of the RED-1 controller allows it to be discovered by an Audia or Nexia device that also has default settings. To edit the network settings, scroll to the network icon and press the select button. From there, you can navigate to each individual parameter and edit as needed.
Edit lock code
The RED-1 can be set to automatically lock after a certain amount of time or after the select button is pressed for over 2 seconds. Once locked, users will be prompted to enter the lock code to operate the remote. To set the lock code, scroll to the key icon and press the select button. Use the scroll wheel and select button to choose a 4 character lock code.
Edit display brightness
The RED-1 has two independent brightness settings, one for normal operation and another for dim display setting. To edit the brightness levels, scroll to the display brightness icon and press the select button. Use the scroll wheel and select button to adjust brightness.
Edit timeouts
The RED-1 provides three timers, one to lock the remote, one to dim the display and one to put the remote in sleep mode. To set the timers, scroll to the timeout icon and press the select button. Then, use the scroll and select button to make changes to the timers.
View device information
The information screen displays the serial number, MAC address, firmware version and system ID. This read-only information is useful when identifying devices from the Audia/Nexia software. To view information about the unit, scroll to the information icon and press the select button. Press the select button again to exit this window.
Exit
To exit the setup screen, scroll to the exit door icon and press the Select button.

