Creating a RED-1 configuration in multiple languages
This article explains how to change the the screen language displayed on the RED-1.
The RED-1 supports fonts for more than 40 different languages. Using presets we can quite easily provide a selection menu in the language of choice.
To type natively in a specific script, the language pack for the script needs to be installed on the computer. To enable Keyboard layout for a script, follow steps mentioned at this link: http://support.microsoft.com/kb/258824.
First step
This example is for a Lounge with source selection for CD, Radio, Microphone, Teleconferencing and Video Conferencing. The RED-1 Display in this example has 7 different languages to choose from and each selection presents the source selection menu in the chosen language.
Create the presets for selecting routing CD, Radio and Microphone for the source selection menu.
Second step
Now we need to create presets for the different languages. Open the control dialog for RED-1 and add 7 control channels

In this example the home screen would need 7 channels since there are 7 language choices.
-
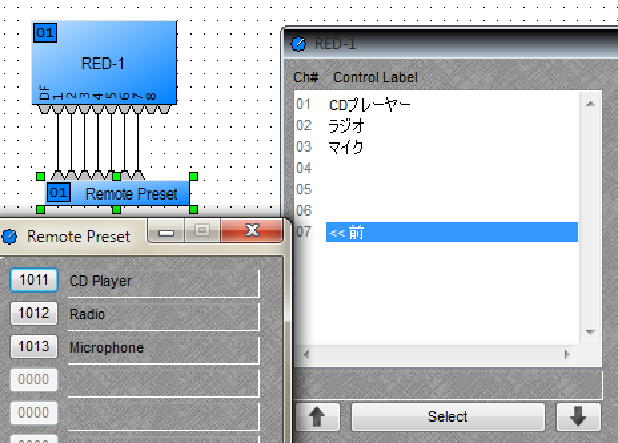
Create source selection menu for each language one by one and save them into a preset, eg. for Japanese copy and paste script for CD, Radio, Microphone and Home screen from an external word processor or some online tool.
-
Assign logic indexes 1, 2 and 3 respectively to each of these control labels.
-
Also add a ‘Back’ option in respective scripts and select the appropriate logic index (in this case, ‘4’).
-
Assign the CD, Radio and Microphone presets to the remote preset block connected to the RED-1 block.
-
Save these settings into a preset by including the RED-1 and remote preset blocks in the selected DSP blocks field. Name the preset ‘Japanese’.
-
Repeat these steps to create presets for the other languages, utilizing the same set of source selection presets.
Third step
-
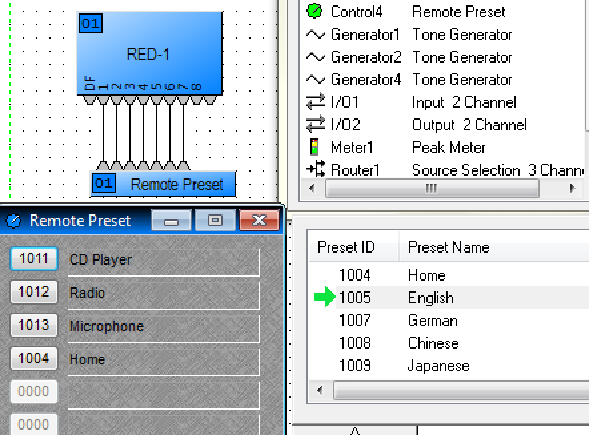
Create a Home screen page in the RED-1 control dialog by adding the language options in respective scripts.

-
Assign logic indexes 1 through 7 to these labels. In the connected remote preset block, assign the language presets created in the previous step. Make sure to match it with the control label and logic index. For example, if control label 01 is English with logic index 01, assign ‘English’ preset to the first node of the remote preset block.
-
Save these settings into a new preset including the RED-1 and Remote preset block in the selected DSP blocks field. Name the preset ‘Home’.
Fourth step
Finally, Edit the 7 language presets to associate the ‘Home’ preset to the ‘Back’ control label. Recall each preset from the preset window and add the Home preset to the remote preset block and select save.

Supported languages
The table on the next page lists the languages currently supported by the RED-1 firmware. More languages may be added in future updates.
| German | Swedish | Maltese | Spanish |
| Dutch | French | English | Romansh |
| Croatian | Hungarian | Greek3 | Finnish |
| Irish1 | Icelandic | Polish | Lithuanian |
| Turkish | Romanian2 | Portuguese | Chinese5 |
| Czech | Italian | Norwegian4 | Japanese6 |
| Danish | Latvian | Russian | Thai |
| Estonian | Slovak | Slovene |
|
Notes:
- Using extended Latin alphabet only. Gaelic type not supported
- Romanian is only supported with cedillas underneath S and T but not with commas.
- Only the basic Greek alphabet is supported. The Coptic alphabet is not supported.
- Only the Bokmål and Nynorsk written languages are supported
- Simplified Chinese
- Japanese – Hiragana, Katakana, Kanji (as written in Simplified Chinese using the Han unification)