Troubleshooting RS232 signals
The physical connection
When working with RS232 it is important to have a good understanding of the general principles of the communication standard, so if you are new to the field we recommend you to read this section regarding the RS232 topic.
When trying to find the problems in a serial signal like RS232, a common thing we see is that the wires have been crossed (or let's say, not crossed), because the receiving end of the cable needs to be connected to the transmitting part from the other end. In principle, it's like mouth-to-ear needs to be connected and when it's the other way round, it's like ear-to-ear or mouth-to-mouth which is not good for communication.
There are small gadgets like the DB9 signal testers you can put in between to test the connectivity, as seen in this article.
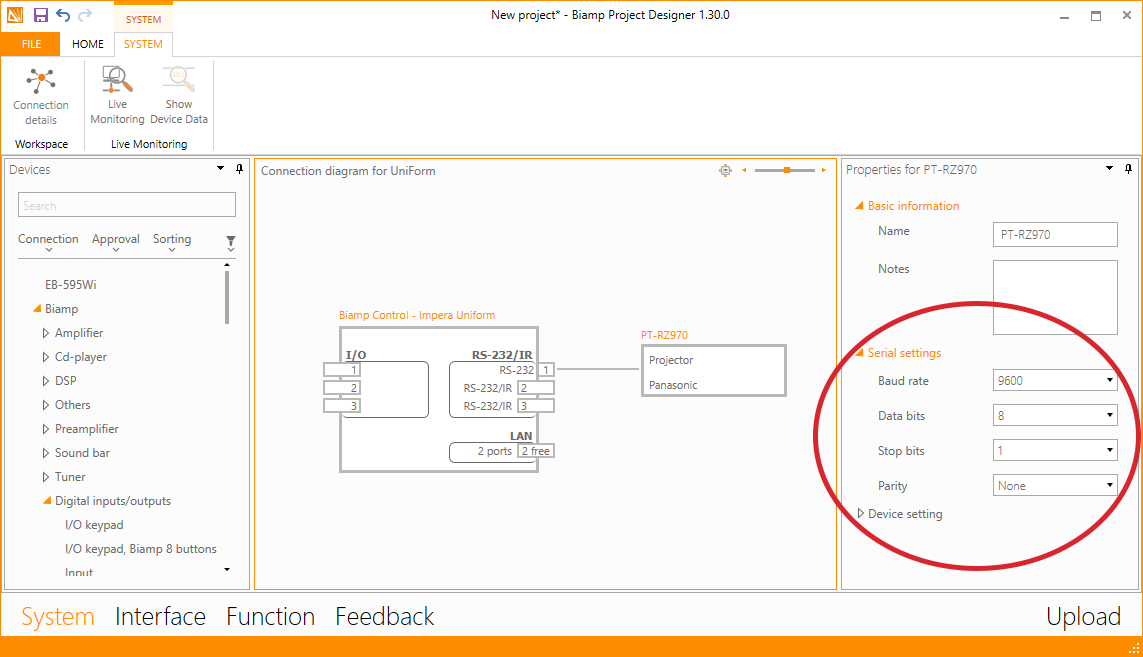
Also some of the easy things to check, besides swapping Rx and Tx, is to check if the baud rate (transmission speed) is set correctly. On some devices, you can choose between different speeds and on others, it's fixed.
In Project Designer it is easy to change the speed, just remember to re-upload to the controller for the changes to take effect.
Another external mistake we often see, is that when connecting to projectors and TV's, the manufacturers in the hunt for the green leaf sticker on the side of their products, often makes it necessary for them to turn off network and RS232 communication, out of the box. It is often called ECO mode or similar, so turn that mode off to make the communication start. An easy way to detect if this should be the case, is that you can control the device, when it is ON, but it is not possible to turn the device ON after you have turned it OFF.
These settings can sometimes be hidden in a service menu, so it can be necessary to contact the support for the given device in order to get the way into this menu.
Device driver:
In Project Designer, you will find devices that are "Biamp approved" and some that are not, the ones that are, mean that we have had the device on the test bench and verified that the timings and commands function correctly. However the devices we have launched as "not approved", are just made from the documentation the manufacturer has released and hence there can be errors in the commands, timings and settings for the driver. Therefore check and verify the commands, if you have a command that is not working as intended. If you find an error in one of our released drivers, please let us know, so that we can update it. Just contact Biamp Support and we will correct it.
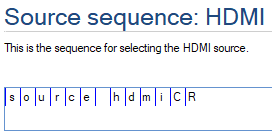
In the example below, there are different ways of writing the same command, but small tweaks are essential for making it work, e.g case sensitivity, CR (Carriage Return) and so on.
.png?revision=1)
.png?revision=1)
.png?revision=1)
n the previous example, you can see that CR is in two bytes (boxes,) meaning that it is two separate characters. and in HEX format C R is 43h 52h and a CR is 0Dh, so only 1 byte. making a big difference for the RS232 decoder in the device you wish to control.
The same goes for lower and upper case letters, e.g. a lower case "a" is 61h and an upper case "A" is 41h.
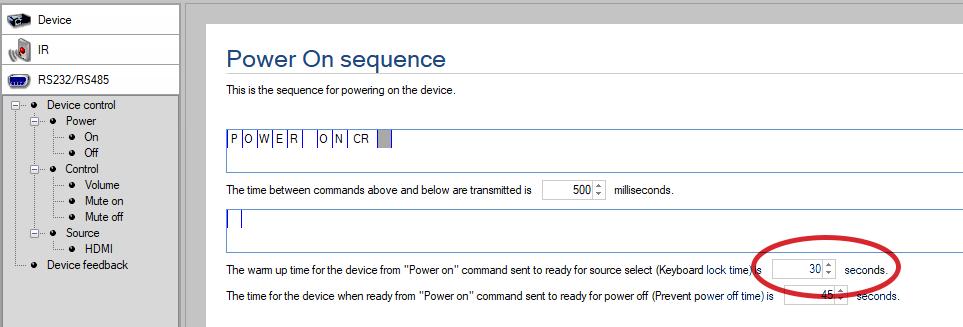
Timing
In the timing sections of the device, it is important to keep in mind the importance of having adjusted the timing correct. Here is an example:
When turning on a TV, the first thing that happens from the controller is that the ON command is sent, then a timer starts and when it runs out, the SOURCE command is sent (this is called the warm-up time). But if the waiting period between the ON command and the SOURCE command is too short, then the TV will not be ready for the SOURCE command, and the command will be missed by the TV. Resulting in the TV might not be on the correct SOURCE.
This is all set in the device driver initially but can be altered from Project Designer after you have added the driver.
In Device Editor you can see the example of the warm up time below:
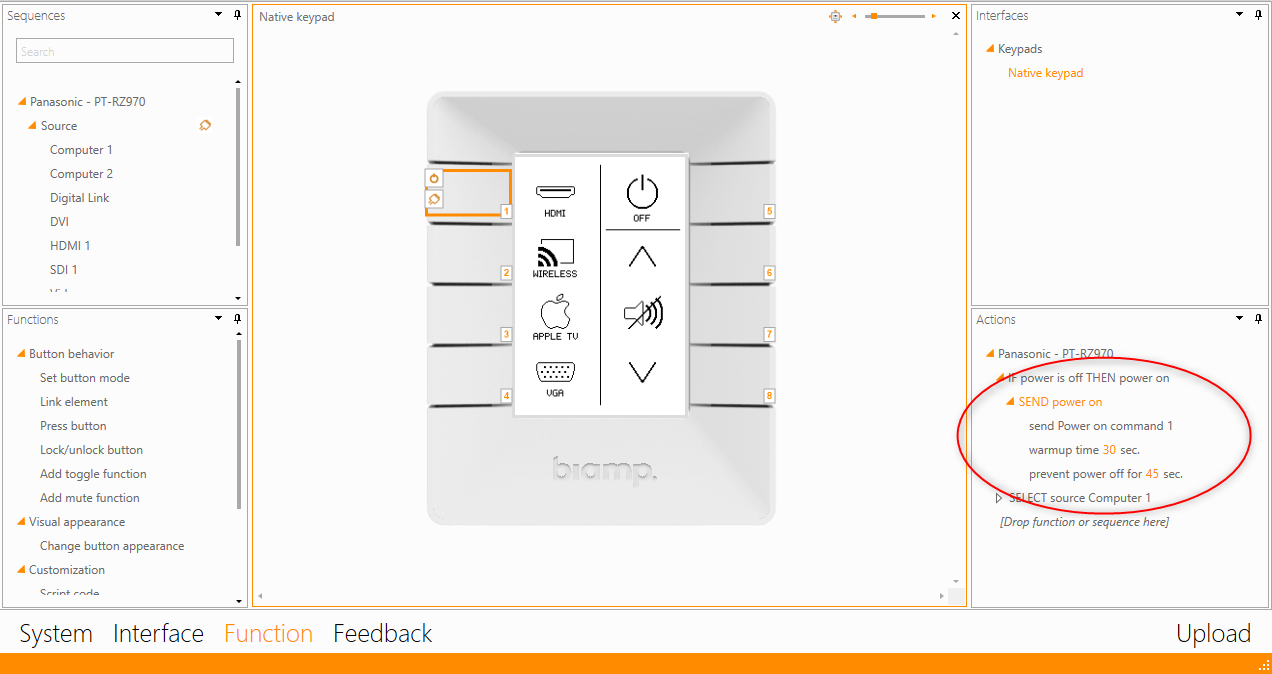
Here in Project Designer you can see the same timer and you can change it here as well, just double tap the numeric value and enter the new value.
Checksum
The transmitted signal is sometimes attached with a checksum calculation, where the sum of all bytes are added to provide a check for the sent message. This is to show the receiving end that the command is valid. If the calculation is done wrong, the receiver will simply discard the message!
This is especially important on levels, where the values change as soon as the user turns the volume up or down. Therefore the checksum will also change and needs to be recalculated by the controller.
There is a complete article on this topic right here.
Extending the signal range
You can use different devices to extend the somewhat limited range of RS232, this can be done with cat-extenders or maybe HDBaseT extenders. Problem is that it has been seen, that these devices add or subtract from the command strings sent by the Biamp controller.
In these cases, it is necessary to investigate the strings sent more thoroughly, more on that in this article.
Terminal software
To see exactly what is transmitted from one end to the other, it is necessary to monitor the signal with a piece of software. Many use an app called Hercules, here at Biamp we prefer the product called Docklight.
Read this article on how to use it!
It is important to have an RS232 port on your laptop, but most laptops don't have that anymore, therefore you will need this USB->RS232 adapter