Enabling USB video for Devio
By default, Devio is configured to pass audio only over USB and video over HDMI. However, it can also be configured to pass video over USB. The following article will explain how to do this.
Please note that, due to persistent compatibility issues between DisplayLink USB video technology and earlier versions of macOS , Biamp does not recommend using the USB video functionality in Devio with macOS-based computers below macOS 10.14 (Mojave). Also note that this only impacts USB video, so you could use a 10.12/10.13 macOS machine with Devio using USB for audio and data transfer, and HDMI for video (though this limits you to one HDMI output).
Enable USB video
By default, USB video is disabled for Devio. To enable USB video, the Devio must be discoverable and configurable in either the System Administration Utility (SAU) or device webpage. Instructions for enabling USB in either of these environments are below.
Enabling USB in the SAU
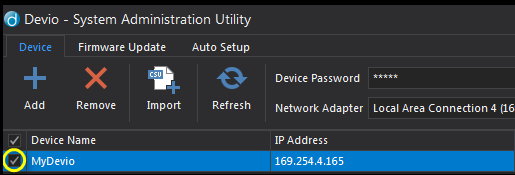
1. Connect to the Devio in the SAU using the instructions found in our article on Connecting to Devio.
NOTE: Depending on your computer's configuration and security settings, it may be necessary to launch the software with administrator rights in order to successfully connect to and configure the Devio unit. To do this, right-click on the Devio software icon and select "Run as Administrator."
2. Select one or more Devio units using the checkboxes on the left side of the SAU interface.
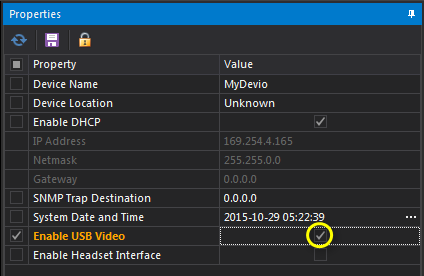
3. Under Properties, check the box in the Value column to the right of Enable USB Video. "Enable USB Video" should turn orange, indicating the value for this item will be modified.
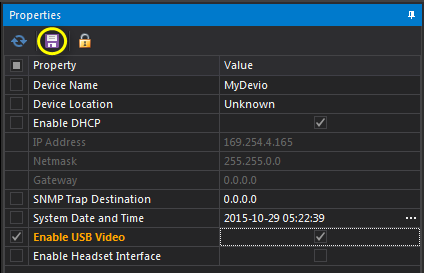
4. Click on the save disk icon at the top of Properties.
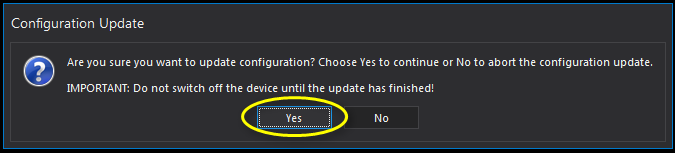
5. Click Yes on the Configuration Update dialog that will pop up to verify that the value should be updated.
6. Once the update is complete, the Progress column to the right of the selected Devio units will display a blue bar and "Finished" message.

Enabling USB in the device webpage
1. If the IP address of the Devio is known, you can enter that IP address into any web browser to access the device web page.
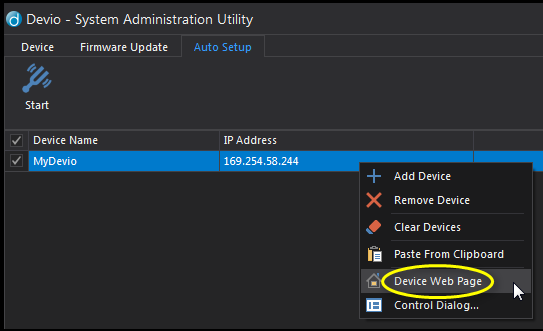
2. If the IP address of the Devio is not known, you will first need to discover the device in the SAU to learn its IP address. Once known, enter it into any web browser to access the device web page. You can also just right-click on the device listing in the SAU and select Device Web Page to launch this automatically in your default browser.
3. The webpage will require a password to access. By default, the password will be "devio". The password is configurable from the SAU, webpage, or Devio API.
4. Once connected to the webpage, you will first need to click on the pencil icon to begin editing the device's configurations.
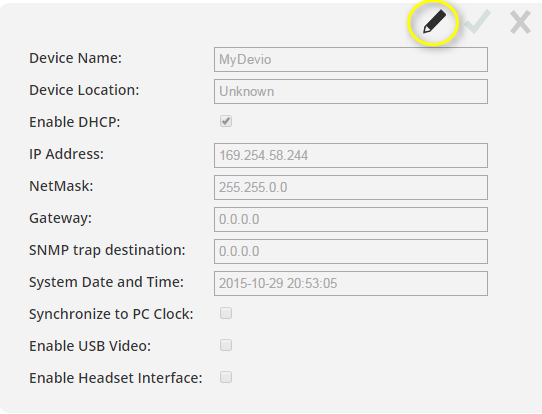
5. Check the box next to Enable USB Video, then click the checkmark at the top to apply this change.

Install the DisplayLink USB video driver
DisplayLink is a third-party USB driver that is required in order for video to flow over USB. The DisplayLink driver is not required for audio to pass over USB, as that can be handled natively by standard USB drivers.
Once USB video has been enabled on a Devio, connecting a computer to that device should cause the computer to automatically search for and install the driver. Once the DisplayLink driver is successfully installed, you will be able to pass video over USB from your computer to up to two additional displays connected to the Devio.
It is possible for the automatic installation of the DisplayLink driver to take longer than expected or to fail. This is most commonly caused by security restrictions, firewalls, or a lack of administrative permissions on the computer. If, for whatever reason, the automatic DisplayLink driver installation is not successful, the DisplayLink driver can still be manually downloaded and installed.
To download, go to http://www.displaylink.com/downloads. Select the appropriate operating system for your computer, then download and install the latest complete version of the driver for your system. It is not recommended to install a beta version of the driver.
For information on how to perform a corporate deployment of the DisplayLink drivers to some or all users at a company, see the guides available on DisplayLink's support website at http://support.displaylink.com/knowledgebase/topics/92322-corporate-deployment.
Configure duplicate or extended displays
Although some computers will be configured to automatically begin using the additional display(s), most will require that you select whether to duplicate or extend your primary monitor's display. When the computer is set to duplicate, it will show the same screen on all monitors/displays. When it is set to extend, it will treat all monitors/displays as a single, contiguous display. Shortcuts and hotkeys may vary depending on the exact computer system, but the display mode should be configurable using the following methods:
For Windows
- Press the Windows Key + P.
- While holding the Windows Key down, continue pressing P to select your desired display mode.
- Select either Duplicate or Extend.
