Performing Auto Setup on a Devio system
One of the key features of Devio is its ability to automatically configure itself for optimal audio in a conference room. This article will describe when, why, and how to utilize Devio's Auto Setup feature.
What is Auto Setup?
Auto Setup is Devio's method of automatically verifying equipment connections, adjusting volume levels, and configuring echo cancelation for optimal performance of a Devio system in a conference room.
The three primary components of Auto Setup are:
- Verifying the connection from the Devio to one or more DTM-1 microphones
- Verifying the connection from the Devio to a speaker
- Setting optimal levels for speaker output to ensure natural conversation and to prevent echo
When should Auto Setup be performed?
To ensure an optimal conferencing audio experience, Auto Setup should be performed if any of the following conditions are true:
- The Devio unit has never had Auto Setup performed on it before
- If this is true, the Auto Setup indicator LED on the front of the Devio will be solid red
- The previously attempted Auto Setup failed
- If this is true, the Auto Setup indicator LED on the front of the Devio will be solid red
- The position of the loudspeaker(s) or microphone(s) has been changed
- Auto Setup calculations are dependent, in part, on the relative position of loudspeaker(s) to microphone(s) in the room, and changing the positions of these without performing Auto Setup again can negatively impact audio quality and echo cancellation.
- Firmware has been updated on the Devio
- The Devio has undergone a Factory Reset
How to perform Auto Setup
While there are a few different ways to initiate Auto Setup, all of these methods will begin with a few of the same steps. Before initiating Auto Setup, make sure to first do the following:
- Connect the DTM-1 microphone(s) to the Devio via a CAT-5e or better cable. Position the microphone in a fixed location where it will be used for conferencing.
- Connect a loudspeaker to the Devio. Complete any additional installation work needed for this loudspeaker to be functional.
- Connect the power cable and external power supply to the Devio. Confirm that the Power indicator LED on the front of the unit is solid green.
Once these initial installation steps have been completed, Auto Setup can be initiated from any of Devio's main interfaces. These include the physical Devio device, the System Administration Utility (SAU) software, a web interface, and via API. Below are the steps to initiating Auto Setup with each of these methods.
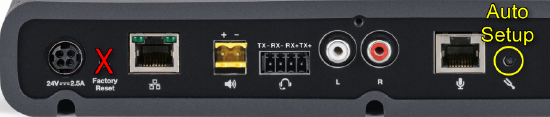
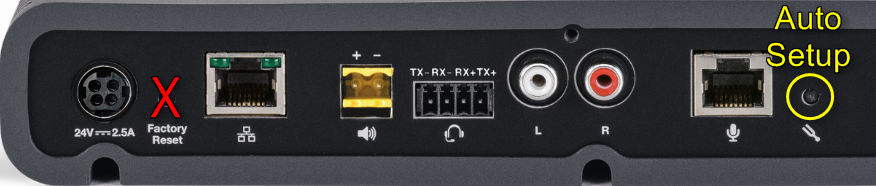
Initiating Auto Setup from the Devio unit
On the back of the Devio, there is a recessed pinhole button for initiating Auto Setup. Be cautious not to confuse this with the pinhole button for initiating a Factory Reset.
- Using an unfolded paperclip, pen tip, or similar narrow, solid object, press and release the Auto Setup button.
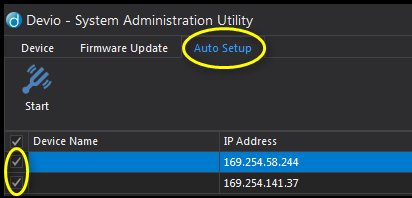
Initiating Auto Setup from the System Administration Utility
- Connect to your Devio in the SAU
- Select the Auto Setup tab, then select the device(s) on which you would like to run Auto Setup in the SAU's device list:

- If multiple devices are selected, they will initiate their own Auto Setup processes simultaneously, as this process takes place independently in the Devio
- If multiple devices are selected, they will initiate their own Auto Setup processes simultaneously, as this process takes place independently in the Devio
- Click the tuning fork icon that says Start to begin Auto Setup:


Initiating Auto Setup from the web page interface
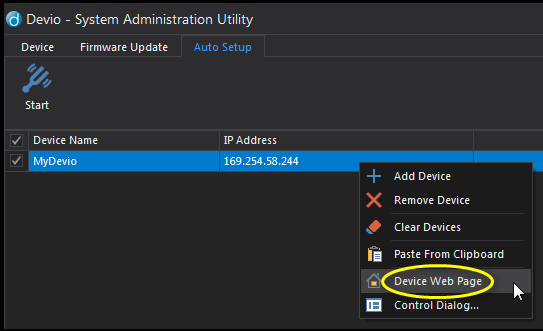
- If you know the IP address of your Devio, you can access its web page interface by simply entering that IP address into any web browser
- If you do not know the IP address of your Devio, you must first discover the unit in the SAU, then right-click on the device entry and select Device Web Page . This will automatically launch the Devio web page interface for this particular unit in a browser.
- The web page will prompt you for a password. This will be the same password that your Devio is set to within the SAU. By default, it is "devio".
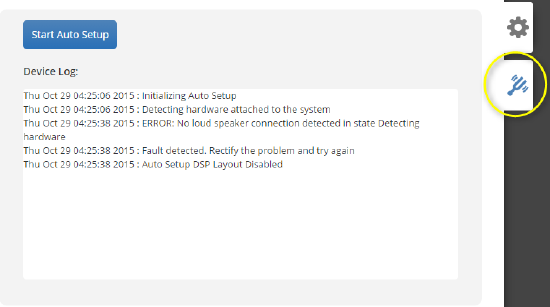
- Click on the tuning fork icon tab on the right side of the page. This will show you the Device Log for the most recent Auto Setup attempt (in the example below, no loudspeaker was attached to the Devio, so Auto Setup failed)
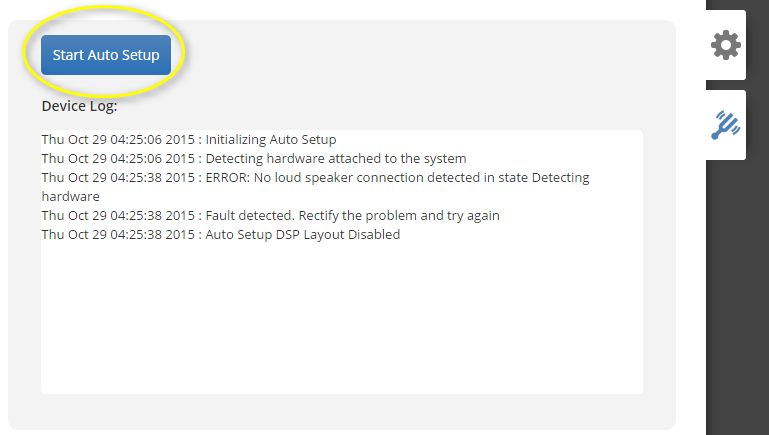
- Click Start Auto Setup to begin Auto Setup


Initiating Auto Setup via the Devio API
Using a terminal emulator, the Devio API can be accessed via the Devio's main control Ethernet port. This is a Raw connection, and requires user authentication upon initial connection. This will be the same password that is configured in the SAU. The default is "devio". Details of the Devio API can be found in the Devio help file.
- Connect a network interface on your computer to the control Ethernet port on the Devio

- Open the terminal emulator of your choosing. In our example, we are using PuTTY.
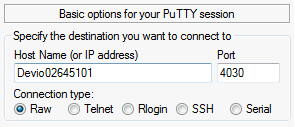
- Enter the following settings:
- Hostname or IP address of the Devio to which you are connected
- Connection type: Raw
- Port: 4030
- It should look something like this:
- Initiate the terminal connection by pressing Open in the terminal emulator or Enter on your keyboard
- Type in the device password and press Enter
- Enter the following command verbatim, then press Enter:
- DEVICE set initiateAutoSetup true
- DEVICE set initiateAutoSetup true
- This should begin the Auto Setup process


Auto Setup
Once Auto Setup has been initiated by any of the above methods, Auto Setup should begin immediately. It is important to remain quiet throughout the duration of Auto Setup in order to ensure that the system is able to test and calibrate itself successfully. You should experience the following:
- Devio will announce through the loudspeaker, "Beginning Devio Auto Setup."
- The Auto Setup indicator led on the front of the Devio will turn amber.
- The system will also announce what is occurring throughout the Auto Setup process.
- If Auto Setup is successful
- You will hear, "Auto Setup successful and complete."
- The Auto Setup indicator LED on the front of the Devio will turn solid green.
- If Auto Setup is not successful
- You will hear, "Auto Setup encountered an error. Please check the log for more details."
- The Auto Setup indicator LED on the front panel of the Devio will be solid red.
- Details of what caused Auto Setup to fail can be found in the Auto Setup log in either the SAU or web interface.