Performing a factory reset on Devio SCR
At times, it may be necessary to perform a factory reset on Devio. This may be to recover the unit from a fault state, to resolve networking or connectivity issues, or simply to return certain conditions of the unit to known values. This article will describe how to perform a factory reset on a Devio, as well as what effects this will have on the unit.
CAUTION: Before proceeding with this process, please note that some of the changes a factory reset will make can result in the Devio unit becoming undiscoverable on the network, and can also cause audio and video signals not to pass as expected. Many of these changes cannot be undone without access to and familiarity with the System Administration Utility, web page interface, or Devio API. Because of this, it is strongly recommended that a factory reset only be performed if you are a system administrator familiar with the Devio installation process, and are certain that a factory reset is required.
Performing a factory reset
Located on the back of the Devio unit is a factory reset button recessed within a pinhole:
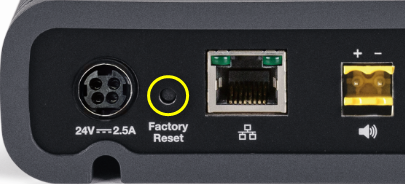
Utilizing this button, the Devio can be restored to its default factory settings with the following steps:
1. Ensure that the Devio unit is plugged into a power source and powered on. The Power indicator light on the front of the Devio should be solid green.

2. Using an unfolded paperclip, pen tip, or similar narrow, solid instrument, press and release the Factory Reset button once.
The factory reset will occur immediately, after which you may notice the following:
- The Auto Setup indicator light on the front of the Devio will be red
- This indicates that Auto Setup must be completed.
- See our article on Performing Auto Setup on a Devio System.
- If you were viewing the unit in the System Administration Utility (SAU), you will see the indicator lights there go dark while the unit rejoins the network.
- Additional configuration steps may be required in order to connect with the unit again in the SAU, as the unit will be set to DHCP and will attempt to obtain a new IP address.
- For details on reconnecting with a unit in its factory reset state, follow the steps in our article about Connecting to Devio with the SAU.
- If you were connected to the device's web page, refreshing the web page will prompt you to log in again.
- If the unit has not yet fully rejoined the network, the login operation will time out.
- If you are unsure what the unit's freshly-obtained IP address will be following the factory reset, you may need to first Connect to the Device with the SAU before you can access its web page interface again.
Factory default states
Below are some of the primary setting states that you will want to be aware of following a factory reset on a Devio.
| Item | Value after factory reset |
| System password | devio |
| Device name | Devio######## (######## = model serial number) |
| DHCP | Enabled - New IP address will be obtained |
| USB video | Disabled |
| Headset interface | Disabled |
| Amplifier load impedance | 8 ohms |
| Microphones | Muted |
| Auto Setup | Needs to be completed |
| Date/Time | Unchanged |