Utilizing Devio's headset interface
The Devio headset interface enables handset telephones with a headset function to integrate with Devio. This integration enables the handset to connect to Devio's loudspeaker and microphone, and calls made with the handset to be bridged into soft codec web conferences running on laptops that are also connected to Devio, as well as any conversations occurring on mobile devices that are connected to Devio via Bluetooth. This feature was implemented in Devio to enable potential integration with phones that have been previously deployed into huddle rooms.
The headset interface is not intended for introducing any external audio sources other than handset telephones to the Devio system; doing so may result in problematic audio, as well as potential damage to the unit. Technical support for attempting to integrate Devio's headset interface with devices other than standard headset telephones may be limited. This article will describe how to configure Devio's headset interface for use, as well as what technical considerations to bear in mind.
A note about sidetone
When you talk into a telephone handset or a cellphone, you may hear your voice played back to you at a low level in the earpiece. This is what is known as sidetone, and its purpose is primarily to assure the talker that the call is still active, as well as to allow the talker to hear themselves so that they are discouraged from talking too loudly. This functions well when speaking into a traditional cellphone or telephone handset that is being held to the mouth and ear, but can be distracting and undesirable when telephone audio is being produced via speakerphone into the room, as the local talker's voice will be played back with a slight delay into the local room via the loudspeaker, which can sound like an echo.
In previous iterations of Devio firmware, it was necessary to disable sidetone within the local telephone's settings. As of firmware version 1.2, Devio features an internal sidetone canceler. This means that it is no longer necessary to disable sidetone on the local telephone that is being integrated with Devio's headset interface, as Devio will handle the elimination of sidetone and prevent the local talker's audio from re-entering the room via the local loudspeaker. If integrating Devio with a handset telephone, it is recommended to update the Devio to firmware version 1.2 and just leave sidetone enabled on the telephone.
Validated telephone models
The following telephone makes and models have been informally tested with and shown to be compatible with Biamp Devio's headset interface1. While other handset telephones may function with Devio, these are the only ones that are currently recommended. As with any third-party equipment, it is recommended to complete pre-installation validation testing in the live production environment to ensure interoperability with Devio and provide time for any troubleshooting that may prove necessary. If considering integration of a handset telephone other than those listed below, bear in mind that additional testing and troubleshooting may be necessary, and a viable interoperability solution may not be found.
| Brand | Model |
|---|---|
| Avaya |
9608G 9611G 9641GS |
| Cisco |
7945 CP 9971 |
| Mitel |
5330 5340 |
| Polycom |
CX600 IP500 |
| Snom |
370 |
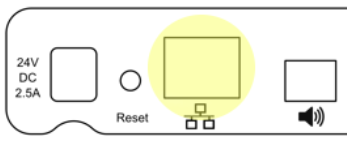
Wiring a handset telephone to the Devio CR-1
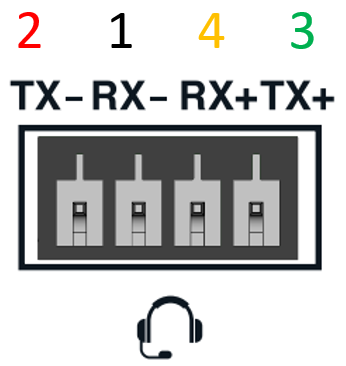
On the back of the Devio CR-1, there is a 4-pin headset interface port:
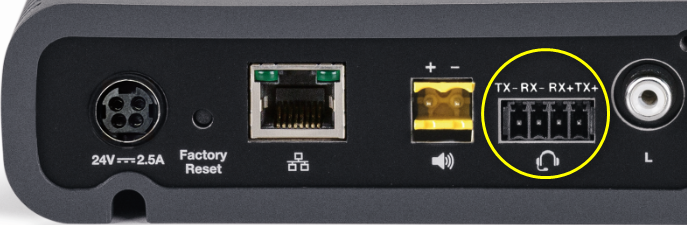
Included in the packaging for any Devio system is a black, 4-pin Phoenix connector for connecting to this port.
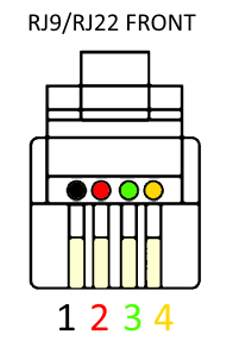
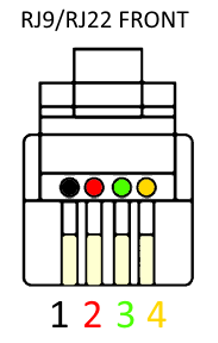
The headset jack of a standard handset telephone is intended for use with a 4-position, 4-connector (4P4C) plug. This type of plug is also commonly referred to as an RJ-9, RJ-10, or RJ-22. At this time, Devio has not been tested or validated for use with non-4P4C headset jacks, and attempting to integrate these is not recommended. Connect the Devio CR-1's headset interface port to the telephone's headset jack via a purchased or custom-built straight-through cable; the cable should have a 4-pin Phoenix connector on the Devio end and a 4P4C plug on the telephone end.
The correct pinout configuration for both the 4-pin Phoenix plug connector and the 4P4C plug will vary depending on the make and model of the telephone. Below are some common pinout configurations for popular telephone manufacturers. Please note that there is the possibility of these configurations varying, even between different phone models from the same manufacturer. Always consult the telephone's technical manual to verify the wiring scheme of the headset jack, and bear in mind that some additional configuration and testing may be necessary to ensure functionality.
| Telephone Manufacturer | Phoenix connector pinout | 4P4C pinout |
|---|---|---|
|
Ascom, Philips |
 |
 |
| Avaya, Mitel, Polycom, Shoretel, Snom | 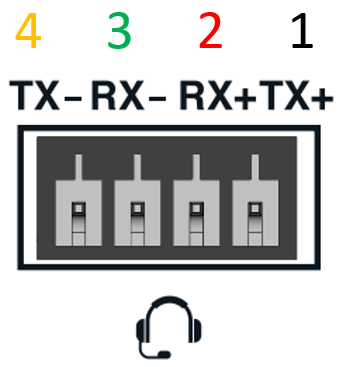 |
 |
| Avaya Callmaster V, Avaya Callmaster VI, Cisco IP | 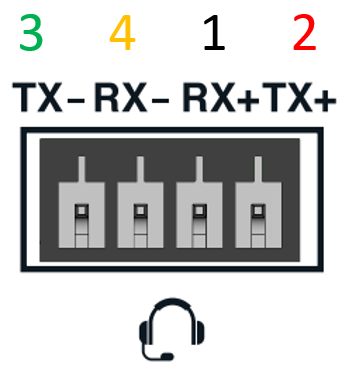 |
 |
| NEC, Nitsuko, Panasonic | 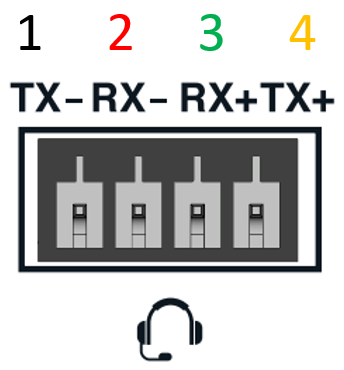 |
 |
| Plantronics Vista Base |  |
 |
The maximum recommended length for the cable connecting the telephone handset to the Devio's headset interface is 100 feet, using standard, 4-conductor, 24 AWG telephone cable.
If the telephone handset supports external speakerphones, it will have a port for the 4P4C plug. If it does not have this port, additional wiring or a different handset telephone may be required.
Wiring a handset telephone to the Devio SCR-25
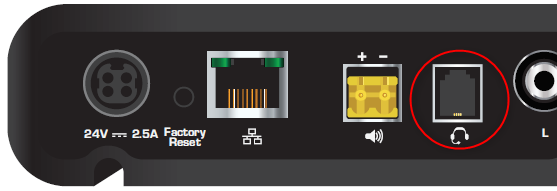
On the back of the Devio SCR-25, there is a 4P4C headset interface port:
The headset jack of a standard handset telephone is intended for use with a 4-position, 4-connector (4P4C) plug. This type of plug is also commonly referred to as an RJ-9, RJ-10, or RJ-22. At this time, Devio has not been tested or validated for use with non-4P4C headset jacks, and attempting to integrate these is not recommended.
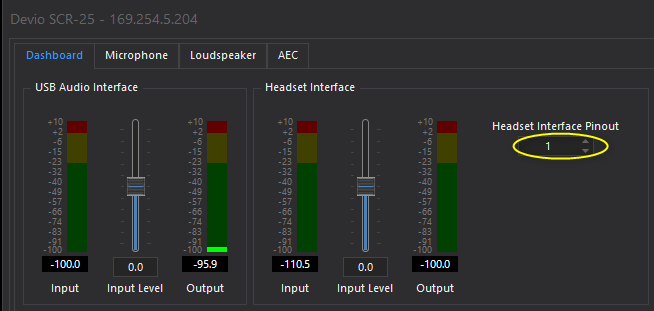
The correct pinout configuration for SCR-25's headset interface port will vary depending on the make and model of the telephone. Rather than having to physically rewire the headset plug to function with a particular telephone make and model, the SCR-25 has 6 pre-configured pinout settings that can be selected within the SAU. These settings can be accessed and adjusted by double-clicking an SCR-25 in the SAU's Device List, as shown below:
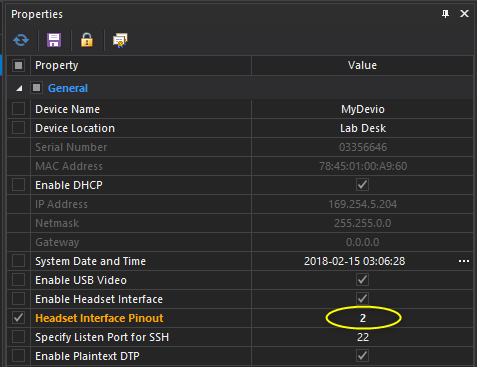
It will be important to test with each of these 6 pinout configurations and determine which one sounds best for the particular telephone being used. Once the best-fit pinout configuration has been determined, this setting can be applied simultaneously to any Devio SCR-25 systems on the network. To do so, select all relevant devices in the Device List, then adjust the pinout setting in the Properties sheet. Clicking the Save icon will apply this setting to all selected SCR-25 devices.
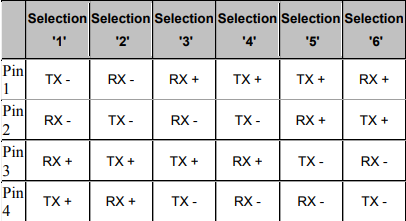
The chart below details the pinout configuration being implemented for each pinout setting number:
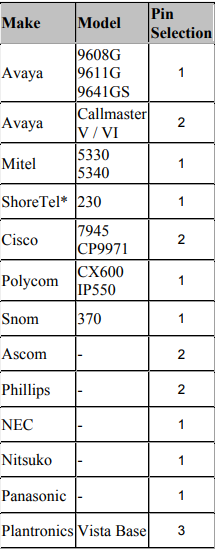
The list below contains some common telephone makes and models with the pinout settings that have been validated for use with them:
Enabling the headset interface
By default, the headset interface will be disabled on Devio. In order to utilize this feature, you must first enable it via the System Administration Utility (SAU), webpage interface, or API. The instructions below will guide you through each of these methods.
Enabling the headset interface in the SAU
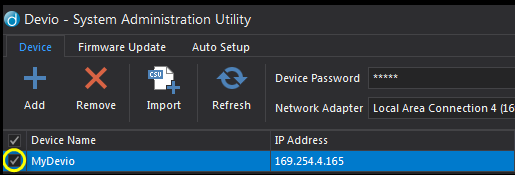
- Discover and connect to the Devio unit in the SAU. For detailed instructions on how to do this, see Connecting to Devio.
- Select one or more Devio units using the checkboxes on the left side of the SAU interface.

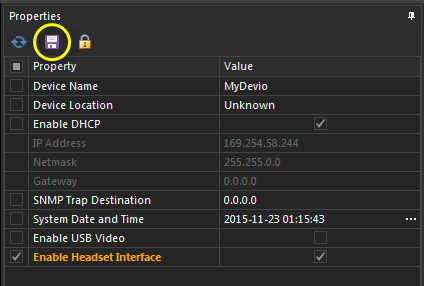
- Under Properties, check the box in the Value column to the right of Enable Headset Interface. "Enable Headset Interface" should turn orange, indicating the value for this item will be modified.

- Click on the save disk icon at the top of Properties.
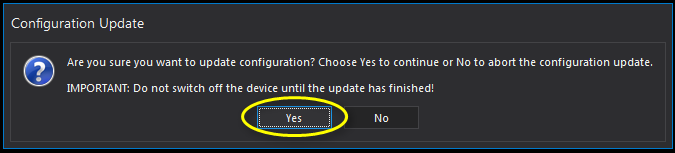
- Click Yes on the Configuration Update dialog that will pop up to verify that the value should be updated.
- Once the update is complete, the Progress column to the right of the selected Devio units will display a blue bar and "Finished" message.


Enabling the headset interface in the device web page
- If the IP address of the Devio unit is known, you can enter that IP address into any web browser to access the device web page.
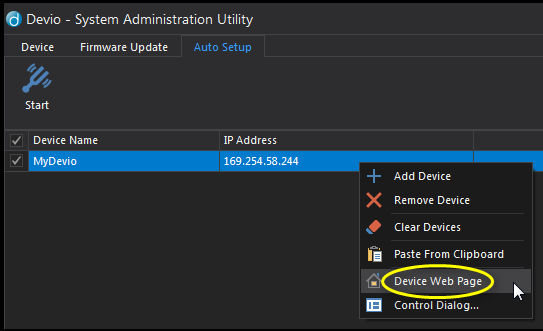
- If the IP address of the Devio unit is not known, you will first need to discover the device in the SAU to learn its IP address. Once known, enter it into any web browser to access the device web page. You can also right-click on the device listing in the SAU and select Device Web Page to launch this automatically in your default browser.
- The webpage will require a password to access. By default, the password will be "devio". The password is configurable from the SAU, webpage, or Devio API.
- Once connected to the webpage, you will first need to click on the pencil icon to begin editing the device's configurations.
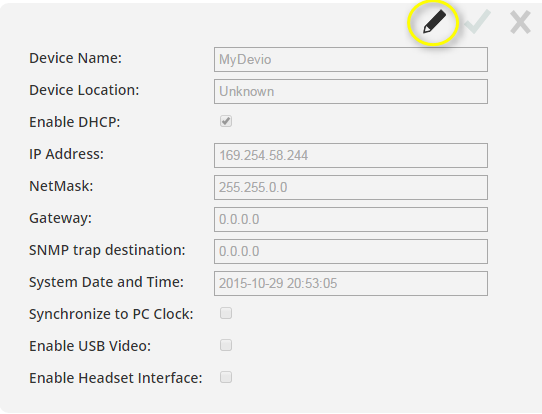
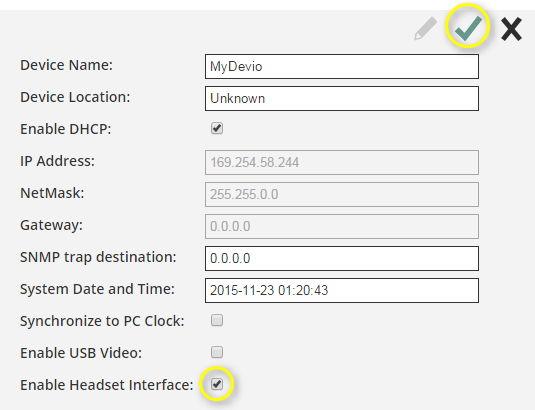
- Check the box next to Enable Headset Interface, then click the checkmark at the top to apply this change.


Enabling the headset interface via the Devio API
Using a terminal emulator, the Devio API can be accessed via Devio's main control Ethernet port. This is a Raw connection, and requires user authentication upon initial connection. This will be the same password that is configured in the SAU. The default is "devio". Details of the Devio API can be found in the Devio help file.
- Connect a network interface on your computer to the control Ethernet port on the Devio unit

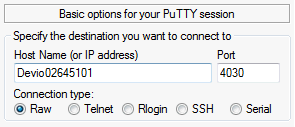
- Open the terminal emulator of your choosing. In this example, we are using PuTTY.
- Enter the following settings:
- Hostname or IP address of the Devio to which you are connected
- Connection type: Raw
- Port: 4030
- It should look something like this:

- Initiate the terminal connection by pressing Open in the terminal emulator or Enter on your keyboard
- Type in the device password and press Enter
- Enter the following command verbatim, then press Enter:
- DEVICE set enableHeadset true
- DEVICE set enableHeadset true
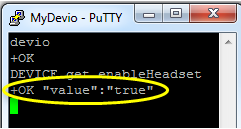
- The Devio headset interface should now be enabled. You can verify this by checking in the SAU or device webpage to ensure the option is selected, or by entering the following command and pressing Enter:
- DEVICE get enableHeadset
- If the headset interface is enabled, you should see the following response:

How to use the headset interface
While the exact headset icon may vary between telephone models, any handset telephone that supports a headset port should have a headset button similar to the following:

Once you have wired the handset telephone to the Devio unit's headset port and enabled the headset interface for Devio, simply press the headset button on your telephone to activate the connection to Devio. Pressing the headset button again will deactivate the connection to Devio. Common use cases for this capability include joining a caller to a soft codec web conference occurring in the room (either when a call is incoming into the room or a call is made on the handset out of the room) or just using Devio as a speaker phone accessory for the handset.
Keep in mind that activating the speakerphone mode on a handset telephone will not engage Devio, but will instead continue to use the built-in speakerphone on the telephone itself. The telephone will only make use of Devio while in headset mode.
1. Manufacturer specifications can change without notice. Biamp Systems strives to keep this list up to date, but is not always made aware of changes made by third parties to the telephones referenced, and therefore Biamp Systems cannot guarantee compatibility with any of the products listed on this page.