Controlling third party devices with a TEC-X Control Pad
Controlling third party devices from a TEC-X Control Pad is possible by using Tesira's Command String Block. A simple way of doing this is to trigger the specific command within the Command String Block to be sent out to the third party device. In some instances, and depending on the control protocol interface of the third party device, it might be possible to enhance the user experience by adding status indication on the TEC-X Control Pads buttons. This article explores some of these options.
For the examples below, we will assume we have a third party device and we want to be able to recall a preset, mute/un-mute audio, and increase/decrease level.
Send and Forget
This is the simplest way of controlling third party devices and can work with stateless commands (i.e. recall a preset, select a source, etc.), dual state commands (i.e. mute, on/off, etc.) or repeated commands (i.e increase or decrease level). Using this method, we simply send a command to the third party device, and we don't listen for any feedback from the device. The process involves adding a Command String Block in Tesira with the commands required to control the third party device and the programming the TEC-X to send those commands when a button is pressed. The following example showcase this process with a generic device.
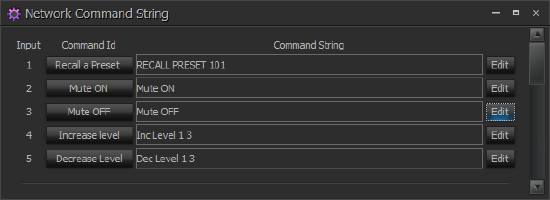
- In Tesira software, add a Command String Block with as many commands as required.
 For this mode, we can use either Serial or Network commands
 - Once the block is created, open the Properties dialog (right click and select properties at the bottom)
- Select the DSP properties tab
- Enter the Server Address (IP or Host name of the device to control) and port
- Set Auto Connect and Connection Sequence as required
- Double click on the Network Command String Block to configure
- Enter the commands required
- Close the dialog
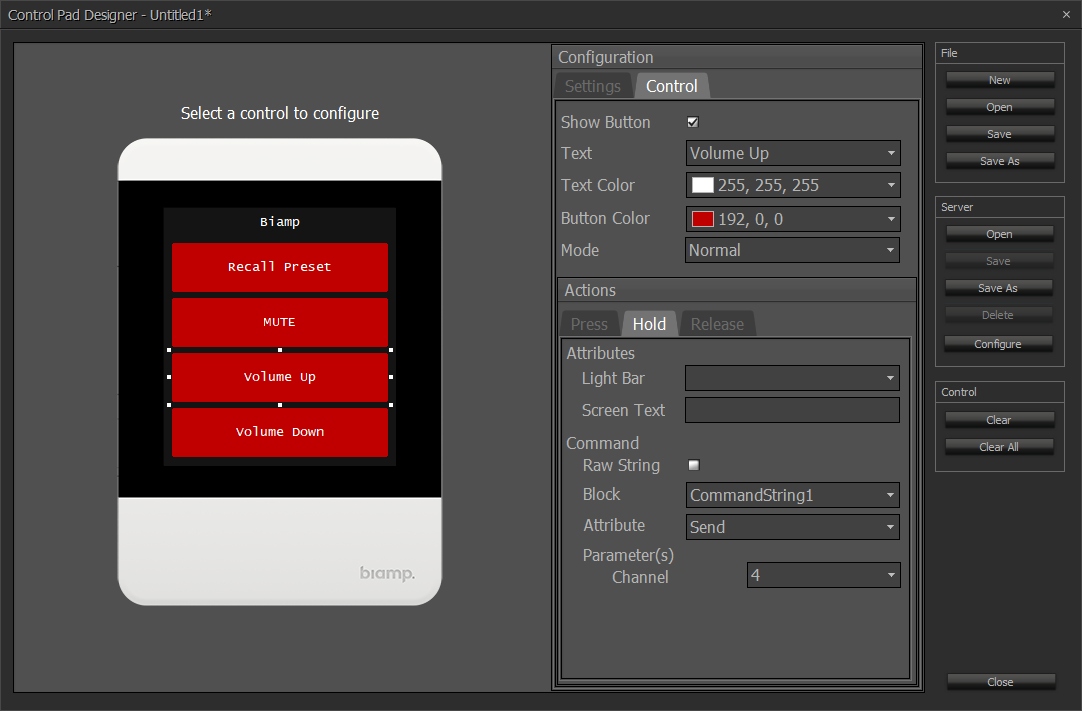
- Open Control Pad Designer to program the TEC-X Control Pad
- In the settings tab, enter a name for the TEC-X Control Pad and the TTP Target
- Select the first button to program
- For the Recall Preset function, set the Button Mode to Normal
- Under Block, Select the Command String Block
- Set the attribute to Send
- Set the parameter to the Command String Block button number, in this case, 1
- For the Mute functionality, set the Button Mode to Latch
- Set the Latch action to send the Mute ON command
- Set the Unlatch action to send the Mute OFF command
- Finally, set two buttons to control volume. One for Volume Up and one for Volume Down. Both of these will be set to Normal
- For both of these, set the Press and the Hold actions to send the appropriate commands

Control with status indication
Keeping status indication only works on those attributes that have dual states (i.e. mute, power, etc.) and on devices that have a control protocol that allows retrieving said status. Getting the status of an attribute can come in two forms: by gratuitous commands (i.e. commands that are sent out automatically by the device when something changes and contain information of the change) or by polling (i.e. requesting the information from the device).
NOTE: Control status with indication only works with Network Command String blocks
Using gratuitous commands
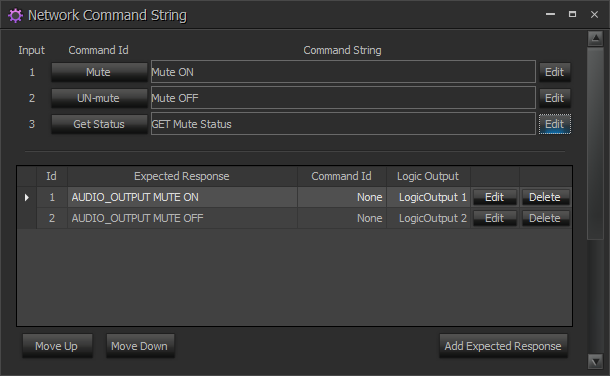
Before we start programing, it's important to verify that the third party device does provide gratuitous commands and what those are for the attribute we want to control. For instance, a device could send out something like ""AUDIO_OUTPUT MUTE ON" when muted and "AUDIO_OUTPUT MUTE OFF" when the mute is off. If this is the case, we can keep track of the mute state with the TEC-X Control Pad
- Add a Network Command String block with two command strings and two logic outputs
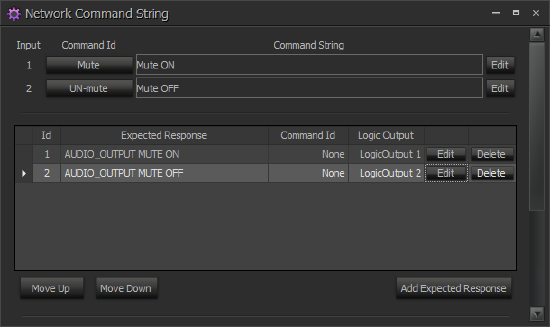
- Double click on the Network Command String Block to configure
- Enter the commands required for mute and un-mute
- Click "Add Expected Response"
- Set the expected response, to the response when the device is muted. Assign this response to Logic Output 1
- Repeat the process for the second response
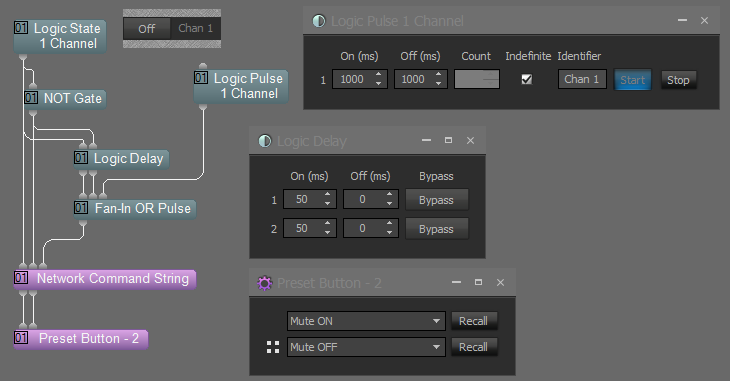
- Add a Logic State Block, a NOT Gate block and a Preset Button block to the Tesira design. Connect the blocks as shown
- Now we need to create two presets to control the Logic State block. Double click the Logic State block and make certain the button is off. Right click on the Logic State block and select "Create New Preset". We'll call this preset "Mute OFF"
- Click the Logic State button to turn it on and create a second preset. We'll call this preset "Mute ON"
- Double click the Preset Button block and assign the presets we just created.
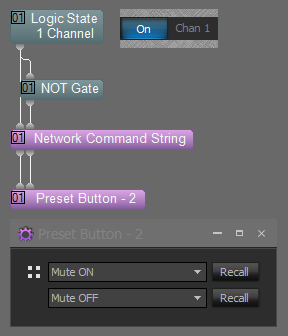 Make certain the "Mute ON" is the first one and "Mute Off is the second
 - Open Control Pad Designer to program the TEC-X Control Pad
- In the settings tab, enter a name for the TEC-X Control Pad and the TTP Target
- Select the button to program
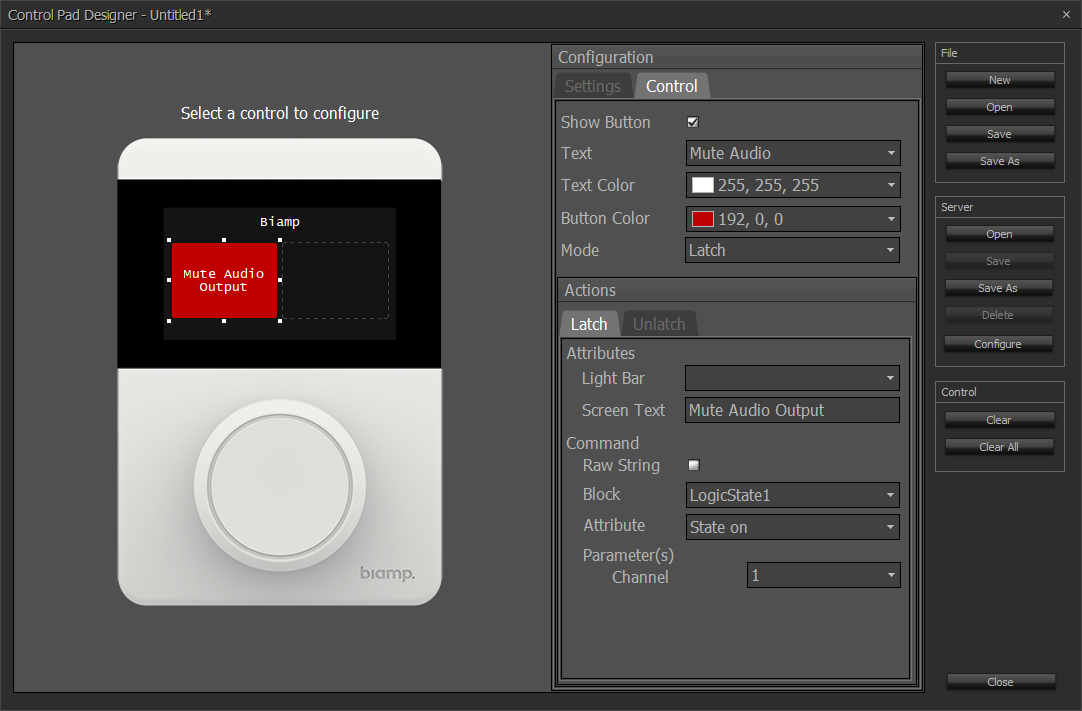
- Set the button mode to Latch
- Set the Latch action to set the Logic State block to on
- Set the Unlatch action to set the Logic State block to off

Using polling
If the third party doesn't provide gratuitous commands but has commands to retrieve the status of an attribute (i.e. Get command), we can modify the above sample a bit so the command string block requests the status periodically. This is done by triggering the retrieve command from a Logic Pulse. Additionally, we need to make sure the request command is sent out after a change is made with the TEC-X Control Pad. A Logic Delay is required so the retrieve command is sent a brief moment after the set command
- Add a Network Command String block with three commands and two logic outputs

- Configure the commands as in the sample above. Set the third command to the command required to get the status from the third party device
- The logic circuit is very similar to the circuit shown above. To that, we will need to add a two channel Logic Delay block to send the retrieve command after the first has been sent, a Logic Pulse block and a Fan-In OR Pulse block. Connect them as show below
- Set the Logic Pulse to Indefinite. Once connected to the system, we need to turn it on by pressing the "Start" button
- Set the Logic Delay to 50ms on both On settings
- In Control Pad Designer configure a latching button as explained above to control the Logic State block