Programming a TEC-X Control Pad to control a Tesira system
The Biamp TEC-X Control Pads are wall-mounted control devices used to manage certain functions of a Tesira system by sending TTP (Tesira Text Protocol) commands. Available models include the TEC-X-1000 with a customizable touch panel and volume knob and the TEC-X-2000 with a larger customizable touch panel. This article explains how to configure a TEC-X Control Pad in a Tesira System
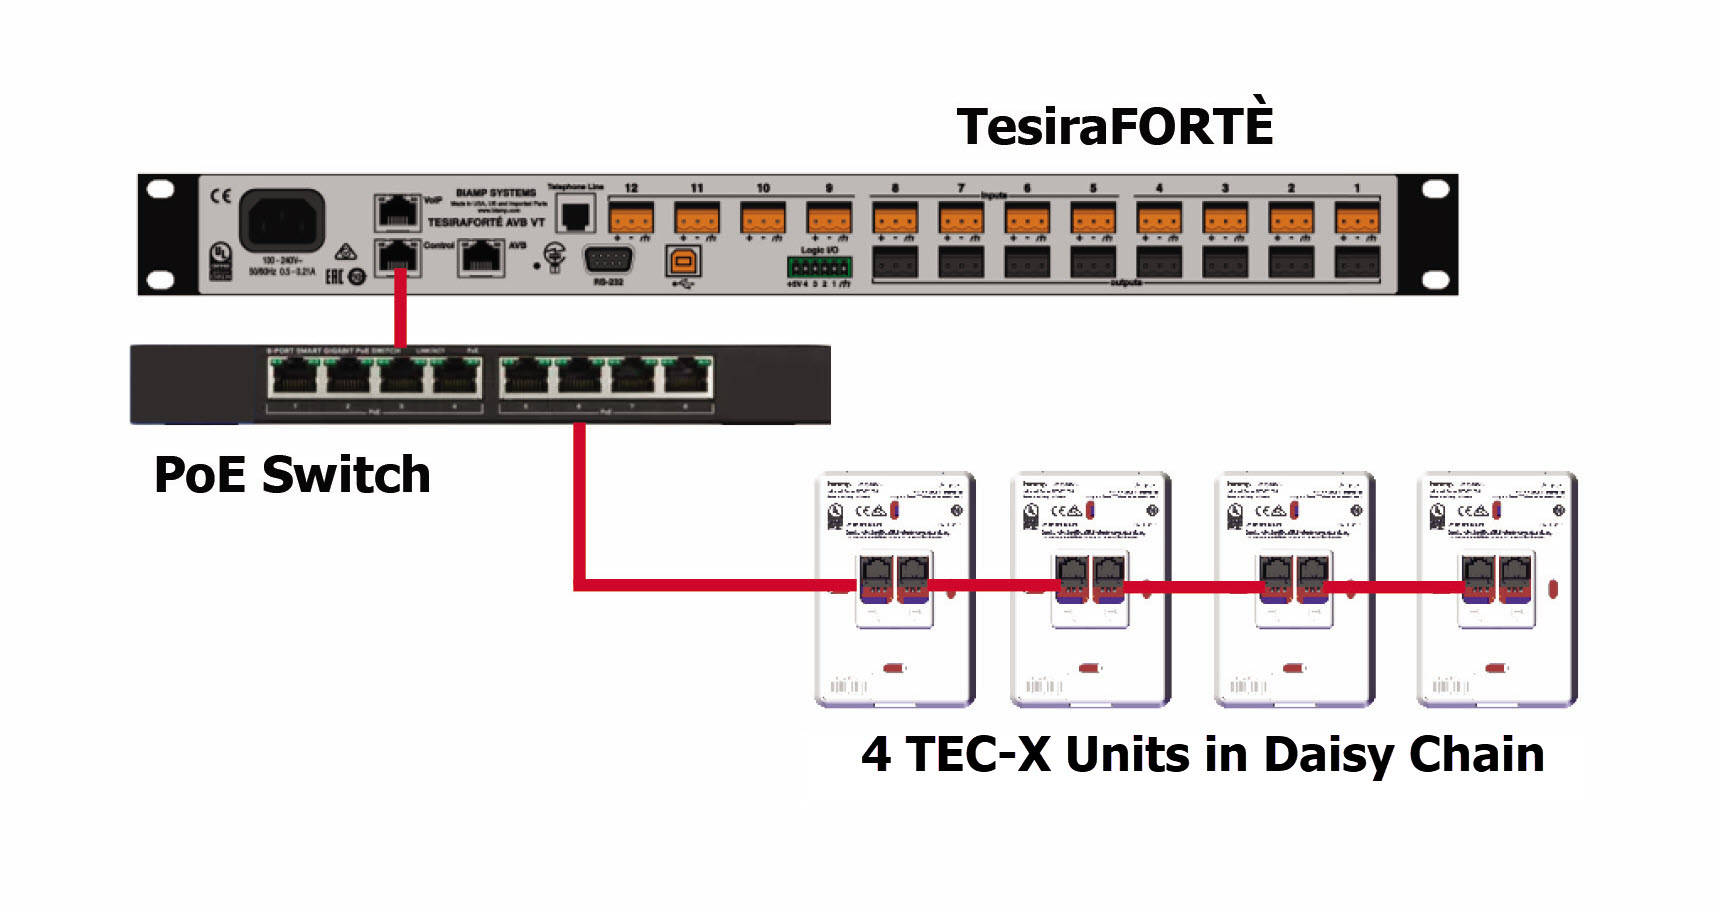
System topology
The TEC-X family of Control Pads are configurable independently from a Tesira System. They must be proxied by a Server-class device (Tesira Server, Tesira Server I/O, TesiraFORTE, TesiraLUX). The proxy can be part of the system we want to control, but is not required to be. For this article, we will assume the TEC-X is proxied by a Server class device in the system. In this case, all devices need to be connected to the same network and discoverable by Tesira Software
Network settings
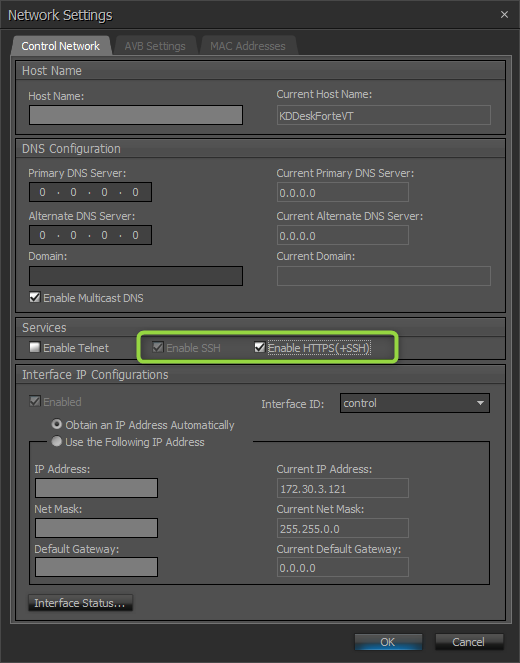
The TEC-X family of Control Pads rely on the web server hosted in the Tesira device. To enable, follow these steps:
- Enable HTTPS in Device Maintenance -> Network settings enables the web-server (port 443) on the selected Tesira device. SSH will simultaneously be enabled as the web-server uses SSH-TTP to control the Tesira system.
TEC-X device setup
Setting up TEC-X Control Pad properties is done the same way as other Tesira Remote Devices. Depending on the system, it might be necessary to adjust the network settings and change the Host Name and Device ID of the TEC-X Control Pads:
- In Device Maintenance, click Remote Devices
- Select the TEC-X you want to set up
- Click Network Settings to edit the Host Name and/or IP settings
- To change the Device ID, click TEC-X Properties
Programming a TEC-X
Configuring TEC-X Control Pads is done in Tesira software using the Control Pad Designer. Since these remotes send TTP commands to the device being controlled, a valid Tesira file is not required to configure the remotes. However, having the Tesira file opened or being connected to the Tesira system we want to control makes programming much easier.
Initial settings
- Open Control Pad Designer by going to Tools > Control Pad Designer or pressing the
 icon in the layout bar
 - In Control Pad Designer, click New
- Under settings enter a Name (this field is required for a valid configuration)
- Select the remote model, color and button layout as required
- Under TTP Target, leave the default setting of User Server LocalHost if the Server hosting the TEC-X Control Pad is the same as the one being controlled. If the controlled device is different that the host device, uncheck this setting and enter the Host Name or IP address of the device you want to send commands to. This can be any device in your system
- If the system is protected, enter the system's Username and Password

Programming control actions
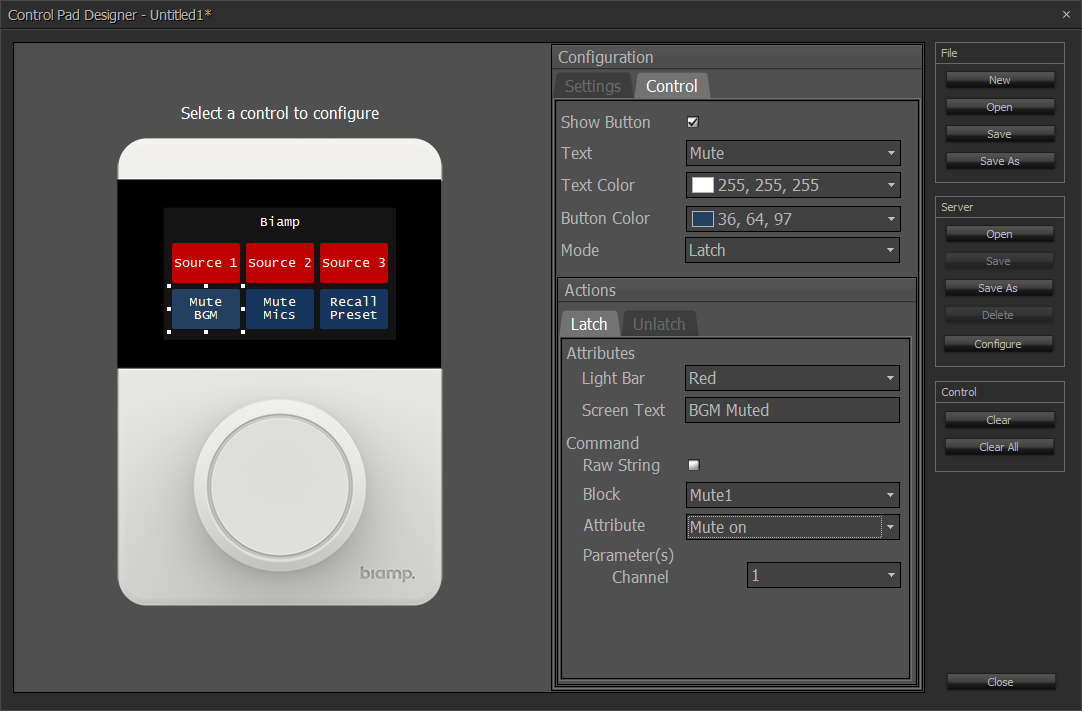
To start programming buttons, navigate to control and then click the button you want to program on the left. Alternatively, you can select the button you want to program and that will take you to the control tab. The left panel will show how the physical remote will look once it's programmed.
Programming buttons
- Set the button text.

- Set button text and background color
- Set button mode
- Normal is a momentary action and can have up to three actions: Press, Hold and Release
- Latching is a two state action. It has two actions Latch and Unlatched
- In the Actions section of the dialog, set the light bar
- Set the screen text
- In the command section, we can enter the actual control. Depending on whether you have the Tesira file opened or not this process might be different:
With the Tesira file we want to control opened:
- Select Block (if block does not appear in the drop down list, follow the steps for programming without the Tesira file opened below)
- Select the Attribute within that block you want to control. Depending on the attribute you may need to also select channels and/or paramenters
Without the Tesira file opened:
- For System commands (Presets and Start and Stop Audio) select System and enter the Attribute and Parameters you want to control
- For anything else, select Raw String
- Enter the command string you want to send. For ease of programming Tesira systems, a link to the Tesira Command String Calculator is provided
Programming the Volume Knob (TEC-X 1000 only)
The volume knob has five actions that can be programmed: Press, Hold, Release, Rotate CW and Rotate CCW and have the same parameters as the buttons. Note that for Volume control it's necessary to program both the clockwise (CW) and counter-clockwise (CCW) settings.
Save the configuration
Since the TEC-X remotes are not part of the Tesira System, their configuration is not saved along with the Tesira file. At this point, it's a good idea to save the control pad configuration to your computer before sending to the remotes.
Configuring a TEC-X
Once the programming is done, it needs to be sent to the device. Control Pad Designer allows sending the current configuration file to one or more Control Pads or configuring multiple remotes with different configurations files at the same time.
Configuring devices with a single file
- With the configuration still opened, click Save As under Server
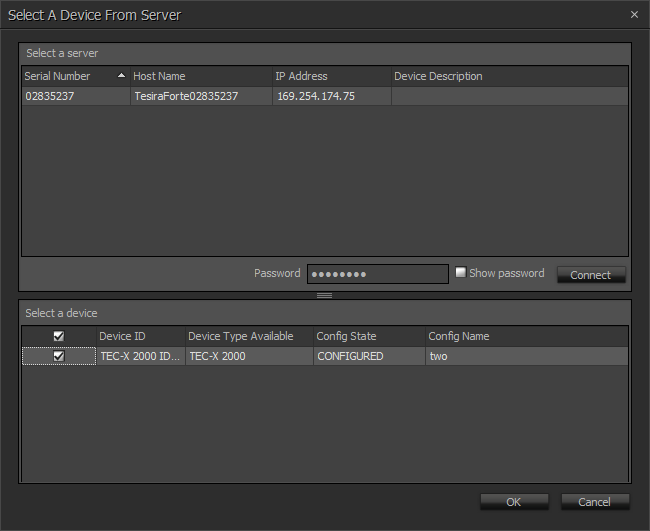
- A dialog will appear showing all discovered server devices. Select the server you want to connect to and enter the password.
- If security has not been set to the device, the default password is the serial number of the Tesira Server device
- Click Connect
- All TEC-X devices will show up in the lower half of the dialog. Select the devices you want to configure
- Click OK
Configuring multiple devices at the same time
- Click Configure under Server
- The Device Configuration dialog will appear showing all discovered server devices. Select the server you want to connect to and enter the password.
- If security has not been set to the device, the default password is the serial number of the Tesira Server device
- Click Connect
- All TEC-X devices will show up in the lower half of the dialog. To configure, click Browse to select the configuration file that will be sent to the remote
- Click Configure
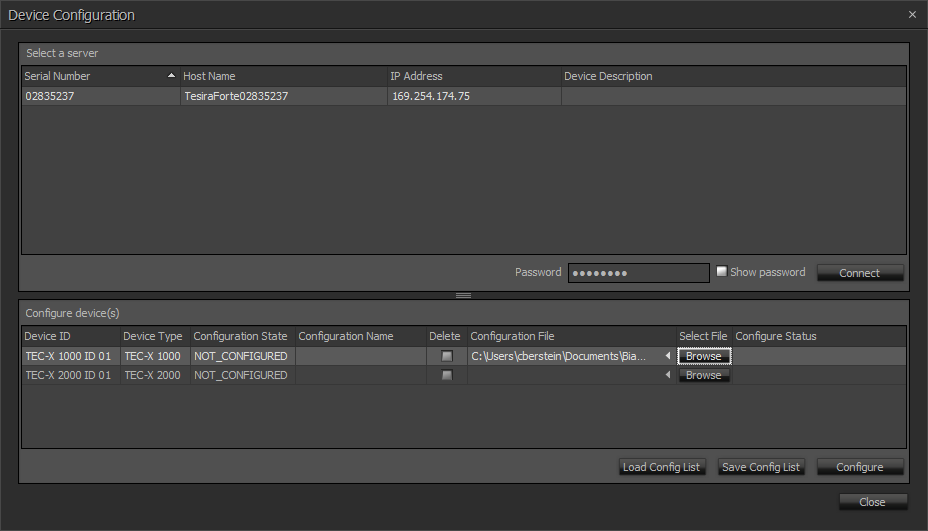
Once configuration has been successfully loaded, you can close the dialog
Overwrite an existing configuration
If a configuration is already loaded to the TEC-X and you wish to overwrite it with a new configuration, when saving the new configuration file, choose Server > Save As then select the active host and enter the Tesira Server's serial number as its password. Select the TEC-X and then OK. Software will ask if you want to overwrite the existing configuration at the server. Select Yes. (If you selected the wrong server device a message will warn that "There are no TEC-X devices on "server-name".)
Reset device
To manually reset a device to factory defaults you must remove the TEC X from its mounting plate. Looking at the rear of the device a small reset button is seen at the far right edge of the circuit board, in line with the 2 Ethernet jacks. Press and release the button while the device is powered to factory reset it.
Further reading
- Controlling a Source Selector with a TEC-X Control Pad
- Controlling third party devices with a TEC-X Control Pad
- TEC-X-1000 Landing Page
- TEC-X-2000 Landing Page
- TEC-X Table Mount Landing Page
- Small hotel ballroom with TEC-X control
- Small hotel ballroom with TEC-X control and Dante inputs
- 4-way Divisible Hotel Ballroom with TEC-X control