Modena Hub initial setup
This article provides an overview of what items are included in the packaging box for Modena Hub/Hub+, as well as information on how to correctly assemble the system and important setup recommendations.
Modena Hub Setup and Configuration from Biamp on Vimeo.
Modena Hub+ Setup and Configuration from Biamp on Vimeo.
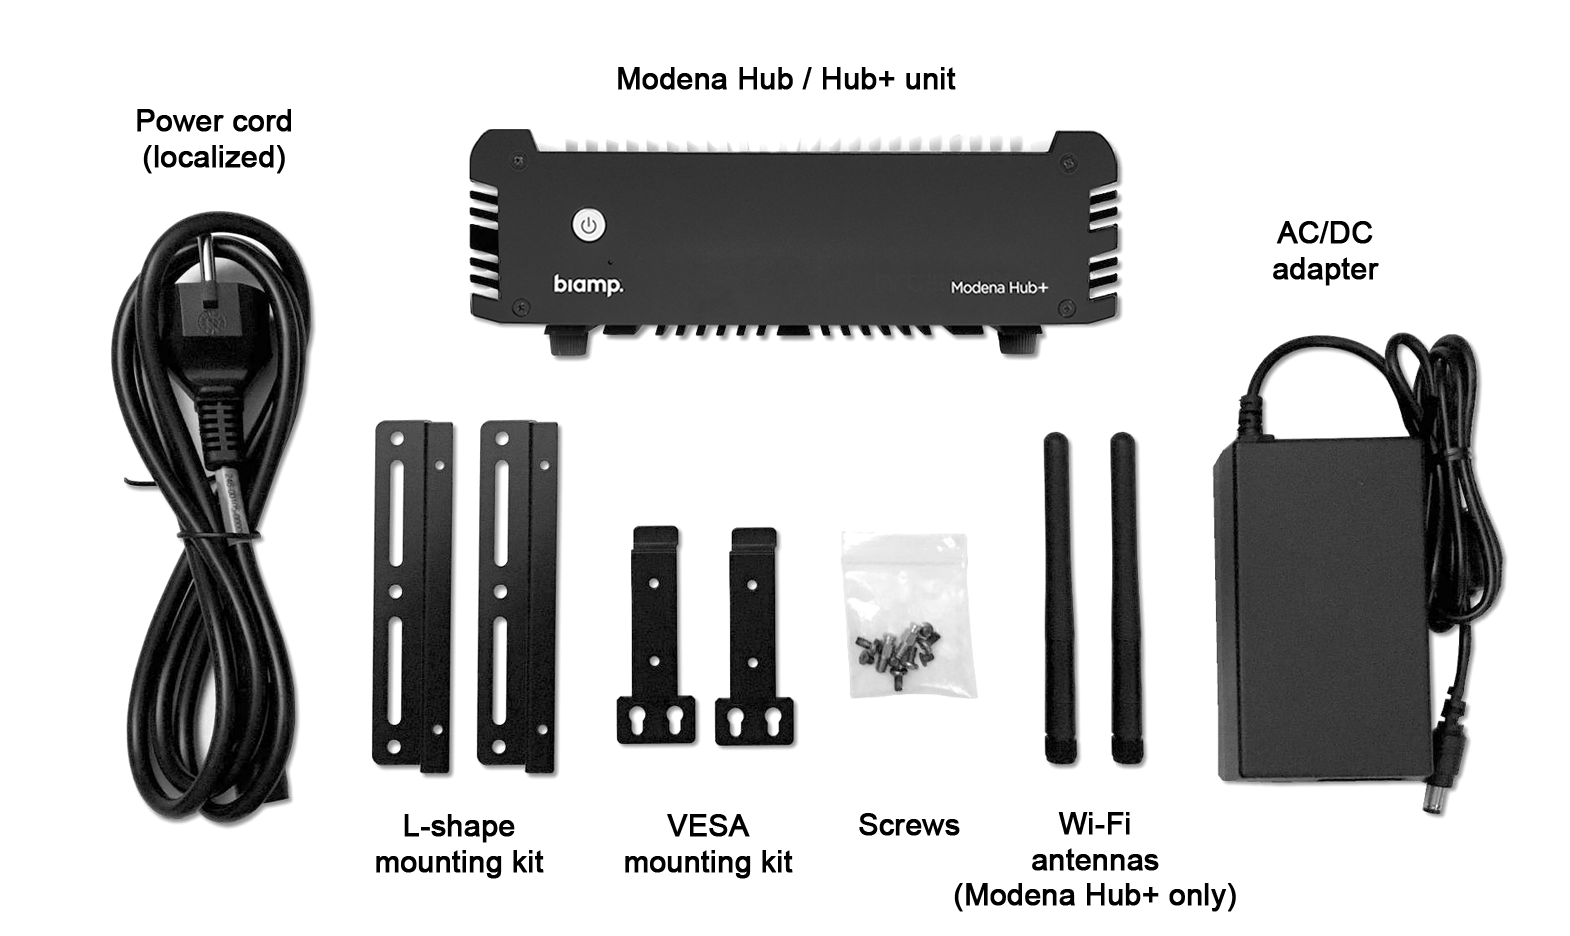
Included in the Modena box
The Modena Hub/Hub+ packaging box contains the following items:
- Modena Hub base unit
- AC/DC adapter
- Input voltage range: 100-240 VAC
- Output: 12V, 5A, 60W
- Only the included AC/DC adapter should be used with Modena.
- Power cord
- The precise model will be country-specific to ensure compatibility with local AC electrical sockets.
- WiFi antennas
- These are included with the Modena Hub+ only.
- Compatible with both 2.4Ghz and 5Ghz WiFi bands.
- 2.0dB gain, 50-ohm impedance.
- Only the included antennas should be used with Modena.
- L-shape mounting kit
- This can be used to secure the base unit to walls, tables, rack cabinets, etc.
- VESA mounting kit
- This can be used to secure the base unit to displays or other devices that follow the VESA mounting standard.
- Screws
- Quick Start Guide
- Specifications, Safety and Conformity sheet
Modena connections
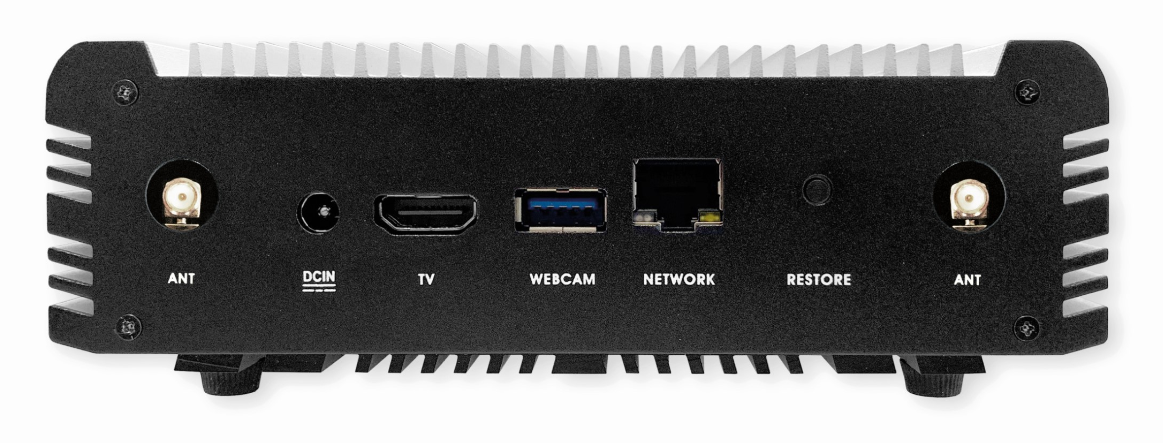
NETWORK port
Modena uses a standard RJ45 network port with gigabit Ethernet capability. Connecting to the installation site's LAN should be done with Cat5e or better cables (not included).
Modena must be connected to the internet in order to download its latest software release.
WEBCAM port (USB)
Modena's webcam port is a standard USB 3.0 Type-A port that is intended to be used for connecting USB Video Class (UVC) devices to Modena. Examples of UVC devices include USB webcams and all-in-one USB devices containing a camera, microphone, and loudspeaker. It is also possible to connect USB touchscreen devices to Modena via this port in order to make use of their annotation features. A list of recommended compatible UVC and USB devices can be found here.
If connecting multiple USB devices (such as a separate USB webcam and USB speakerphone), it will be necessary to provide an approved USB 3.0 active hub. Both USB devices will need to connect to the active hub, and then the active hub can be connected to Modena's webcam port.
TV port (HDMI)
Modena's TV port is a standard HDMI port that is used as a local video output. It can be connected to a display monitor, touchscreen, or projector via a standard HDMI cable (not included).
ANT ports (Modena Hub+ only)
The Modena Hub+ features two ANT ports for attaching each of the provided WiFi antennas.
The antennas can be connected to the ANT ports by inserting them and gently hand-twisting clockwise to secure. Once the Modena Hub+ base unit is in its final installation location, the antennas can be rotated and pivoted at their hinge to adjust the WiFi signal coverage area.
Further information on utilizing a wireless network with the Modena Hub+ can be found here.
DCIN and power
To power Modena, connect the power cord to the AC/DC power supply, then plug the power supply into Modena's DCIN port and connect the power cord to a standard electrical wall socket. Modena will automatically power on and the LED power indicator on its front panel should turn green.
The first time a new Modena system is powered on, it will automatically begin its firmware installation procedure. This operation may take several minutes to complete.
Every time Modena is powered on after its initial firmware installation, it will reach out to Biamp's software/firmware repository to check for updates (note: this will require a valid internet connection on Modena's Network port). If a more recent version of firmware is found, the device will automatically install it.
Note that both the initial firmware installation and any subsequent system updates may take several minutes to complete, during which time the device may appear to be unresponsive. The length of time needed to check for, download, and install updates will be partially dependent on available internet speed to the device. When this process is complete, the HDMI port will output its "Welcome" screen.
To turn Modena off, press and hold the power button down for 5-10 seconds. To turn Modena back on, press and release the power button once.
Power consumption
The maximum power consumption of Modena (excluding peripherals) is 17W, that is approximately 60 BTU/hr.
Setup recommendations
- Only tested, known-good cables should be used for any Ethernet, HDMI, or USB connections.
- Modena Hub+ should not be placed near potential WiFi obstacles (walls, metallic surfaces, other radio equipment or signals, etc.).
- Conducting a WiFi site survey can help discover potential issues with interference levels in the local WiFi environment.
- On some corporate networks with active Rogue Access Point (AP) Detection, connecting an unknown AP such as Modena may result in an alarm being raised that there is a potential security breach. This may also result in the network connection Modena is using to connect to the corporate network being disabled. It is best practice to communicate with the local IT administrators before adding Modena or any other devices to their corporate network.