EasyConnect MPX 100 Overview
The EasyConnect MPX 100 is an easy-to-use media switcher designed for conference rooms equipped with a dedicated UC Room system, such as a Microsoft Teams Room or Zoom Room, but from which a user occasionally needs to use an alternate UC platform.
MPX 100 installs between the UC Room host and the conference room peripherals. When a user needs to use an alternate UC platform, they simply connect a laptop to the MPX 100 via a USB and HDMI cable pair, and it will automatically switch away from the primary UC compute and connect the BYOM laptop to the in-room A/V peripherals. Then, the user can launch the alternate UC meeting from their mobile device and hold the meeting as normal. As soon as the user disconnects the USB and HDMI cable pair, the MPX 100 switches the room peripherals back to the dedicated UC room compute.
Connectivity
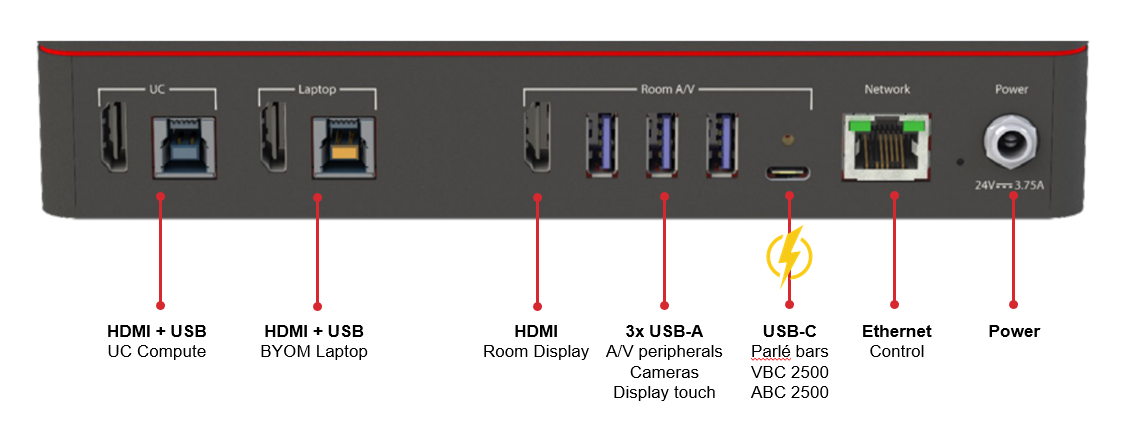
The ports required for operating the system are all located in the rear part of the unit:
- Connection to the UC Compute unit (Microsoft Teams Room, Zoom Room, etc.)
- HDMI 2.0 in
- USB 3.0 Type-B
- Connection to the BYOM Laptop
- HDMI 2.0 in
- USB 3.0 Type-B
- Connection to the room A/V peripherals
- HDMI 2.0 out to room display
- USB 3.0 Type-A (3x)
- USB 3.0 Type-C with locking screw and 60W Power Delivery
- RJ45 Network port (Gigabit Ethernet)
- Power
Typical connection schemes
With VBC 2500
In the scheme below, an EasyConnect MPX 100 is connected to a Room system and a BYOM laptop. A room display is connected through HDMI. If the display is a touchscreen (not required), it can also be connected through USB to provide touchback functionality to the connected device.
A Parlé VBC 2500 video soundbar can be connected to the USB 3.0 Type-C port on the back of the MPX unit. The MPX 100 can power the VBC 2500, through this connection and does not require an additional power supply. The video soundbar can be managed through the network using SageVue or by directly performing Launch from the MPX 100 admin interface. See below for more.
In this setup, the two unused USB-A ports are available to connect additional devices, further expanding the system.
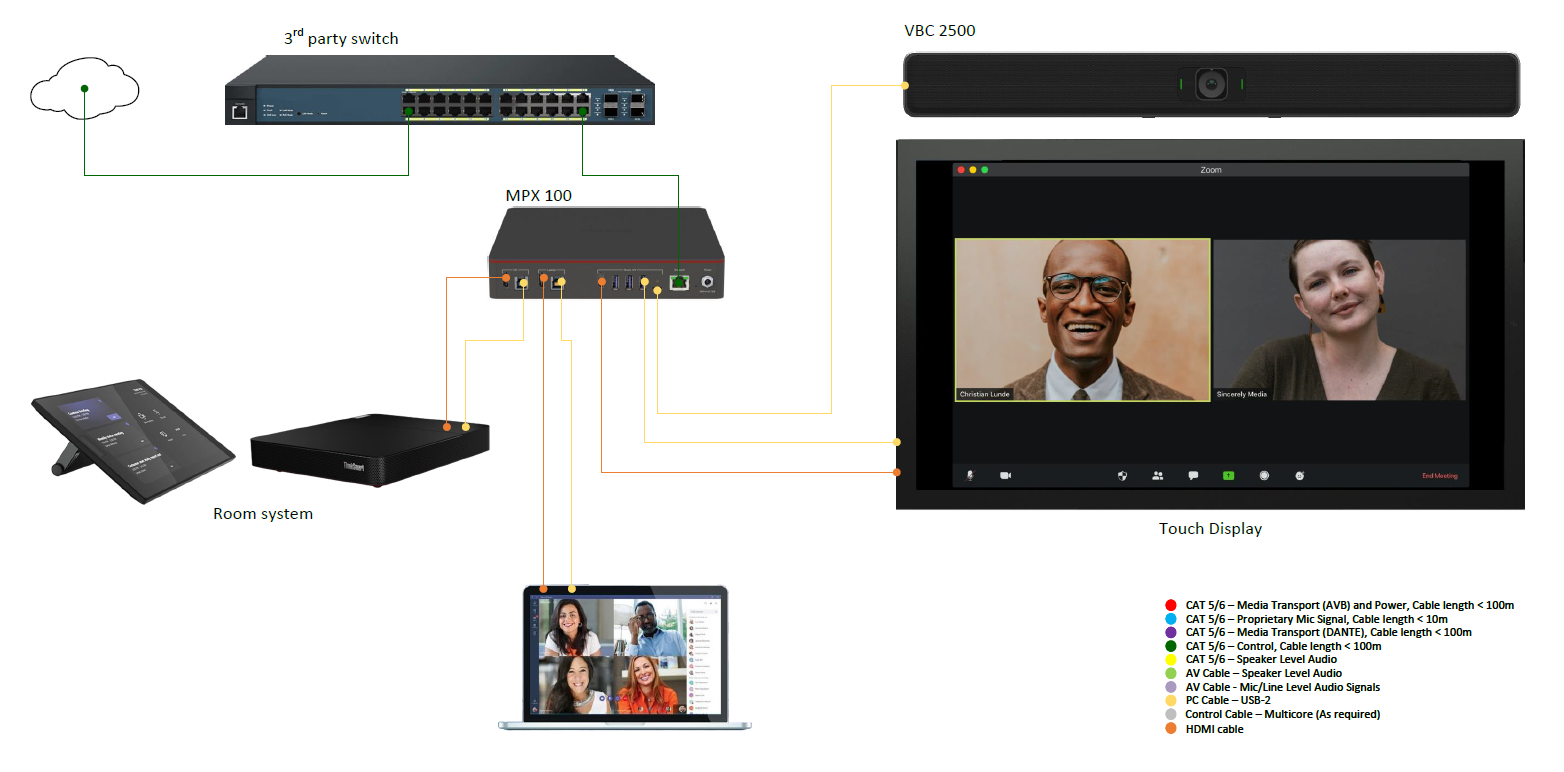
 Warning: Never connect the EasyConnect MPX 100 power supply to a Parlé ABC / VBC 2500 unit. Doing so will damage the conference bar and is indicated by a warning label on the MPX 100 power supply.
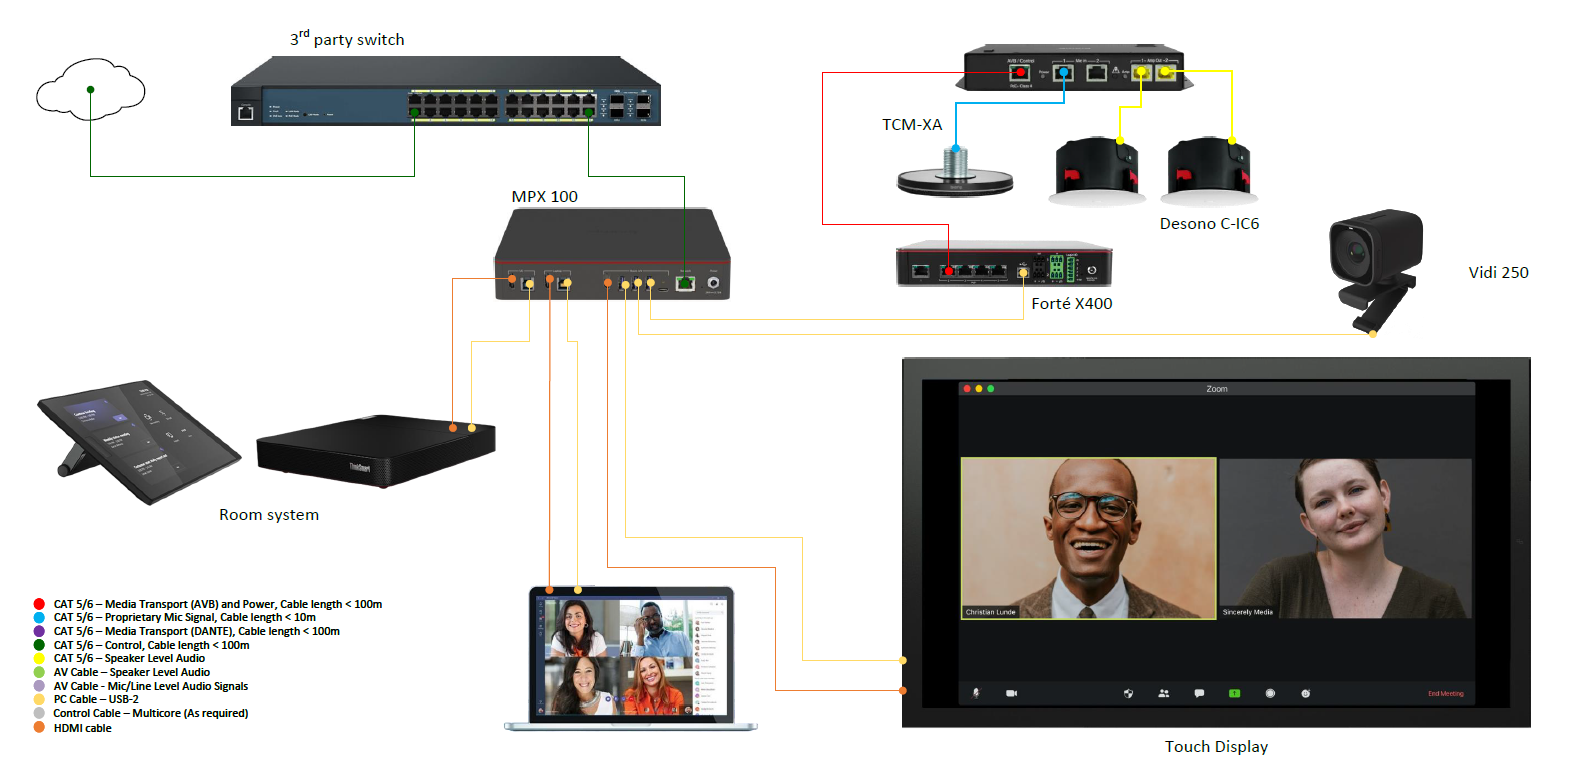
With Vidi 250 and TesiraForté X 400
In the scheme below, EasyConnect MPX 100 is connected to a Room system and a BYOM laptop. A room display is connected through HDMI. If the display is a touchscreen (not required), it can also be connected through USB to provide touchback functionality to the connected device.
A Vidi 250 camera and a TesiraForté X 400 are connected to the USB-A ports on the back of the MPX unit, to provide respectively video and audio capabilities to the system. The USB-C port in this setup is not in use and available for other peripherals.
Included in the EasyConnect MPX 100 box
The packaging box contains the following items:
- EasyConnect MPX 100 base unit
- Cabling to the room display
- USB 3.0 Type-A to Type-B, 3' (1m)
- HDMI 2.0 4K60, 3' (1m)
- Cabling to the UC compute
- USB 3.0 Type-A to Type-B, 3' (1m)
- HDMI 2.0 4K60, 3' (1m)
- Cabling to the BYOM laptop
- USB 3.0 Type-B to Type-C, active, 15' (5m)
- HDMI 2.0 4K60, 15' (5m)
- 2x Cable Sliders
- AC/DC adapter
- Input voltage range: 100-240 VAC
- Output: 24V, 3.75A, 90W
- Country-specific power cord, to ensure compatibility with local AC electrical sockets
- Only the included AC/DC adapter should be used with EasyConnect
- Mounting and cable handling system
Switching
Automatic switch
By default, MPX 100 fully automates switching, eliminating the need for a button press or remote control.
The switch is driven by the HDMI connection, with the USB port immediately following the change. Priority is always given to the Laptop connection: As soon as the “Laptop HDMI” port senses a connection, the MPX 100 will perform the change. It's not possible to use a direct or remote control system to operate the switch.
The process takes approximately 6 seconds to complete (note that the connected devices might need more time to fulfill the change). On a few HDMI displays, the switching may take up to 20 seconds to complete.
Switching from the UC to the Laptop:
- Connect the HDMI cable from the Laptop port to the BYOM laptop host
- Connect the USB cable from the Laptop port to the BYOM laptop host
- The system senses a new signal on the “Laptop HDMI” port and switches the active connection to the Laptop ports
Switching from the Laptop to the UC:
- Disconnect the HDMI cable from the laptop host
- Disconnect the USB cable from the laptop host
- The system senses a lack of signal on the “Laptop HDMI” port and switches the active connection back to the UC ports
Manual switch
Optionally, manual switching from a network controller device can be enabled.
To allow this functionality:
- Enable SSH and/or Telnet in the admin Network page, section Control
- Activate the "Manual Host Switch Control" option in the admin Room page
To connect to the system, the default username is "control" and password is "control".
Refer to the EasyConnect MPX 100 Help for a list of supported commands. In addition to switching, maintenance operations (e.g. rebooting the unit) can also be performed through network control.
Maintenance screen
This is a status screen that shows on the HDMI display connected to the unit (on the Room A/V HDMI port) in either of these cases:
- The unit is in Maintenance Mode (see below)
- There are no active input HDMI connections on the UC nor the Laptop HDMI ports

The tile on the left side shows a list of all the connected devices, that can be used to check if USB peripherals are correctly recognized. For Biamp Parlé devices, the current firmware version is also shown.
The tile on the right side shows information on the current general status of the unit (room name, unit serial number, firmware version, IP address). This is especially useful to check which IP address should be used to enter the system configuration from a browser.
Multiple peripherals of the same type connected
EasyConnect MPX 100 supports multiple devices connected to the USB ports.
Please note the following behaviors:
-
With Logitech RoomMate
If multiple USB peripherals of the same type (mic, speaker, camera) are connected to the EasyConnect MPX 100 "Room A/V" USB ports, the switchback from the Laptop to the RoomMate UC does not happen automatically. User intervention is required to select the peripherals to use on RoomMate. -
With Biamp Vidi and Parlè cameras
If multiple Biamp cameras (Vidi 100, Vidi 150, Vidi 250, Parlè VBC 2500) of the same model are connected to the EasyConnect MPX 100 "Room A/V" USB ports, the switchback from the laptop to the UC does not happen automatically. User intervention is required to select the camera on the UC.
Administration
Accessing the admin console
The Web Administration Console is used to manage the parameters and settings of the EasyConnect device via web browsers. From the browser, navigate to the sign-in page by either going to
https://<IP-ADDRESS>
or to:
https://EasyConnectMPX100-<SERIAL-NUMBER>.local
No username is needed; the default password is the device's 8-digit serial number. After entering the correct username and password, use the sidebar on the left to select pages for specific settings. It is recommended to change the password in the Device page after the first access, to protect the security of the system.
Maintenance operations and firmware update
The Administration Console’s Device page displays information about the model, serial number, and currently installed firmware version.
The Reboot button on the page allows you to soft reboot the unit without having to physically remove power. The Factory Reset option restores or resets it to factory defaults. Factory reset can also be achieved by pressing the pin-hole button on the back of the unit for a few seconds. Lastly, the Download Logs button downloads engineering logs that can be provided to Biamp support for troubleshooting.
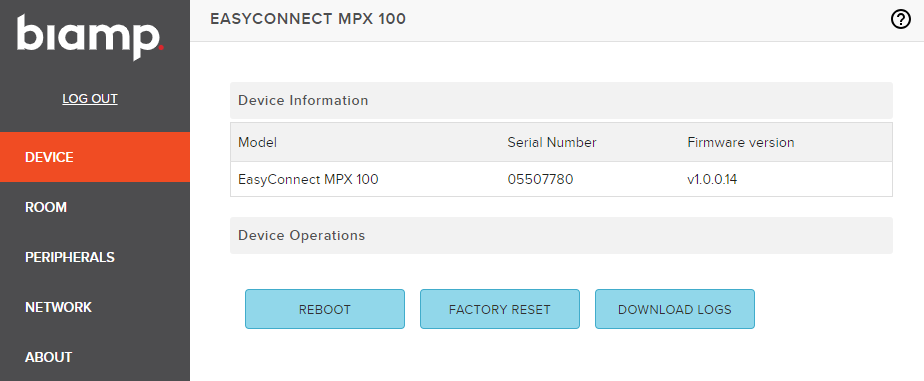
The Date & Time section of the Device page provides options for manually editing these settings or configuring an NTP server to enable automatic synchronization. If "Use NTP Servers from DHCP first" is checked, NTP will be configured from DHCP if available. If not, the specified NTP server will be used instead.

The Firmware section allows the administrator to manually upload a copy of the firmware. See the EasyConnect release notes for information on firmware versions. 
Checking the switch status
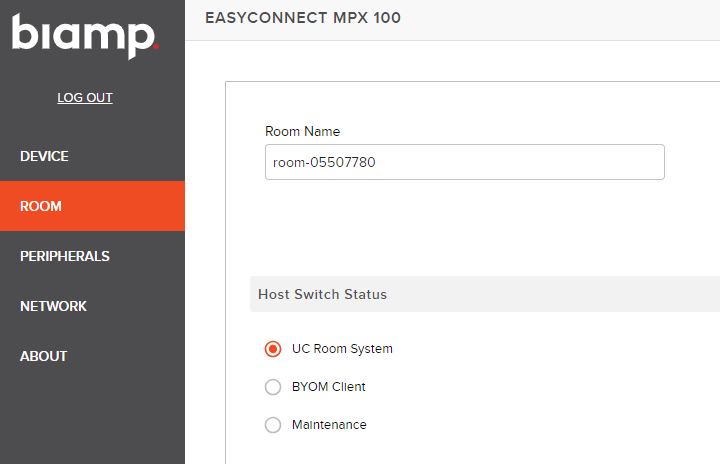
The MPX's three "switch status" modes displayed on the Room page are:
- UC Room System: no HDMI is connected to the Laptop port, the UC ports are active
- BYOM Client: an HDMI is connected to the Laptop port, the Laptop ports are active
- Maintenance: the MPX unit has been manually put into Maintenance Mode; switching ports are temporarily disabled
This is a read-only configuration. To manually activate or deactivate Maintenance Mode, see below
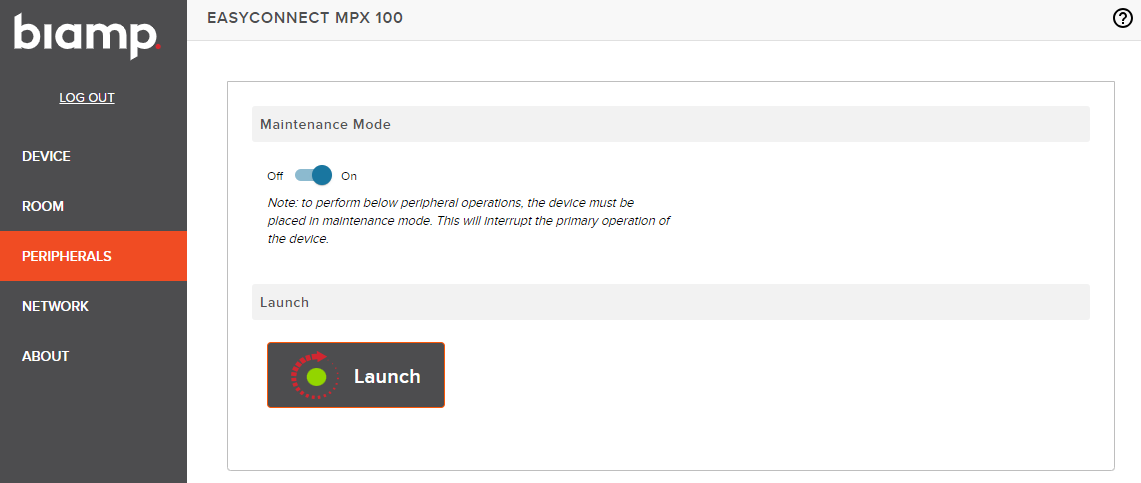
Maintenance Mode and Performing Launch
Maintenance Mode must be manually activated on the Peripherals page in order to perform a Launch procedure. When activated, all switching ports are temporarily disabled and the system cannot be used. Maintenance Mode is also indicated on the connected HDMI room display (current supported resolutions are 1080p and 4k, on widescreen displays the maintenance screen may appear differently than expected).
Launch is available when a Parlé ABC/VBC 2500 bar is connected to the system. Click on the Launch button and wait for the voice to guide you through the procedure. If Launch fails for any reason, the button will turn red and indicate "Launch failed".
Network configuration
The MPX 100 can be configured on the Network page to receive an IP address from the network DHCP or to use a static IP address that can be specified here, along with the netmask and gateway to the network infrastructure. Similarly, the DNS can be received from the network DHCP or configured manually.
