Connecting an FSR MM-CLCKAUD to an EX-LOGIC
One popular application for the EX-LOGIC is to interface with conferencing microphones that feature mute switches and LED indicators. This article describes how to physically connect an FSR MM-CLCKAUD to a Tesira EX-LOGIC.
Note that even though this article shows diagrams for only the EX-LOGIC, the logic I/O terminals that are built into Tesira servers and TesiraFORTÉs can be used for the same purposes as an EX-LOGIC.
Goal
After completing this article, you will be able to connect an FSR MM-CLCKAUD to a Tesira EX-LOGIC. This will allow your Tesira configuration to control the mic's LED, and it will also allow the mic's mute switch to control functions within your Tesira configuration (like microphone muting).
Conductor Color
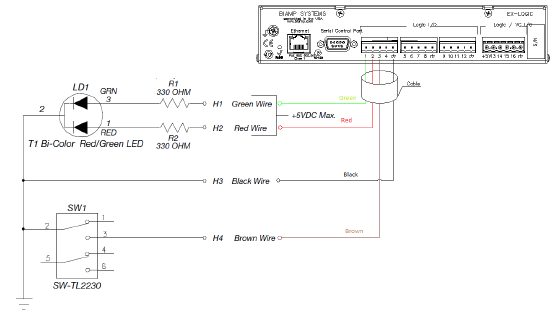
The FSR MM-CLCKAUD comes with an un-terminated cable, which has the following color code:
| Conductor Color | Function |
|---|---|
| Green | Green LED |
| Red | Red LED |
| Black | Common |
| Brown | Switch 1 |
Wiring
The diagram below displays the physical connection between MM-CLCKAUD with the Tesira EX-LOGIC:
In Tesira Software
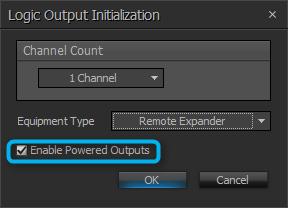
 Green and RED LED's will be configured as logic outputs and Enable Powered Outputs should be turned on. Push button (Switch 1) will be configured as standard logic input.

