Configuring a Tesira NPX paging system
NPX Paging Stations can be configured as a Tesira expander, enabling a convenient way to add paging features to a Tesira system. All NPX models feature both AVB and Dante interfaces, making them compatible with AVB or Dante Tesira systems.
This article explains how to manage and configure an NPX device, and to build a paging system on a Tesira system.
(Updated for Software and Firmware Versions 4.3.0)
Supported paging actions
On device actions:
- Live Paging: via PTT /PTL button on the device
- Recorded Announcements
Tesira configuration enabled actions:
- Repeated Recorded Announcements with Logic trigger using external controls
- Scheduled Announcements with recorded messages using Presets and Event Scheduler block
For more information on Tesira configuration enabled actions, refer to this article.
Supported system topologies
NPX and Paging Blocks can be added to a Tesira layout in either only AVB or only Dante media network modes, and all additional NPX devices added to the layout will be assigned the same mode. The following topologies are supported based on the media network type selected.
NPX and Paging Blocks are not supported on the Tesira Connect TC-5D (Dante <> AVB bridge).
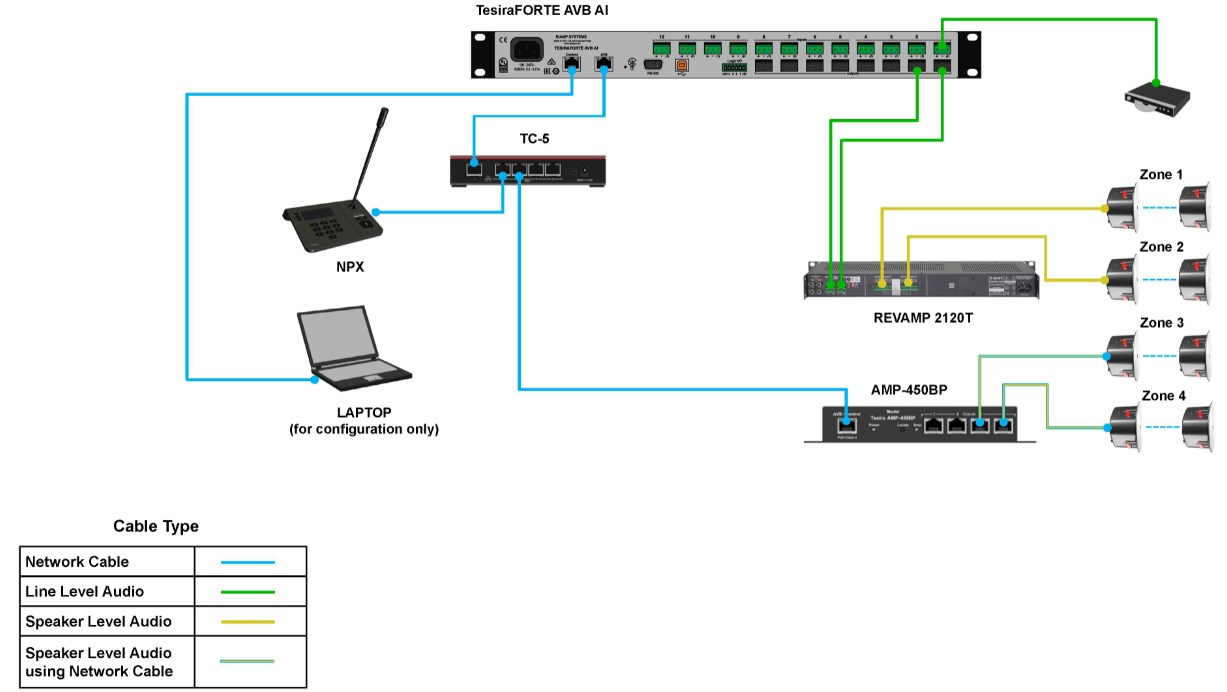
Single-cable AVB mode
All media traffic and communications are handled with a single link to the AVB port. The NPX unit should be assigned an IP address in the same range as the AVB port on the Server device.

Separated networks AVB mode (Firmware 4.3 and newer)
In Tesira software and firmware version 4.3 (and newer) and NPX paging station firmware version 1.1 (and newer) Biamp has extended support to cover separated AVB network topologies on all NPX handheld and gooseneck models. This addition to manage the paging stations via the Control network will greater align with past management of expander-class devices.
Station management functions are now able to be performed via the control network for separated AVB media and Control networks.
Separated networks AVB mode (Firmware 4.2.5 and older)
Media and control traffic are separated in their own networks, and NPX is part of the AVB media network.
In this network mode, NPX device features under Device Maintenance > Remote Devices can only be managed by direct communications between Tesira Software and the NPX unit. This can be achieved by a connection from an alternate network interface on the control PC/Laptop to the media network, configured to the same IP range as the NPX unit.

If two separate network interfaces are not available, the control PC/Laptop will need to be switched over to the media network with the correct IP settings to access the NPX device management features. Besides the Device Maintenance settings, all paging related configurations and changes are handled from the control network, and direct network connection between Tesira software and NPX unit is not necessary.
Note: NPX AVB currently requires MVRP enabled and AVB VLAN 2 (default) on the AVB network.
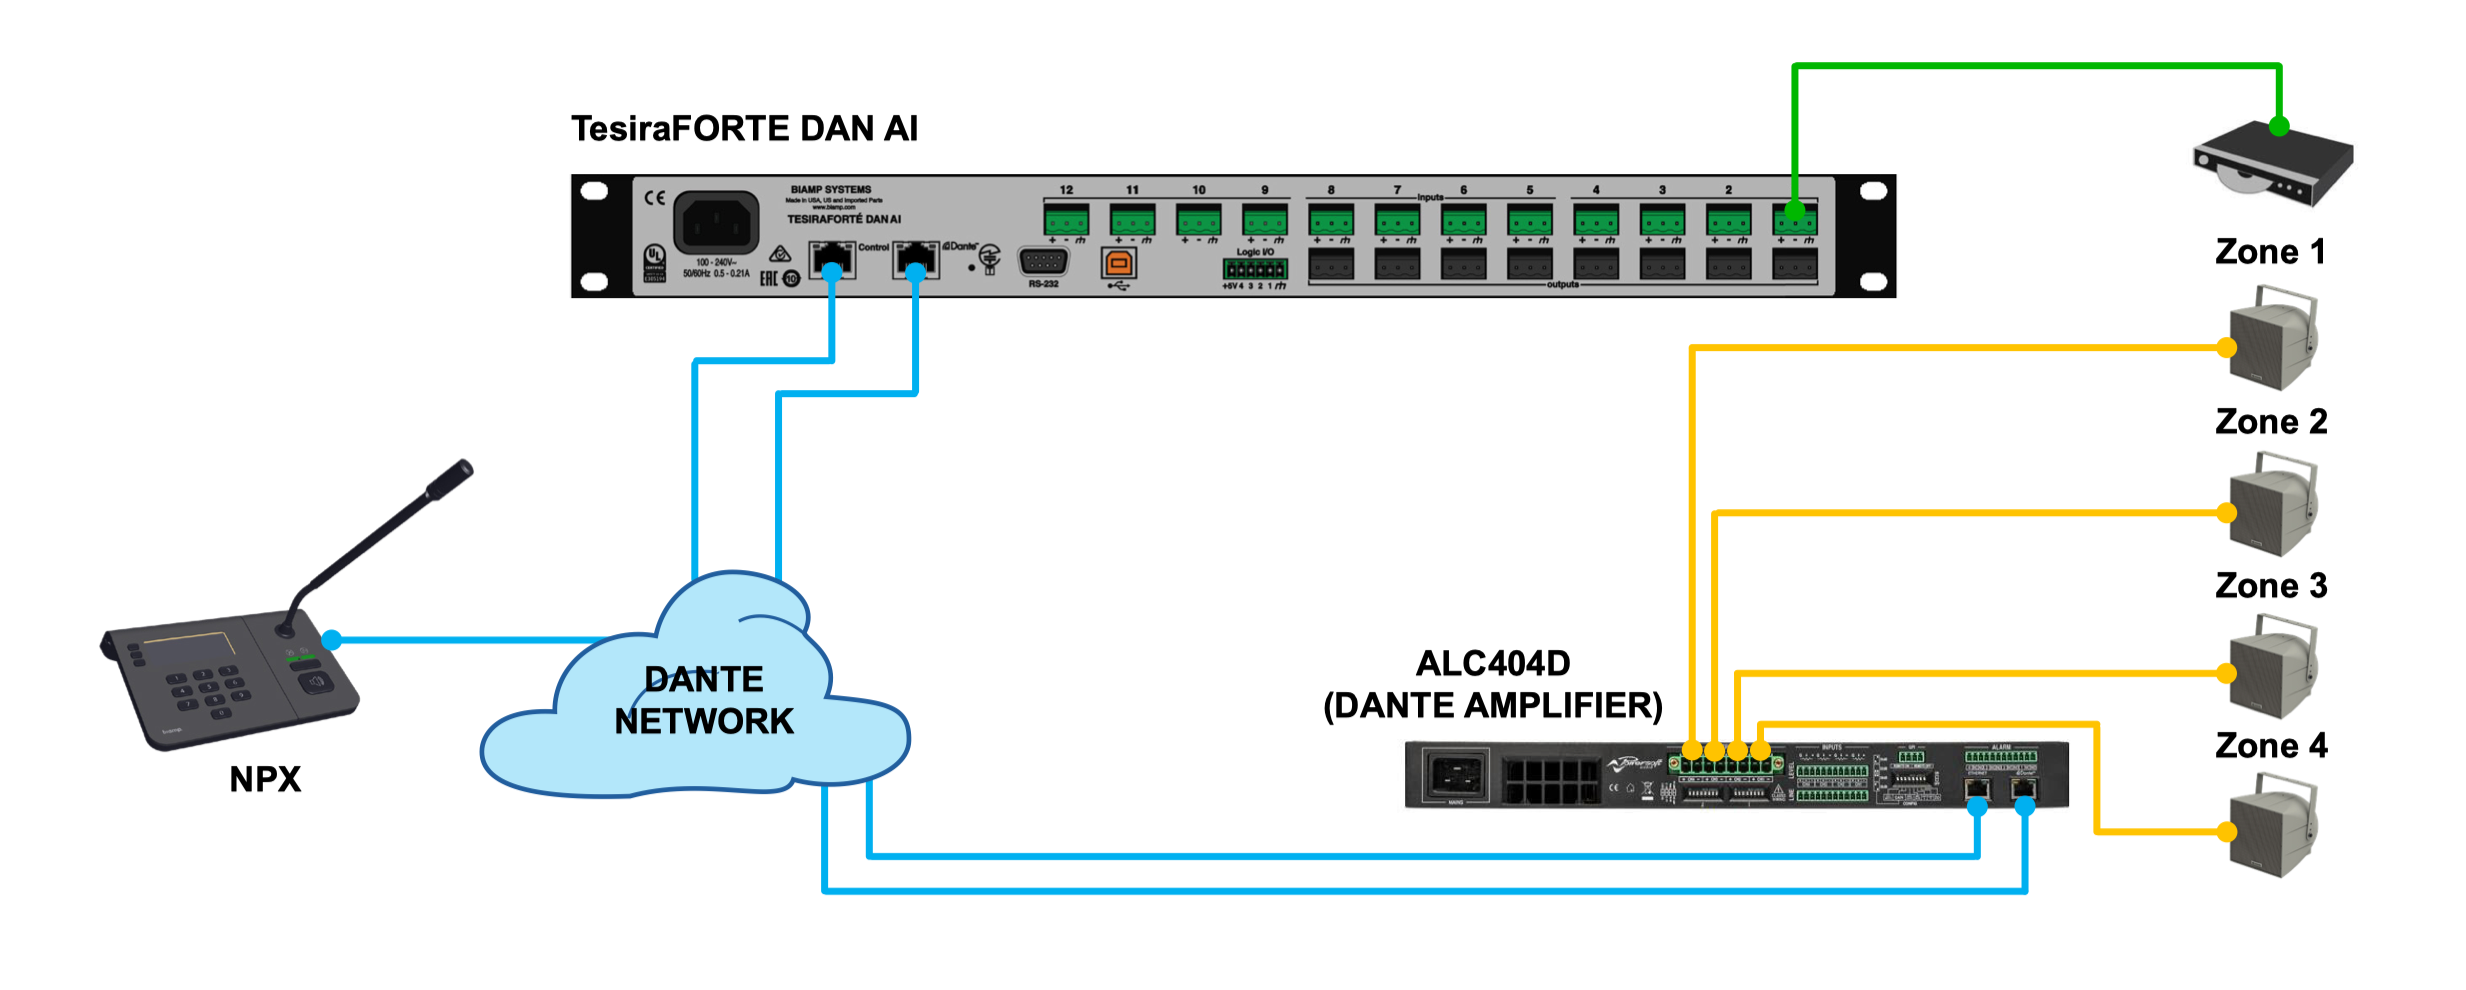
Dante mode
NPX functions as a Dante endpoint in this mode and is configured with the Tesira DAN Servers on a converged Control and Dante network. A converged Control and Dante network is necessary because the internal Control and Dante interfaces onboard the NPX device share the same Ethernet port.
NPX and Paging Blocks are not supported on the Tesira Connect TC-5D (Dante <> AVB bridge).
NPX device settings
NPX features standard expander type and paging specific settings under Device Maintenance>Remote Devices. This section covers settings that are different and/or specific to the paging stations.
Network settings
As of Tesira version 4.3, the NPX Network Settings dialog enables separate IP configurations for the internal Control interface and the Dante interface (restricted to DHCP only in older versions). Dante network configuration/AVB related alternate media network settings are available in the Media Networks tab. Control and media traffic are combined, allowing the one physical network interface on the NPX to service both functions.

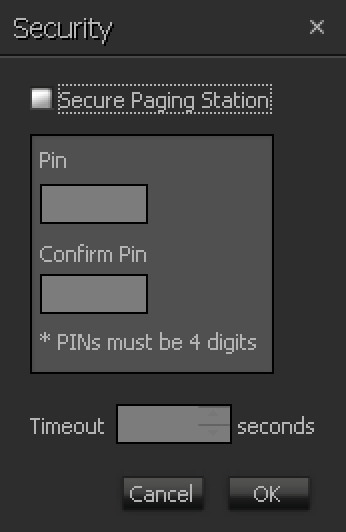
Security settings
There are two separate security settings on an NPX:
- Device Configuration Security: The Device Security dialog under the 'Security Settings' button secures device configuration from the software, much like the Security Settings for a Tesira system. Clicking on 'Protect Device...' prompts for an admin password of 8 or more alphanumeric characters. This password will be required anytime an NPX is accessed by the Tesira software for device settings or configurations.
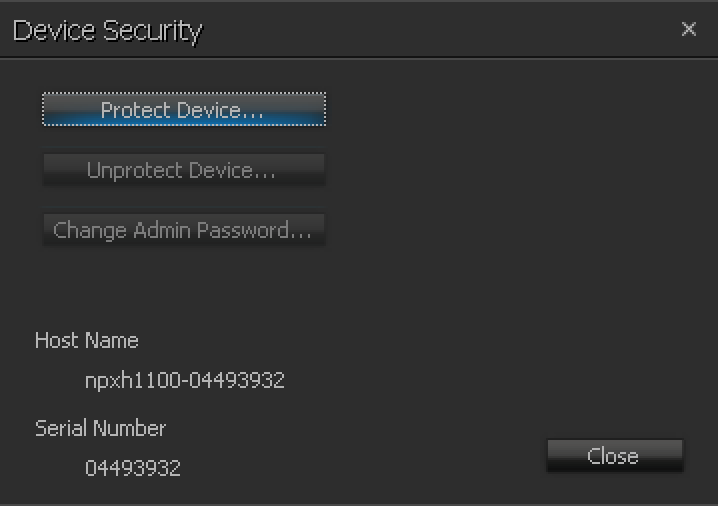
- Device Access Security: On device paging functions and settings can be secured with an on screen 4-digit pin code. This pin code option can be enabled by clicking the little 'Lock' icon on the bottom left of the Paging Maintenance dialog (Dialog screenshot in the section below)
Device Firmware Update
The firmware update process for the NPX follows the same steps as for Tesira Server devices:
- In Tesira software, click the Device Maintenance button
 or go to System→Network→Perform Device Maintenance.
 - Click the Update Firmware button.
- Browse to the firmware update file, which should be a .qfa file.
- The firmware update dialog will only show discovered NPX devices. Select all of the devices that you'd like to update, or click Select All to update all devices. Click OK to begin the upgrade.
Audio file management
The 'Manage Paging Station' button opens the Paging Maintenance dialog with ten slots each for Recordings and Preambles. By default all the slots are disabled. Audio files can be uploaded by clicking the up arrow which opens a standard Windows 'Open' Dialog.
Alternately, audio can be recorded directly from the NPX device by selecting a slot and following on screen instructions. Each NPX can store upto 50 minutes of audio shared across the 10 slots of recorded messages and preambles combined. Audio data does not sync across NPX devices, and needs to be separately managed for each device.
Existing recordings (previously uploaded or recorded on device) or preambles can be downloaded and saved to PC by clicking the down arrow icon and can also be deleted by clicking the trash can icon.
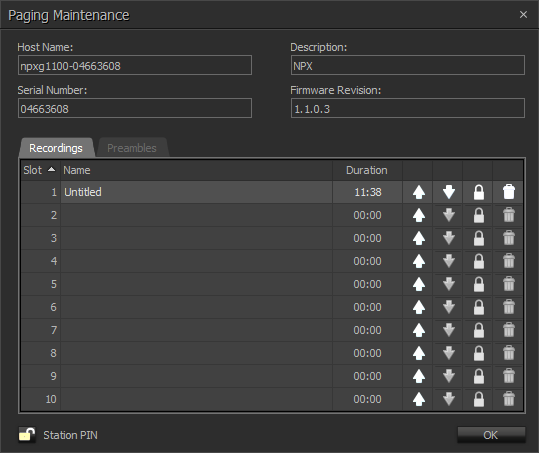
As of Tesira software and firmware version 4.3 as well as NPX firmware version 1.1.0.3, the ability to prevent messages from being overwritten or removed has been added to the NPX paging stations. The option will prevent an operator from overwriting an existing message by either recording a message to the slot from the paging station or by uploading a new message via the Tesira software.
To enable a message slot to be locked, use the lock icon (  ). Once a message lock is enabled, the Upload, Download and Delete functions will be unavailable until such time the slot is unlocked again. The lock icon also serves to unlock the message slot.
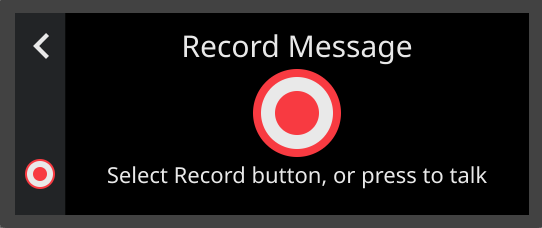
The NPX on screen UI provides options to select a slot, record audio, save and delete messages.
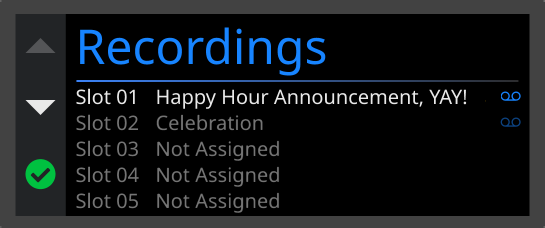

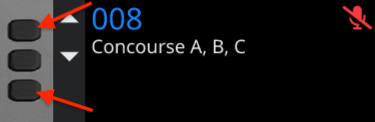
To access the Recordings Slots and related controls,, press the top and button buttons next to the NPX Screen
Audio settings
Each Paging Station block control dialog includes tabs for Audio, Filters and Compressor.
The Audio tab shows meters for NPX Mic, Record message Playback level, and Page Out levels. The Filters tab features 6 slots for adding upto 6 filters of various types. The Compressor tab contains a standard Tesira compresssor type UI with 1 active knee point.

Configuring a paging system
Step 1: Add paging blocks to Tesira layout
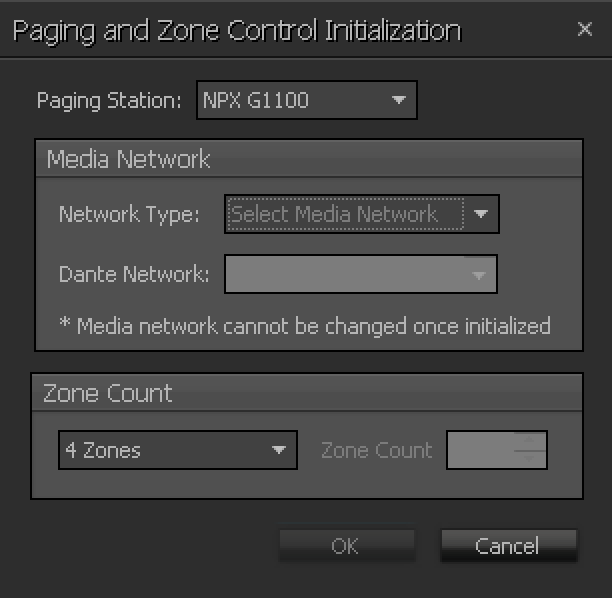
From the 'Paging Blocks' menu ![]() in the Object toolbar, add 'Paging and Zone Control' to the layout . Specify the NPX media mode (AVB or Dante), first NPX device model and number of zones in the Paging and Zone control Initialization dialog.
in the Object toolbar, add 'Paging and Zone Control' to the layout . Specify the NPX media mode (AVB or Dante), first NPX device model and number of zones in the Paging and Zone control Initialization dialog.
Note: Network media type cannot be changed after the initial selection unless starting over by deleting all the paging blocks.
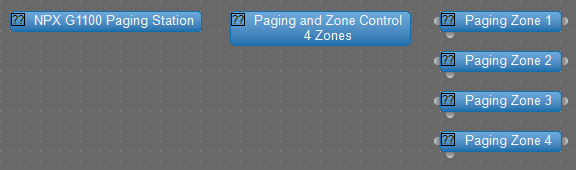
In the layout the paging blocks appear as a collection of three types of blocks: 'Paging Station', 'Paging and Zone Control' and 'Zones'.
All three types of blocks must reside on the same partition. If cross-partition audio routing is desired this can be achieved by the use of partition connectors placed before or after the Paging Zone blocks. Only one Paging and Zone Control block can be placed per-layout.
Paging Station and Paging and Zone Control blocks have no included or optional logic I/O nodes.
As of Tesira Software and Firmware version 4.3, Paging Zone objects automatically include a single logic output node. The logic output will be active for the duration of a paging event to the associated zone.
The Zone blocks can be placed on an output path for the intended zones.
Upto 32 Paging Zone blocks are supported within NPX paging systems. Additional Zone blocks can be added by modifying the Zone count from the Edit Block Parameters option for the Paging and Zone Control block in the right click context menu.
Upto 16 paging stations can be added from Paging Blocks > Paging Stations.
Step 2: Connect Paging Zone blocks
Connect the input and output nodes of the The Paging Zone block to the designated zone outputs in the Tesira layout. When paging is initiated from the NPX, the Paging Zone block ducks the signal coming into the input node in favor of the NPX paging audio. Ducking threshold can be changed from the default -30 dB in the control dialog of the block.
Logic output nodes on the Paging Zone blocks can be optionally used to trigger logic functions based on paging activity within the Tesira system or send ASCII/HEX strings to external systems using Command String blocks.

Sample Layout with Paging Blocks
Step 3: Create Page Codes
Open the Paging and Zone Control block and click 'Add New' to create Page Codes.
Page Codes define announcement action (Live/Recorded), Preamble ( or chimes) that plays prior, what zones the announcement would be heard and the priority level of the announcement. Page Codes and its properties are defined in the Paging and Zone Control dialog.
Up to 999 Page Codes can be created with unique labels and specific Zone combinations, Preambles, Action and Priority.
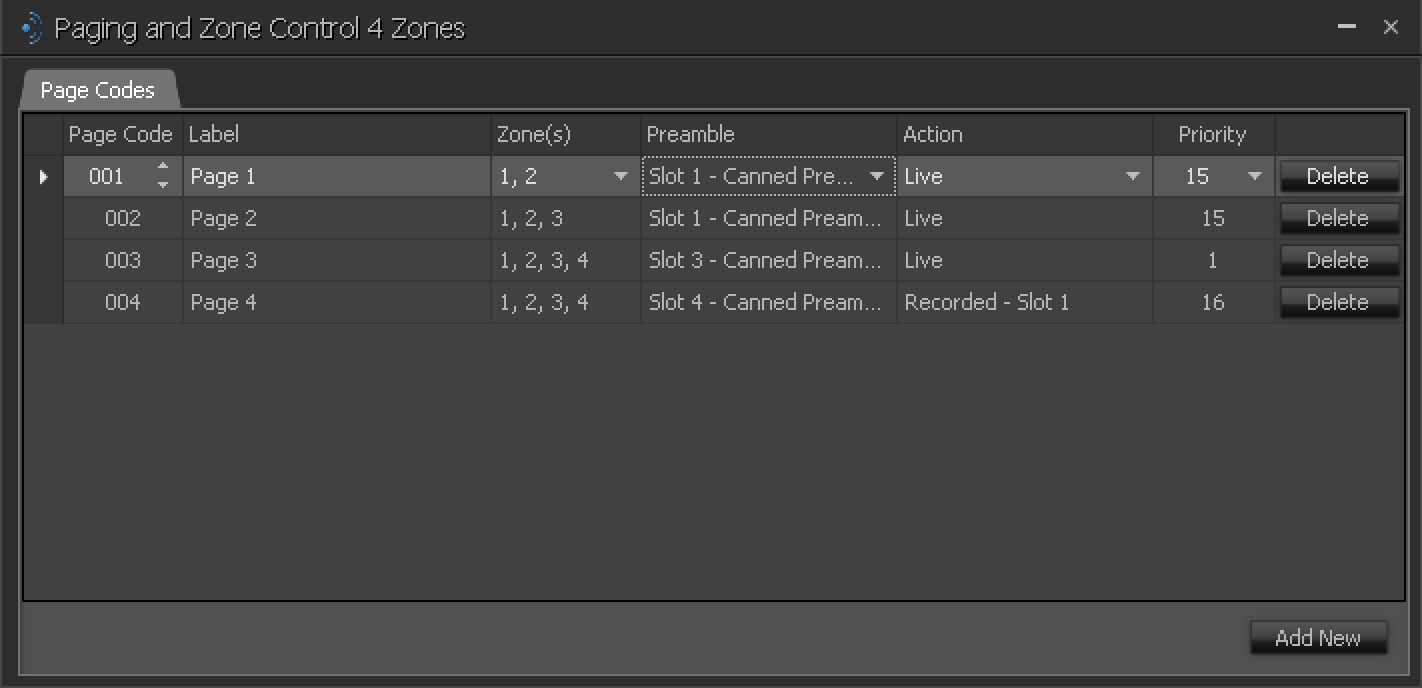
Tesira software includes five canned Preambles in Slots 1 through 5, with the option of uploading custom preambles in Slots 6 through 10.
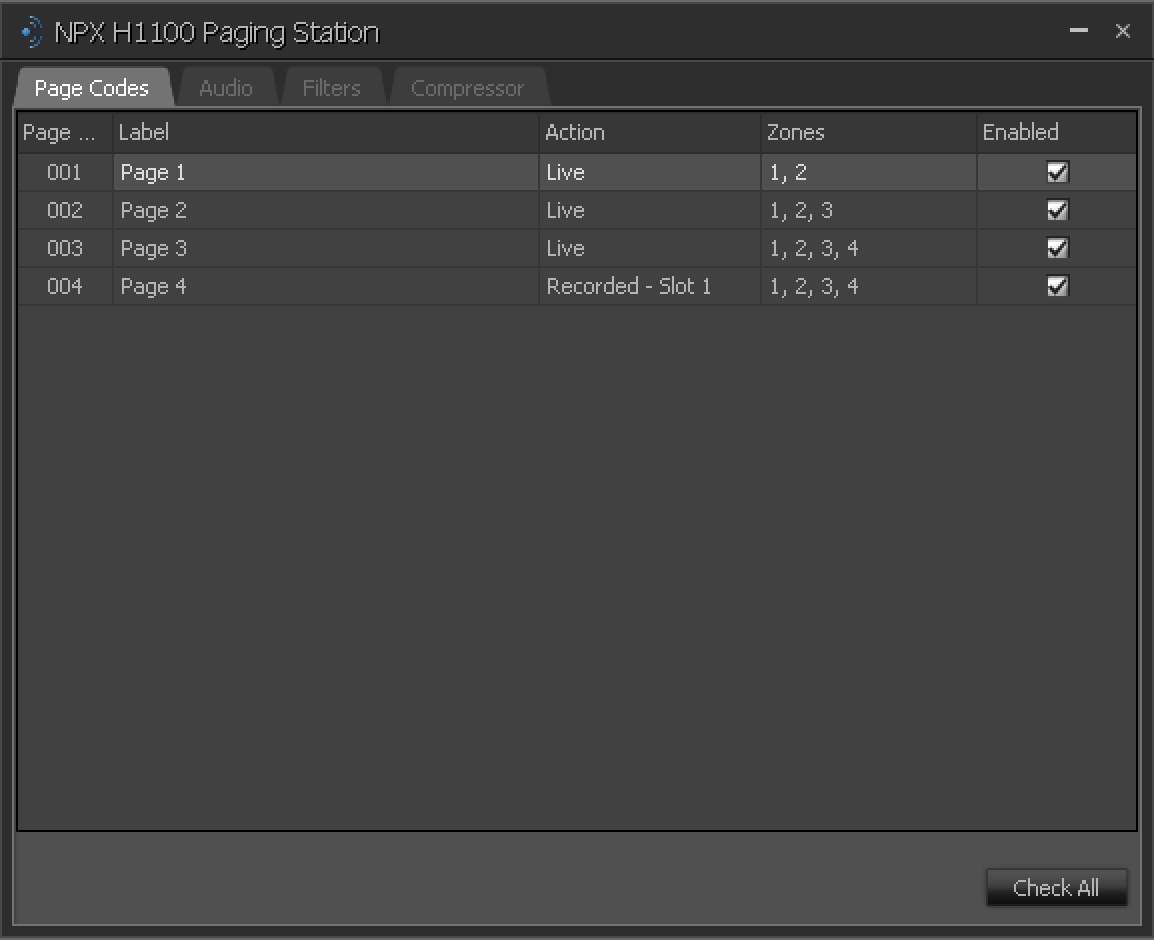
Step 4: Assign Page Codes to Paging Stations
Open each paging station block and enable page codes in desired combination. This action can be performed offline or online
Step 5: Additional media network configuration
In AVB mode, NPX requires no further configuration and should work like other Tesira expanders.
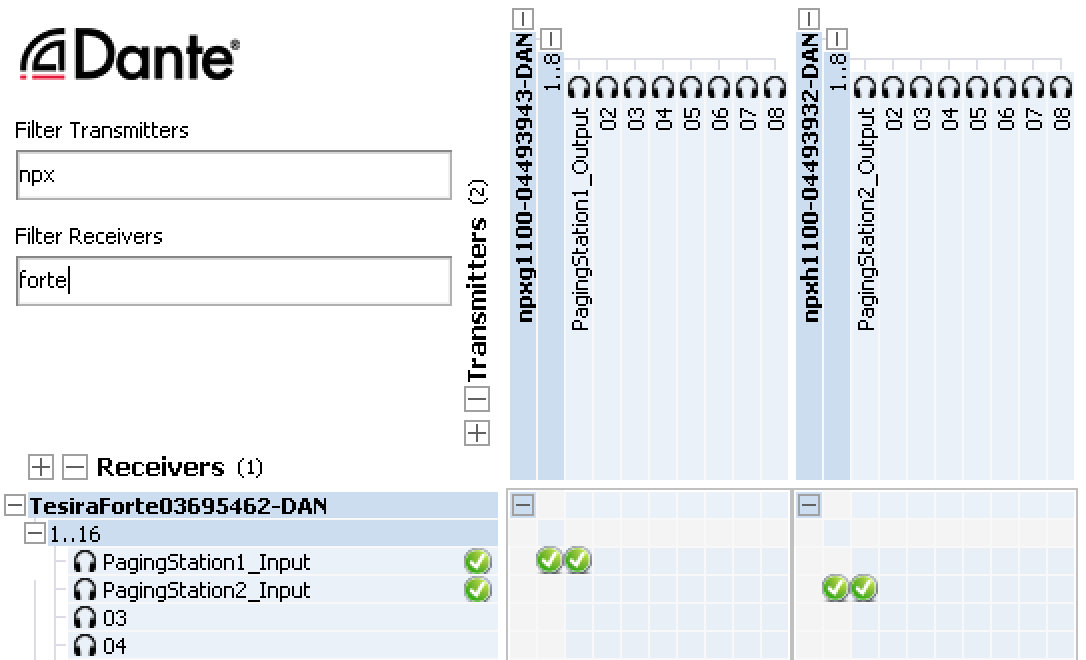
In Dante mode, Dante transmit channel from each NPX will need to be paired with the corresponding Dante receive channel on the host Tesira system via the Dante Controller. The name of the Dante channels for NPX is in the format 'PagingStationX_Output' and for the host Tesira system it's 'PagingStationX_Input', where X is 1 for the first device and increments as more devices are added.