

Integrating USB 200 with Tesira Logic I/O
This article describes/explains how to integrate the USB 200 switcher with Tesira Logic I/O. This article specifically works with a Forte X, however the logic I/O works the same on rackmount Forte's and also Server IO's.
Connections/Preparation
We will need to connect the Forte's Logic I/O port to the USB 200 device's switch input via Phoenix connectors. There are two inputs on the USB 200: PC 1 and PC 2. There is also a selection switch on the side of the USB 200 to switch between "Manual Mode" and "Priority Mode". Use the USB 200 Quick Start Guide to see exactly where these are located
Programming in Tesira
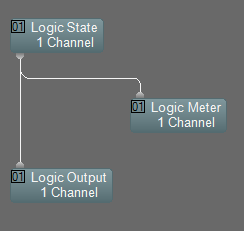
First step is to add in our Logic blocks. Logic State 1 channel and a Logic Output 1 channel is all you need for the most simple setup. Connect the Logic State to the Logic Output block. This will be momentary signal, not latching; we will cover the latching functionality in this article later on. You can add a Logic Meter block off of the Logic State to verify the logic signal is going out of the Logic State block. It should look something like this:
Latching functionality
This is the logic programming for latching functionality:
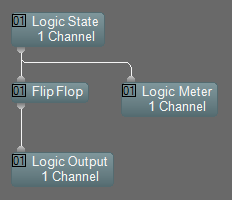
The Flip Flop logic block adds the latching functionality. Now the USB 200 will switch PC inputs when the block sees a High-to-Low-to-High logic signal.
Further reading