Manually assigning I/O channels
When compiling a Tesira configuration, the compiler will automatically assign the channels within each input/output (I/O) block to physical channels on the device. However, if that automatic assignment doesn't assign the channels the way you need them to be assigned, then you can also manually assign the channels.
This article describes how to manually assign channels within input and output blocks to physical channels.
Device I/O
 The current channel assignment can always be viewed by simply opening up the input or output block. Each I/O block has a column labeled "Dev. IO" that shows the current channel assignment.
Depending on what type of device the I/O block is assigned to, the "Dev. IO" column may display the channel assignment slightly differently:
Blocks assigned to Tesira Servers and Expanders will display the channel assignment as a number, followed by a period, and then another number (i.e. 1.3 or 11.2). The first number corresponds to the card slot number on the device, and the second number corresponds to the channel number on that card. So, for instance, 8.3 means slot 8, channel 3.
Blocks assigned to TesiraFORTÉ devices will display the channel assignment as a single number, which corresponds to the input or output number on that device.
If the device I/O is listed as question marks (??), then channels have not yet been assigned in this block. This is usually because the file has not yet been compiled.
Manual assignment
 Manual assignment of the device I/O can be accomplished in the Properties window of the input or output block. However, manual assignment is not allowed unless the block is fixed to a particular device. Follow these steps to manually assign the device I/O of an input or output block:
- Right-click on the input or output block, and select Properties to open the Properties window.
- Select the DSP Properties tab in the Properties window.
- For Allocated to unit, select the device number to which this block should be allocated.
- Once the device number has been selected, set Fixed in unit to True.
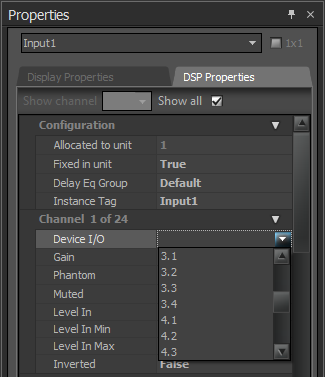
- At the top of the properties window (directly beneath the tabs), find the Show channel drop-down menu. Select the channel number within the block that you'd like to manually assign in the drop-down menu. Alternatively, you can check the Show all checkbox to show the properties of all channels simultaneously.
- At the bottom of the list of properties in the Properties window, the currently selected channel (or all channels) will be displayed. For the channel that you'd like to assign, select the Device I/O property and choose the desired physical channel.
Hints
- Note that you can only assign a physical channel that has not already been assigned to a block. If the channel you'd like to assign does not appear as an available channel, then it may already be assigned elsewhere. Unassign it by setting it to question marks (??) to make it available for assignment.
- Manual assignment of AEC input channels can only be done from the Properties window of the AEC Processing block, not the AEC Input block. Manual assignment of telephony inputs can only be done from the Properties window of the TI Receive or VoIP Receive block.
- After manually assigning channels, be sure to leave the Fixed in unit property to True, to prevent the compiler from overriding your channel assignments when the file is compiled next.