Cisco CallManager configuration for Audia VoIP-2
Biamp’s VoIP-2 card allows Biamp AudiaFLEX digital signal processors to make and receive phone calls over any Voice-over-IP (VoIP) system that adheres to the SIP (Session Initiation Protocol) standard. This document details the steps required to configure a Cisco CallManager VoIP system to work with Biamp’s VoIP-2 card.
Preliminary steps
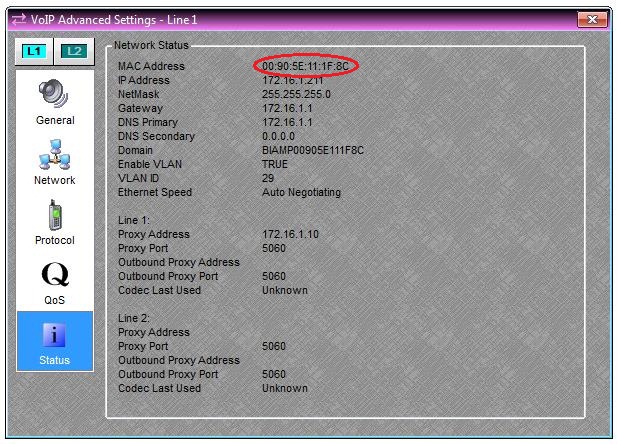
Before configuring the CallManager system, there is some information that needs to be obtained. First, note the MAC address of the VoIP-2 card. To do this, first connect to the configured Audia® system using the Audia software. Then, double-click on the VoIP Console block and click on the “Advanced” button. Navigate to the Status page to find the MAC Address of the VoIP-2 card. Note that the MAC Address will only appear here if you are connected live to the Audia system.
Cisco changed license policy from version 9.0 onwards, so the below is not relevant for newer versions. But older versions required that the CallManager system has enough licenses available to handle a VoIP-2. From CallManager’s perspective, the VoIP-2 card appears as a third party SIP endpoint. Cisco required that a sufficient quantity of licenses be purchased from them before a third party SIP endpoint can be integrated into the CallManager system. To confirm this, log in to the CallManager system, and go to System—>Licensing—>License User Report. If you plan to use the VoIP-2 card for a single extension, you will need 3 available licenses. If you plan to use the VoIP-2 card for two separate extensions, you will need 6 available licenses.
Cisco configuration
First, we'll focus on setting up the Cisco CallManager server.
Security Profile
The first step to setting up the CallManager system is to create a Security Profile. If your CallManager system already has an existing Security Profile that you'd like to use, you may be able to skip this step, although you should confirm that the existing Security Profile has the settings described below. Follow the steps below to create a Security Profile:
- Go to System—>Security Profile—>Phone Security Profile.
- Click the "Add New" button.
- Select the Phone Security Profile Type
- If you plan to use the VoIP-2 card for a single extension, choose Third-party SIP Device (Basic).
- If you plan to use the VoIP-2 card for two separate extensions, choose Third-party SIP Device (Advanced).
- Click the "Next" button.
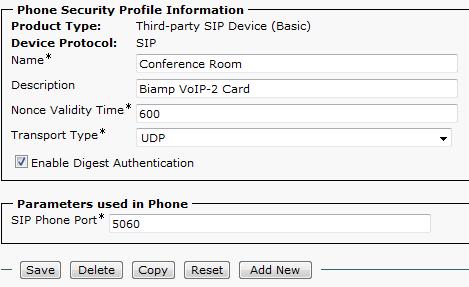
- Enter a name and a description for the new Security Profile.
- Leave the Nonce Validity Time at its default value of 600.
- Set the Transport Type to UDP.
- Click the checkbox to Enable Digest Authentication.
- Leave the SIP Phone Port at its default value of 5060 unless your particular situation requires SIP traffic to be transmitted on a different port. If this is the case, you'll need to specify this port in the VoIP-2 card as well.
- Click the "Save" button.
Add a new user
Once a suitable Security Profile has been created, a new user must be created. Follow the steps below to create a new user:
- Go to User Management—>End User.
- Click the "Add New" button.
- Enter a user ID. Take note of this username, as it will be used later as the "Proxy Username" in the VoIP-2 card.
- The password and PIN number are not required.
- Enter a Last Name (this name is for internal descriptive purposes only).
- Enter a password in Digest Credentials. Take note of this password, as it will be used later as the “Proxy Password” in the VoIP-2 card.
- Enter the same password in “Confirm Digest Credentials”.
- The remaining fields on this page can be left either blank or at their default values. Click the “Save” button.
Add a new device
Once a new user has been created, a new device must be created. This device will link to the Security Profile and the user created in earlier steps. Follow the steps below to create a new device:
| Steps 3-8 | 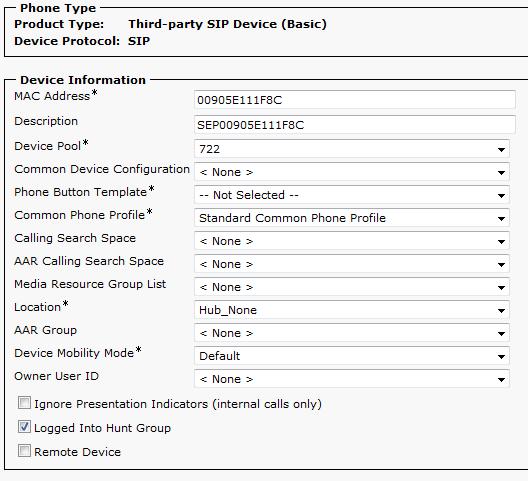 |
| Steps 9-13 | 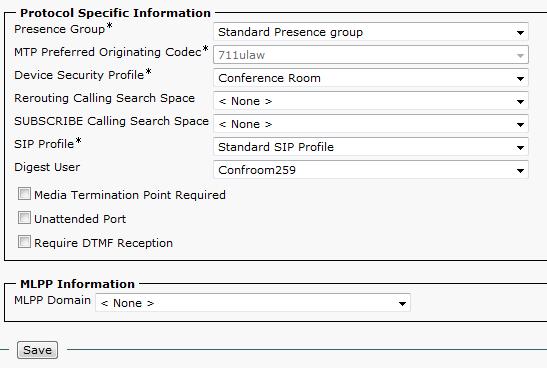 |
| Step 15 | 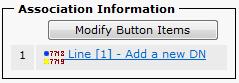 |
| Steps 16-18 |
|

- Go to Device—>Phone.
- Click the “Add New” button.
- Select the Phone Type.
- If you plan to use the VoIP-2 card for a single extension, choose Third-party SIP Device (Basic).
- If you plan to use the VoIP-2 card for two separate extensions, choose Third-party SIP Device (Advanced). Note that the Third-party SIP Device (Advanced) setting allows up to 8 lines, but the VoIP-2 card uses a maximum of 2 lines. This results in a "partially registered" message from Call Manager. This is normal and not a cause for concern.
- Click the "Next" button.
- Input the MAC Address of the VoIP-2 card. Note that the colons should not be included in the MAC Address.
- The Description field will auto-populate once the MAC Address has been entered.
- Select the desired Device Pool in which this device should be included. Ensure that the codec used by this device pool is supported by the VoIP-2 card (the VoIP-2 card supports the following codecs: G.722, G.711μ, G.711A, G.729AB, and G.723.1).
- The remaining fields under the “Device Information” heading can be left at their default values.
- For the Device Security Profile, choose the Security Profile created earlier.
- For SIP Profile, choose Standard SIP Profile.
- For the Digest User, select the User created earlier.
- The remaining fields under the “Protocol Specific Information” and “MLPP Information” headings can be left at their default values.
- Click the “Save” button.
- Once your information is saved, you will be brought back to the configuration page for the device you just created. The only difference will be that there is an new “Association Information” section in the top left corner. If you’re in Basic (single extension) mode, you should see one line here. If you’re in Advanced (two extensions) mode, you should see up to 8 lines here.
- Click on “Line [1] - Add a new DN”.
- Enter the directory number for this extension. Take note of this number, as it will be used as the “Subscriber Number” in the VoIP-2 card settings.
- The remaining fields on this page can be left at their default values.
- Click the “Save” button.
- If you’re setting up a 2-line configuration, click on the “Line [2] - Add a new DN” and repeat steps 16-18 above. Otherwise, the CallManager setup is complete.
Audia configuration
Next, we'll focus on setting up the AudiaFlex configuration to match the settings that were used in CallManager.
VoIP Console
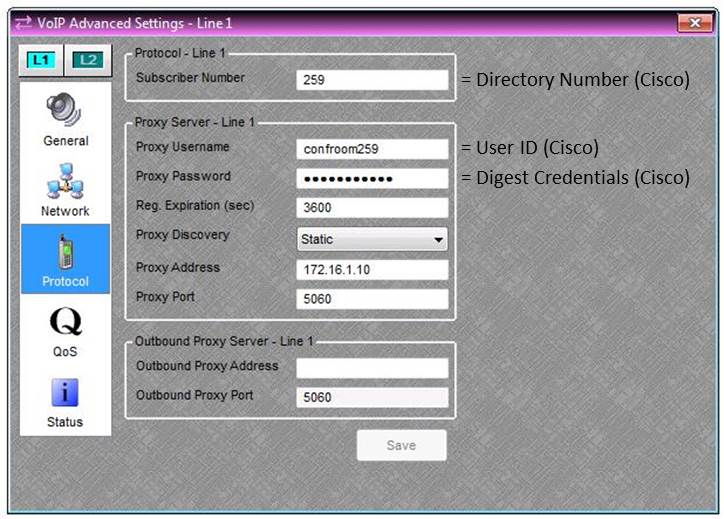
| Biamp VoIP-2 | Cisco Call Manager | |
| Subscriber Number | = | Directory Number |
| Proxy Username | = | User ID |
| Proxy Password | = | Digest Credentials |
- Open the Audia software, and open the .dap file for your project. Do not connect to the Audia system yet, because the information below cannot be entered while you are connected to the Audia system.
- Double-click on the VoIP Console block and click on the “Advanced” button. In the Advanced Settings window, select the Network page.
- If the VoIP-2 card is connected via a tagged VLAN, then click the “Enable VLAN” check box and enter the VLAN ID. If the VoIP-2 card is on an untagged VLAN (or no VLAN), leave the "Enable VLAN" check box unchecked.
- If the VoIP-2 card is intended to obtain its networking information via DHCP, click on the “Use DHCP” check box. Otherwise, manually enter the networking information into the fields below. If you’re not sure what information to enter for steps 3 and 4, contact the IT administrator who manages the VoIP network.
- Select the Protocol page.
- Enter the Subscriber number (the same number entered under “Add a New Device”, step 16).
- Enter the Proxy Username and Password (the same information entered under “Add a New User”, steps 3 and 6).
- For Proxy Address, enter the IP address of the Cisco CallManager server. If the VoIP port is different than the standard port of 5060, enter it under Proxy Port. If you have separate Subscriber and Publisher servers, enter the IP address of the server that will act as the active registrar for endpoint devices. It is also worth stating that at this time Audia devices do not support Cisco server redundancy and will only register to a single server. If a failover occurs the Audia VoIP device will continuously register to the primary Cisco unit and will and the connection will heal upon this devices return.
- If your system has a separate proxy server for outbound traffic, enter its IP address under “Outbound Proxy Address”. Otherwise, leave it blank.

Steps 10-11 only apply if your VoIP network prioritizes traffic using Quality of Service (QoS). If your VoIP network doesn’t use QoS, skip to step 12.
- Select the QoS page.
- Enter the appropriate L2 (Layer 2) and/or L3 (Layer 3) QoS parameters for your network.
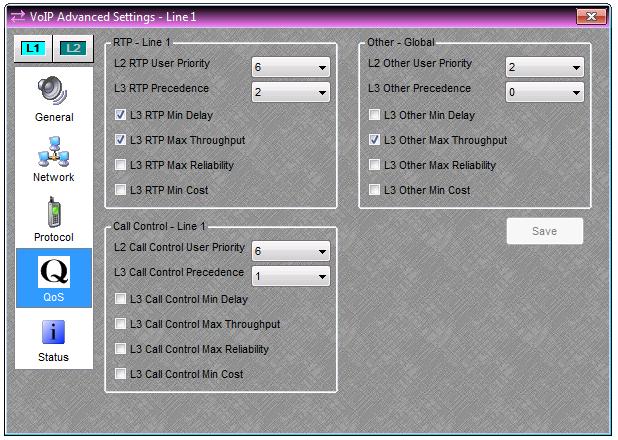
Note: The VoIP-2 card defines QoS parameters based on the ToS (Type of Services) code. If your network defines QoS parameters based on the DiffServ code, please refer to this conversion table to convert DiffServ to ToS.
- Close the VoIP Advanced Settings window, and send the system configuration to the Audia (File—>Network—>Send System Configuration). Once the file is loaded, the VoIP card will attempt to register with the proxy server. Various status messages will appear in the top left of the VoIP Console window (above the dial pad) to let you know where the VoIP card is in the registration process. If a status message is displayed in the VoIP console, this indicates there is a problem with the registration process. See VoIP-2 status messages for a description of the possible status messages and their meanings.
Further reading
- If you've followed these steps and the VoIP card isn't registering, check to see if a VoIP-2 status message is indicating a problem.
- If you need to input Quality of Service (QoS) settings, but only have those settings in a DiffServ format, see the DiffServ to ToS conversion table.