Linking multiple TesiraFORTÉ DAN units together
With the introduction of the TesiraFORTÉ DAN, it is possible to utilize the Dante protocol in the TesiraFORTÉ line of products. While the TesiraFORTÉ DAN is primarily intended to be used in smaller systems where only one TesiraFORTÉ is required, it is possible to use multiple TesiraFORTÉ DANs in a single system. Such systems will require some additional considerations, and this article discusses the important things to consider when using more than one TesiraFORTÉ DAN in a single Tesira system.
We recommend using a Tesira Server-IO with DAN-1 cards if your system requires more than two TesiraFORTÉ DAN units. Due to the potential signal flow complexities of the layout resulting from 2 or more TesiraFORTÉ DAN in a file it is likely that any potential savings on hardware will be offset by added labor fees during programming and commissioning. Use of a Server-IO allows the optional addition of an AVB-1 card to gang multiple chassis together via an AVB backbone making the system much more flexible and expandable via Dante and AVB.
Design and commissioning considerations
Additional configurations will be needed during the initial design and commissioning phases of a system containing multiple TesiraFORTÉ DAN units due to the fact that, unlike AVB, Dante cannot be routed implicitly. Implicit AVB routing allows the compiler in Tesira to handle jumps between devices automatically (indicated by changing the signal path to a dashed blue line in the Tesira software once compiled). With Dante, routing must be done manually through the use of a third-party Dante Controller software, which behaves essentially as a matrix mixer for Dante audio streams.
Bear in mind that the Tesira software's persistent signal path identifier will not function across a Dante jump, and that the system also will not be able to automatically calculate network based delay. Because of this, special attention should be paid to system design to ensure proper routing and configuration. When tuning the room, some delay may need to be added to non-Dante channels in order to synchronize them with the Dante channels.
AEC
In Tesira hardware AEC processing is hosted on the analog AEC input circuit boards. The AEC processing channels can be individually re-allocated to digital inputs leaving the analog inputs available as standard non-AEC inputs.
The TesiraFORTÉ DAN VT4 has 4 analog AEC inputs and thus supports 4 channels of AEC for any combination of either analog or Dante inputs.
With the exception of the TesiraFORTÉ DAN AI, other TesiraFORTÉ DAN models support 12 channels of AEC for any combination of either analog or Dante inputs.
Network considerations
When combining two TesiraFORTÉ Dan models together, there are some networking considerations to keep in mind:
- The TesiraFORTÉ DAN line can support up to 32 channels in and 32 channels out (as opposed to the full 64 channels that the Tesira SERVER-IO's DAN-1 card can support).
- All Dante devices in the system will need to be linked on the Dante network.
- Each TesiraFORTÉ DAN has a single Dante network port (primary only) through which it will handle all Dante I/O for third-party devices as well as Dante I/O between any Tesira/TesiraFORTÉ devices.
- Dante cannot be used for control traffic. Because of this, the TesiraFORTÉ DAN units will need to have their Control Ethernet ports linked, as well. The Control ports can be linked on a separate switch from the Dante ports.
- Remote expanders and rack-mount expanders for Tesira cannot be used in this type of system, as TesiraFORTÉ DAN devices do not support AVB.
- Setting up this system will require the use of Audinate's Dante Controller software. This is a third-party software used for routing Dante audio channels on a network. You can find a copy of the software here.
Programming the Tesira layout file
1. In the Tesira layout, it will be necessary to explicitly pass Dante audio out of one unit and into the other. In the example below, a Dante Output has been added for Unit 2 to transmit audio to the Dante network. A Dante Input block has then been added for Unit 1 to receive audio from the Dante network. The audio channels this input block will receive must be manually configured using the Dante Controller software, the process for which will be shown later in this article.
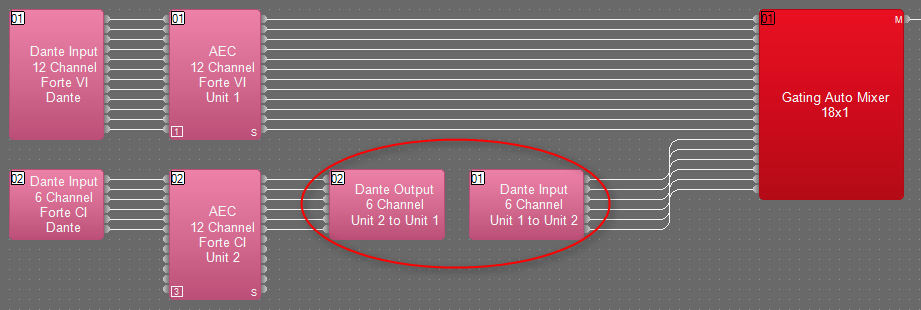
Note in the above example that we must explicitly choose in the Tesira configuration where the Dante jump between units will take place. In order for the 6 Dante inputs from Unit 2 to be included in the 18-channel Gating Auto Mixer that resides in Unit 1, the audio from Unit 2 must be manually routed over Dante to enter Unit 1. If you attempt to draw a line directly from the inputs in unit 2 to the Gating Auto Mixer in unit 1 without going through Dante blocks, the file will not successfully compile.
2. It will also be necessary to route the audio from Unit 1 back to Unit 2. Otherwise, AEC will not function correctly in Unit 2.

In the image above, audio has been passed from the output side of the matrix in Unit 1 to Unit 2 for the local room outputs and AEC Reference. This will ensure that the outputs of Unit 2 will still receive the necessary audio signals, and that the AEC Reference on Unit 2 will have the VoIP Receive audio from Unit 1 routed to it.
3. For all desired Dante audio to be successfully routed to both units in the Tesira layout, it will be necessary to ensure that you do not exceed Dante channel limits for the TesiraFORTÉ DAN units (32 in x 32 out). Based on the two images above, Unit 1 is using the following:
- 12 channels (primary Dante Input block for microphones)
- 6 channels (secondary Dante Input receiving audio from Unit 2)
- Total Dante Input channels = 18
- 9 channels (Dante Output for transmitting audio back to Unit 2)
- Total Dante Output channels = 9
...and Unit 2 is using the following:
- 6 channels (primary Dante Input block for microphones)
- 9 channels (secondary Dante Input block receiving audio from Unit 1)
- Total Dante Input channels = 15
- 6 channels (Dante Output for transmitting audio to Unit 1)
- Total Dante Output channels = 6
Both units are within the stated limits for Dante I/O channels, so there is no need to adjust the design of this system further.
If you attempt to exceed the available number of Dante I/O channels Tesira software will either:
- add another device automatically. Expected behavior will differ if the document mode is "TesiraFORTÉ only" versus "Both Tesira Servers and TesiraFORTÉ".
- show a compilation error "No solution to the allocation problem found."
The behavior is dictated by whether the "Add Devices" setting in Tesira software's Tools>Options>Application Settings>Compile is true or false.
Optional step: Renaming channels
When routing Dante audio channels in the Dante Controller software, each channel will be labeled using an automatically generated unique channel name. When multiple devices are being used and multiple channels will be transmitted and received between the devices, renaming the default Dante audio channel names to something more immediately identifiable can make it easier to route the channels within Dante Controller.
IMPORTANT: Do not attempt to change channel names from within the Dante Controller software. Changes made there are not reported back to the Tesira software, and can cause the Dante network to stop functioning. Make all changes to Dante channel names within the Tesira software only.
To rename a Dante channel, follow these steps:
- Right-click on a Dante block and select Properties to open the Properties sheet on the side of the screen
- Select the DSP Properties tab
- Find the Channel Name field. Editing this will edit the Dante channel's name on the network

Additional information on naming Dante channels can be found in this article.
Routing Dante
Before Dante routing can be configured in Audinate Dante Controller software, the Tesira configuration file must first be sent to the TesiraFORTÉ DAN devices. Once the configuration file has been loaded, the Dante channels sent by the Tesira system should be discoverable in the Dante Controller software. Configured channels will show a channel name in the matrix. Note that unused channels are also shown in Dante Controller software.
Routing Dante channels in Dante Controller is a simple matter of selecting the desired crosspoints of inputs and outputs, just like in a matrix mixer. Below is the same configuration file that has been built in this article, as it appears in Dante Controller.
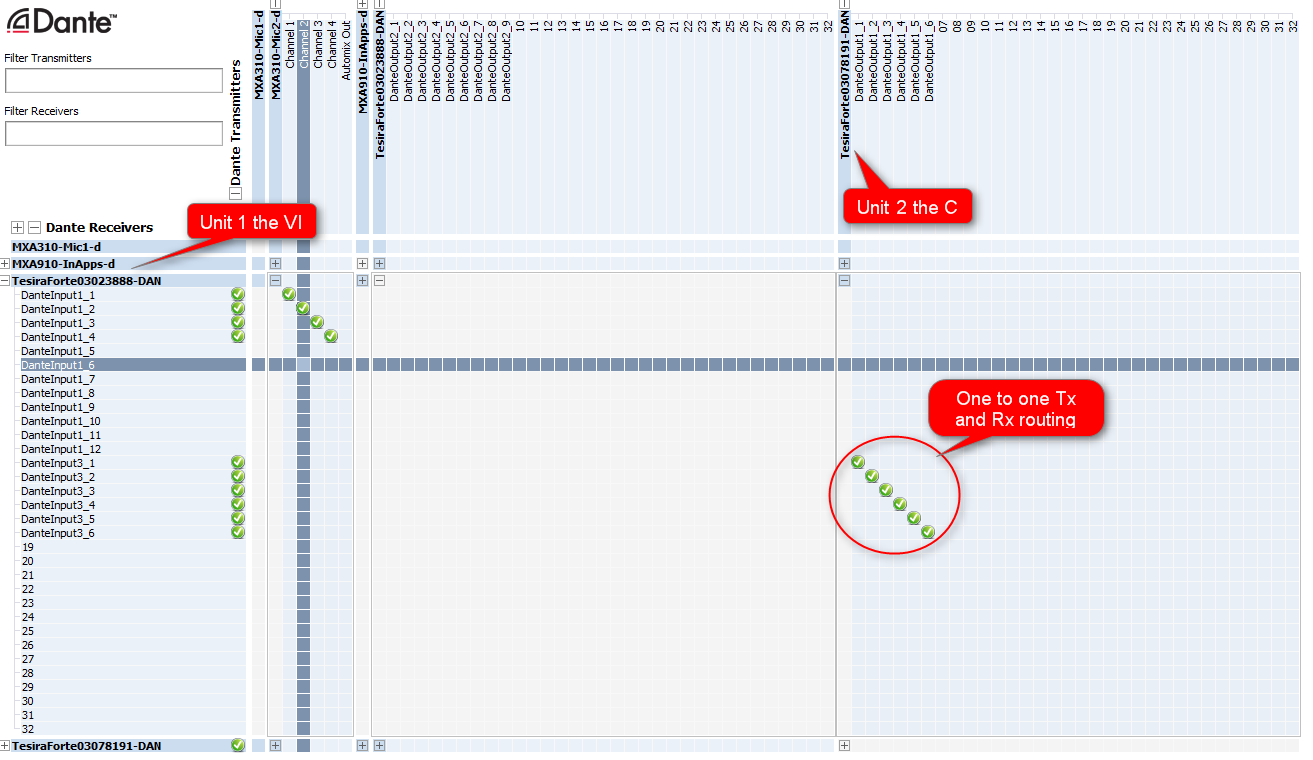
Note that Unit 2's Dante Outputs are being routed to Unit 1's Dante Inputs as a one-to-one matrix (i.e., Dante Output 1 from Unit 2 goes to Dante Input 1 on Unit 1, and so on). The additional Dante Inputs seen in this example are from third-party Dante microphones.
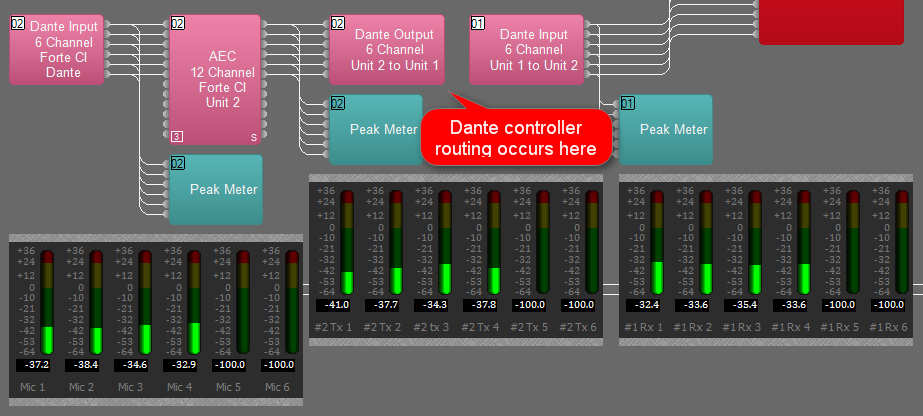
Once the Dante channels have been routed in Dante Controller, peak meters will show the microphone audio coming in over Dante to Unit 2, then moving over the Dante network and being received by Unit 1.
A more in depth example of routing Dante channels via Dante controller can be found in this Dante article.
Sample files
Below are some sample files for integrating two TesiraFORTÉ DAN units together. All examples are using a TesiraFORTÉ DAN VI and TesiraFORTÉ DAN CI.
- VI + CI units linked via Dante with no processing - A simple file to use for practicing Dante routing. There are no processing blocks, just I/O blocks and a mixer.
- VI + CI units linked via Dante with signal processing, program audio, and USB - A slightly more complex example, in which two units are combined via Dante, and one of the unit's local outputs are used for all system audio.
- VI + CI units linked via Dante in a combinable space - A configuration file for combining two Forte DAN units in a room that can be combined or divided.
Further reading
The following articles provide further, important details about utilizing Dante in general, as well as specific information for integrating Shure MXA310 and MXA910 microphones.
- Dante - Overview article for implementing Dante audio in Tesira
- Using the Shure MXA910 microphone array with Tesira - Article providing guidance on using the Shure MXA910 mic arrays with Tesira
- Using TesiraFORTÉ DAN with Shure MXA310 and MXA910 - Tech note with networking guidance and programming tips specifically for the MXA310 and MXA910