Microphone placement: acoustic concepts
This article describes some of the concerns to consider when deciding on locations for microphones in a room.
Closer, closer, closer!
For best results the microphone should always be as close to the source as possible.
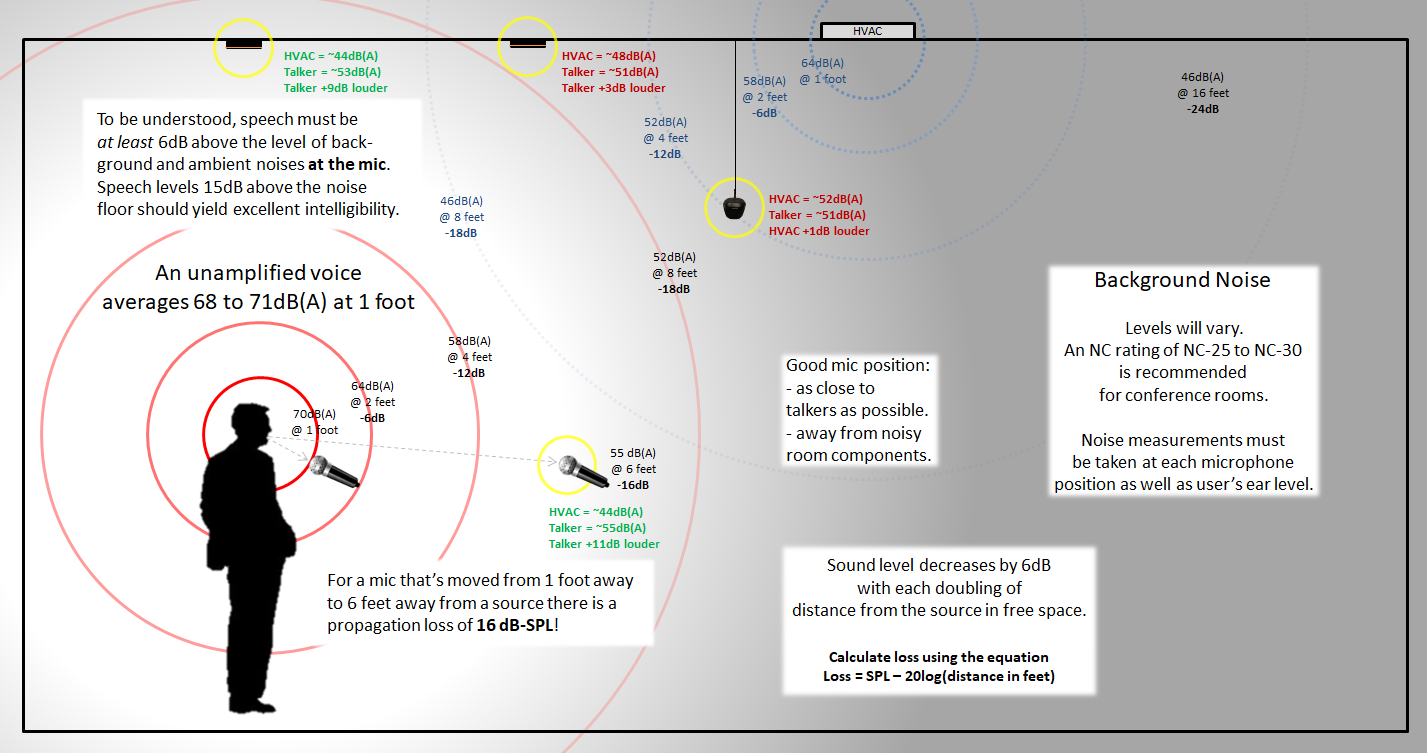
Why do we recommend close miking? Because it will sound better - as distance from any source increases the apparent volume drops and as apparent volume drops it approaches the ambient noise level of the space. As the distance from the source increases, we have to increase the microphone's analog input gain to maintain the same relative level, making the microphone more sensitive to extraneous noises that we don't want to hear in our program material - noises such as projector fans, squeaky chairs, rustling papers, or cars driving past the building.
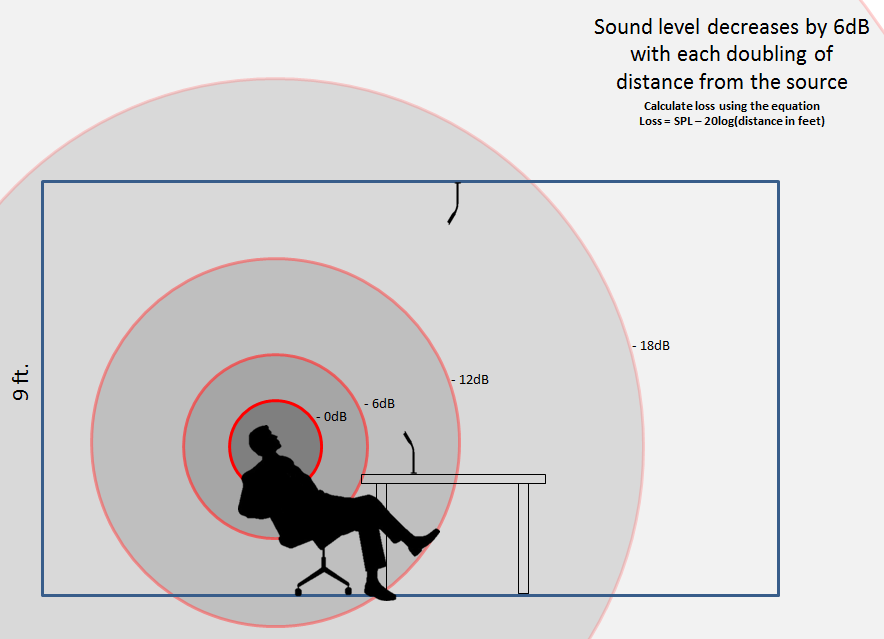
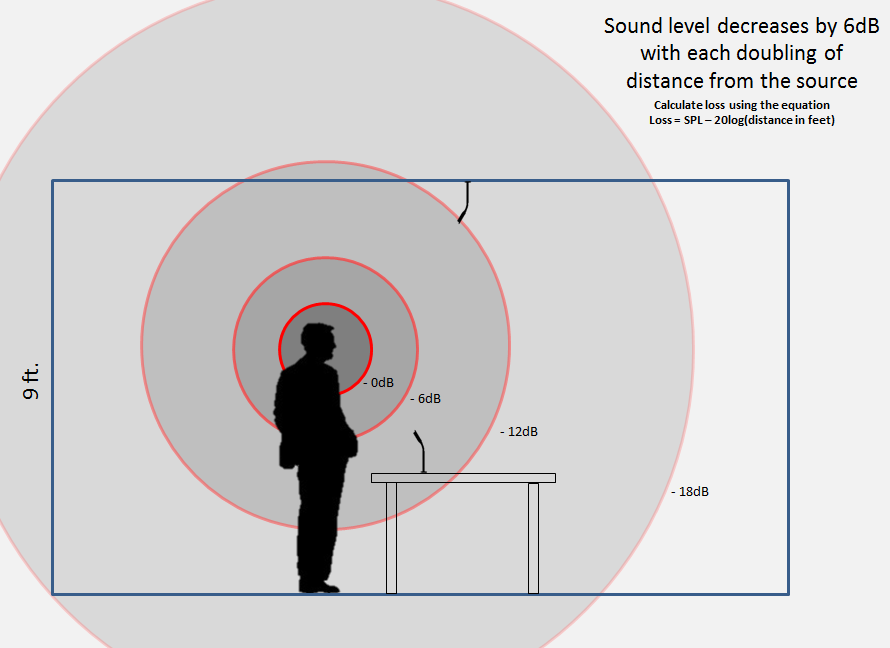
If there are no obstructions, sound waves (acoustic energy) move outward from a noise source in a spherical shape. As the energy moves away from the source the total amount of energy remains the same, but it gets distributed over an ever-increasing area. Eventually it is dispersed to the point where it is indistinguishable from the ambient acoustic energy (or background noise). For every doubling of distance from the source (doubling of radius of the sphere) the energy is spread over four times the surface area, reducing the volume by one half. In terms of acoustic energy we say that this equals a drop (or loss) of 6 dB-SPL.
The -6dB-SPL per doubling of distance rule applies to a perfect free-field scenario, where acoustic energy is free to dissipate equally in all directions. In the real world there are obstructions such as floors, walls, ceilings, and more which can reflect the energy back into the same acoustic space. These reflections will be constructive (adding energy) or destructive (negating energy) depending upon the frequency of the sound and the distance from the origin and the obstructions. In an enclosed space, it is more typical for levels to reduce at an average of 4.5 to 5dB-SPL per doubling of distance, due to reflected energy from boundary surfaces.
The distance of the mic from the source is important.
Signal-to-noise and Direct-to-reverberant ratios
The signal-to-noise ratio is a measure of a signal's level compared to the background noise level of the room. To be understood, a speech signal must be at least 6dB above, or twice as loud as, the background noise level. This means that the speech must have a minimum signal-to-noise ratio of 6dB - recall that dB is a ratio expression, 6dB denotes a 2:1 ratio. Obtaining higher signal-to-noise ratios will result in higher quality signals. There are only two ways to raise the signal-to-noise ratio: either lower the background noise level of the room (which is usually not practical) or move the microphone closer to the talker. Noise reduction algorithms can also artificially increase the signal-to-noise ratio, but they can sometimes introduce artifacts into the signal.
The direct-to-reverberant ratio is another important measurement for speech intelligibility. When someone speaks in a room, the sound of their voice travels in a straight line directly from their mouth to the microphone. However, it also travels in many other directions, bouncing off of various surfaces in the room, and those reflections or reverberations are also picked up by the microphone. The direct-to-reverberant ratio is a measure of the level of the direct sound compared to the level of the reverberant sound that is picked up by the microphone. The more direct sound the microphone picks up, the easier it is to understand the speech. Imagine you're standing far away from someone in a highly reverberant area (like a cathedral) and trying to listen to them speak. The reason it is hard to understand them is because of their low direct-to-reverberant ratio. There are only two ways to raise the direct-to-reverberant ratio: either (1) acoustically treat the room to absorb reflections and reduce reverberation (which is often impractical) or (2) move the microphone (listener) closer to the talker.
3-to-1 Rule
The 3-to-1 Rule is another guide for microphone placement. It is intended to prevent destructive comb-filtering from occurring. This rule states that if you measure the distance from the sound source (e.g., the talker) to the nearest microphone, then the next closest microphone must be at least three times that distance away. The distance allows the sound reaching the second microphone to disperse (to be naturally attenuated by to distance) to a level which is not high enough to significantly destructively combine with the signal captured at the first microphone.
In other words, if the distance between you and the closest mic is 2 feet, then the next closest mic should be at least 6 feet away. When microphones are located close to their sources, this rule is usually not difficult to follow. However, when microphones are farther away, it can become impossible to satisfy this rule. For instance, when ceiling mics are used above a conference table, the nearest microphone might be 6 feet away from you. To adhere to the 3-to-1 Rule, the next closest microphone would have to be 18 feet away. Having microphones spaced so far apart would lead to gaps in coverage.
The 3-to-1 Rule is meant to prevent the same sound source from being picked up at the same level by multiple microphones at slightly different times, which can cause comb filtering.
Automixers can help to reduce comb filtering when adhering to the 3-to-1 rule is not possible. Automixers work by shutting off microphones that aren't being spoken into. For instance, if two microphones are close to the same source, the automixer will shut one of the two microphones off, thereby eliminating any comb filtering.