Using the Shure MXA910 or MXA920 microphone array with Tesira
The purpose of this article is to provide a starting point to aid in the successful deployment of the Shure MXA910/MXA920 microphone with Biamp Tesira systems. Specific understanding of the Shure MXA910/MXA920 is best gleaned from documentation and training provided by Shure prior to reading this article.
Prerequisites
Microphone array
The MXA910 is a ceiling mounted microphone array that utilizes microphone array technology to create steerable pickup lobes. Recent experience leads us to believe that a minimum of two hours may be required per MXA910 to properly aim and test the microphone lobes. This number may vary based upon system needs, room acoustics, static vs. dynamic seating configurations and prior experience held by the commissioning technician.
Proper commissioning of the MXA910 microphone must be completed before the Tesira system can be commissioned.
It is possible to apply EQ within the MXA910 itself as well as in the Tesira. You should take care to not apply duplicate EQ curves in both DSP's. It is recommended to choose one platform or the other (Shure or Tesira) for EQ so it is easy to see the changes made to the mic. If EQ is being done in Tesira then the initial commissioning phase of the MXA910 involves setting coverage patterns and verifying lobe behavior via Shure's software.
If MXA910 assistance is needed Shure Systems Support can be contacted at systemssupport@shure.com or (847) 600-8541.
Shure has provided the following documentation and resources for the MXA910:
Network
The MXA910 uses Dante to transport nine discrete channels of audio. Channels 1 through 8 are discrete for each individual microphone lobe and the 9th channel is an automixed version of the available lobes.
A Dante capable switch is required to connect devices. More information on switch setup and detailed connection diagrams can be found in the User Guide as well as in the Routing Dante Audio article.
The Biamp Tesira system will require either a Tesira Server or Server-IO with DAN-1 card or a Tesira Forte DAN to receive audio from the MXA910 via the Dante network. See the Cornerstone article on Dante and the DAN-1 card for more info.
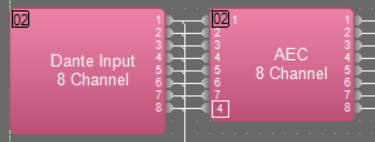
For conferencing applications, a channel of dedicated AEC is required per Dante channel. Since Tesira AEC processing is physically hosted on hardware, (2) SEC-4 cards are required for (8) channels of AEC per MXA910 in Tesira Server / Server-IO, or a Tesira Forte DAN will supply sufficient AEC processing for (1) MXA910.
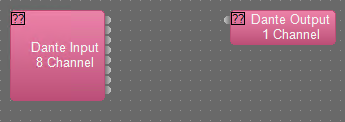
Up to (8) MXA-910 are supported on a DAN-1 card; however, you will need to use one or more standard Dante input blocks for mics 5-8. You can use the standard Dante block for all 8 mics if desired.
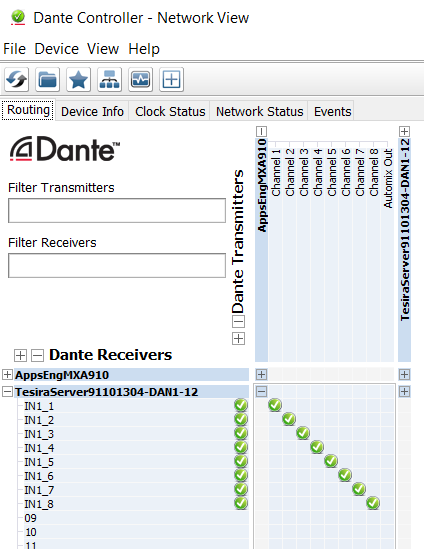
The following image shows common routing in Dante Controller for a single MXA910 with the Tesira DAN-1. Note that if Shure MXA910 block is used with the Tesira Server / Server-IO with DAN-1, the inputs will start at channel 33 of the DAN-1 card. (The Shure MXA910 block inputs will start with channel 1 on the Tesira Forte DAN):
Microphone lobes
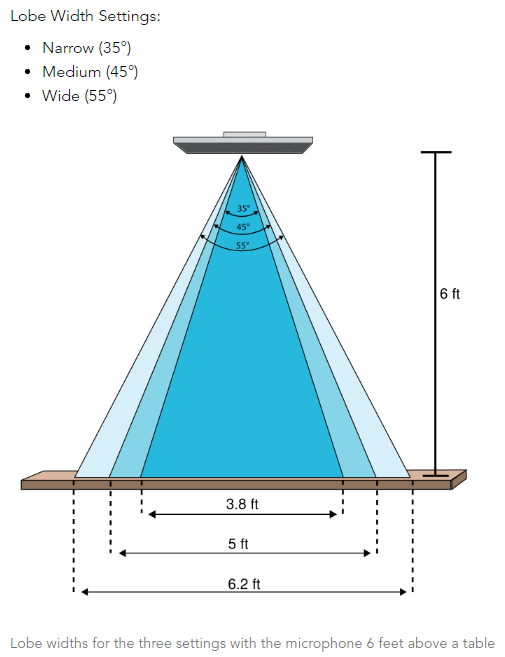
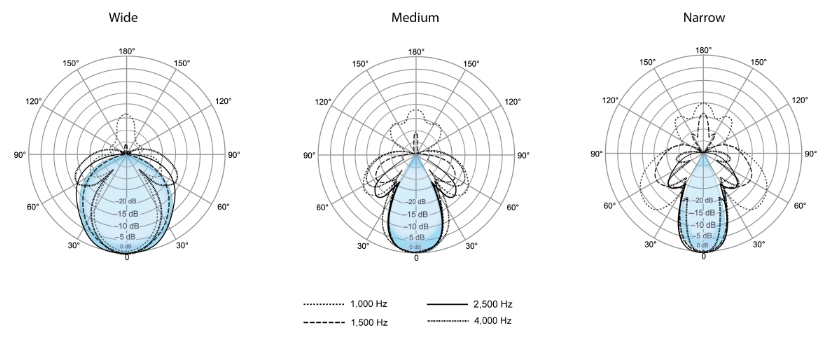
The MXA910 is capable of creating eight microphone lobes each of which can have different widths as configured in the MXA910 web interface. The web interface provides an Auto Position function that will aim the current lobe at a talker. When using this Auto Position function, it is important to use actual human speech as the talker source. Each lobe can be used to pick up one or more talkers, so the concept of "less is more" should be kept in mind. Any unnecessary lobes should be deleted. Notice in the images that as the lobe width is set tighter, side lobes become more prominent. In some applications, it may be better to use medium or wide lobes depending on the desired results. (The following images were sourced from the Shure MXA910 User Guide.)
Distance
The MXA910 can maintain a STIPA "A" rating at up to 16 feet (4.87 meters). This makes an excellent "rule of thumb": the MXA910 should be no more than 16 ft. from the talker's mouth. (This applies to a room with an RT60 time of 500 ms @ 1kHz and a room noise floor of 40dBA)
Wikipedia provides further explanation on STI as well as the following images:

Additional reference measurements that may aid in aiming or confirming aiming of microphone lobes:
- The average conference room table is 30" Above Finished Floor (AFF).
- The average height of a talker's mouth is 48" AFF when in the seated position.
- The average height of a talker's mouth is 60-66" AFF when in the standing position.
DSP commissioning
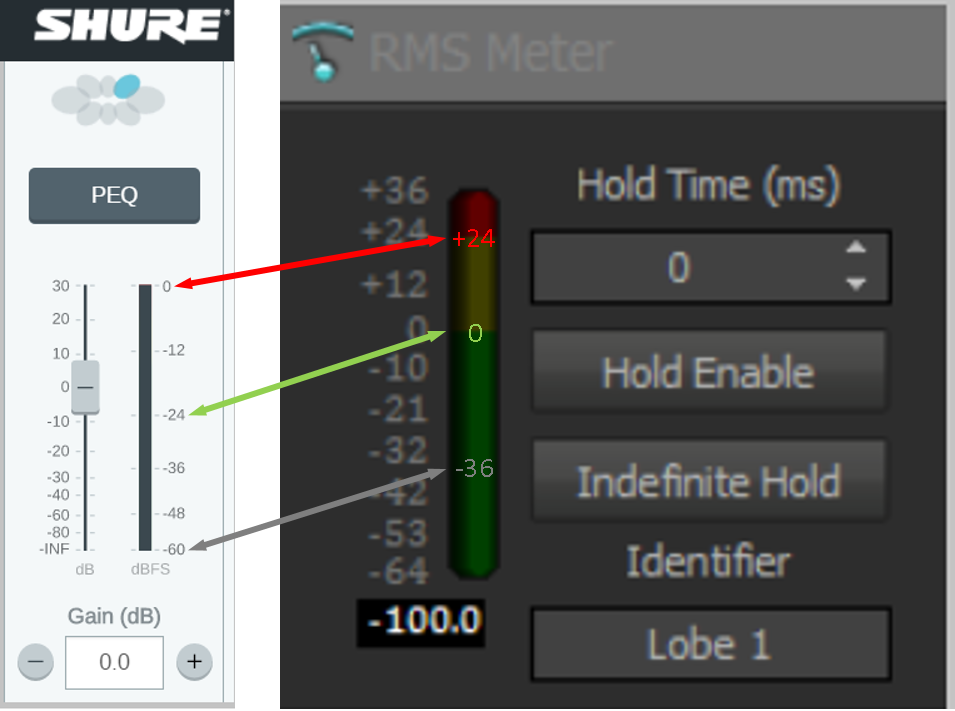
Meters & Inputs
It is important to understand that the meters displayed in the MXA910 web interface are Full Scale meters (dBFS). This means they will show a maximum of 0 and a minimum of -60 dBFS. Notice that the Shure MXA910 meters simultaneously display Peak and RMS information. Within Tesira software the user has the option to select Peak or RMS meters when designing a file. Meters in Tesira are dBu meters with a maximum of +36 and a minimum of -100 dBu; anything above +24 dBu will be clipped. This means that a signal registering as -24 dBFS in the MXA910 should register at 0 dBu on the meters in a Tesira file. Whether it be a normal tabletop microphone or a lobe from the MXA910, we want to adjust gain so that the Tesira input meters indicate 0 dBu RMS. The following image shows the Shure and Tesira meters side by side for comparison:
To achieve the target 0 dBu RMS it is common to add 6 dB or more at the Dante Input block in the Tesira file. It is a good idea to use the same talker to test each of the lobes for this target 0 dBu RMS, as well as confirming that each lobe is within 3 dB of the other lobes.
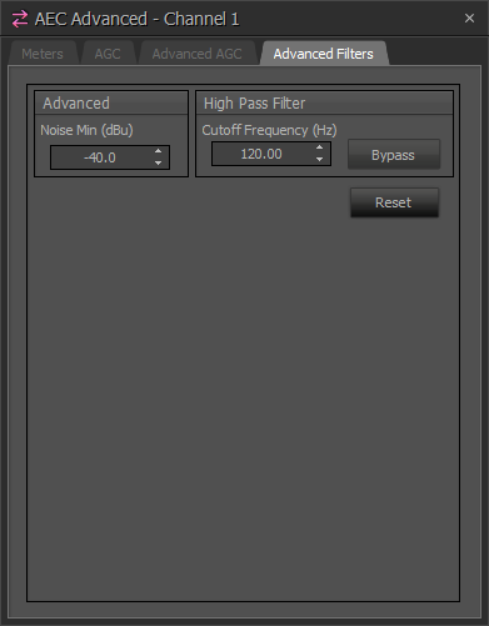
AEC Settings
For best performance, each lobe from the MXA910 array will require a dedicated channel of AEC:
The AEC processing should be configured as shown below for each channel in use. Remember, these are starting point recommendations and may vary dependent upon room, system and user needs:
- NLP should be set to Low.
- Noise Reduction (NR) should be set to Low.
- AGC should be bypassed.
- Advanced Noise Min. should be set below the metered noise floor.
- High Pass Filter should be set to 120 Hz.
.png?revision=1)
.png?revision=1)
.png?revision=1)
The Noise Min (dBu) setting should be set below the observed noise floor shown on the AEC input meters in the AEC processing block. This setting essentially freezes the AEC, NLP and NR algorithms when the signal drops below the set level. This is typically used in microphones that mute at the element. However, in this application it allows MXA910 presets with different lobe layouts to be called without resetting the AEC, NLP and NR filters that have been adaptively created.
EQ
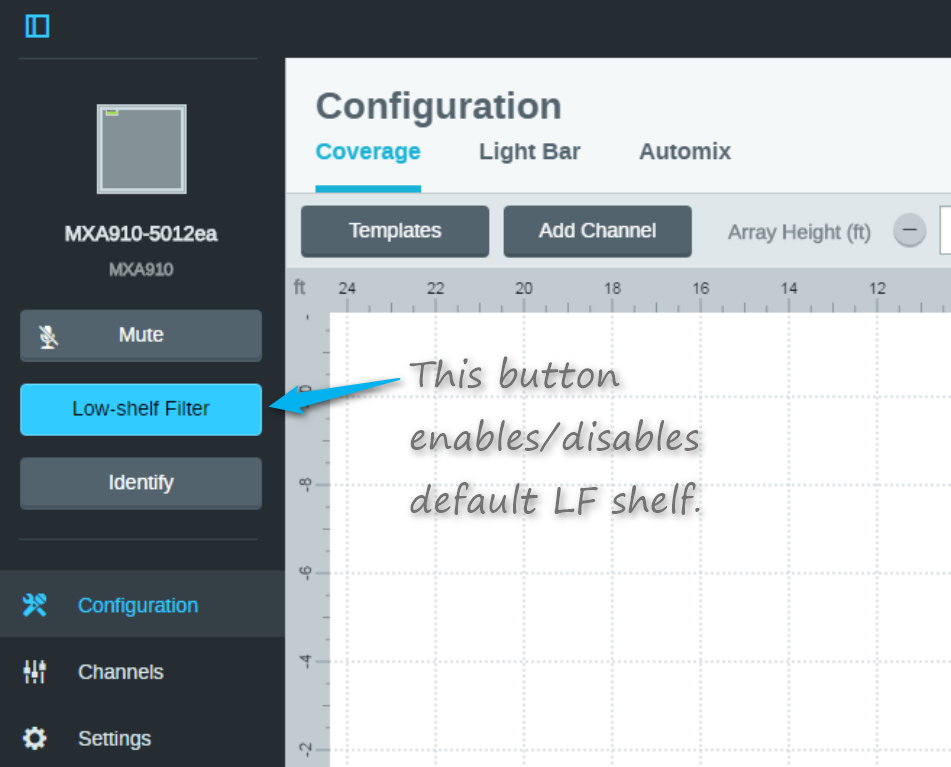
Prior to Shure MXA910 firmware version 1.3.4 (12/22/2016), the MXA910 best practices - setup hints recommended a low shelf EQ curve be implemented on each channel within the web interface to help with low frequency build up. With the release of firmware version 1.3.4 or later, the recommendation became a default that is applied to all channels. The default curve can be bypassed on all channels with a simple click:
Care should be taken that the EQ curves do not overlap or duplicate one another. Biamp recommends using one device to apply the EQ whenever possible. This makes it easier to see the applied EQ settings at a glance versus having to look in multiple device configurations and attempt to mentally sum the additive effects of multiple stacked EQs.
The recommended curve shown below can be deployed in an Uber Filter block within the Tesira file. One of the benefits to deploying the EQ curve in an Uber Filter block is the ability to copy and paste Uber Filter settings to the other blocks for the remaining lobes. The following is a starting point conferencing EQ curve we developed based upon the recommendations from Shure as well as input from the Biamp Applications Engineering members. This EQ curve was developed for flush-mount applications (half-space loading) and is not recommended when the mic is mounted on a stalk in a free-space environment:
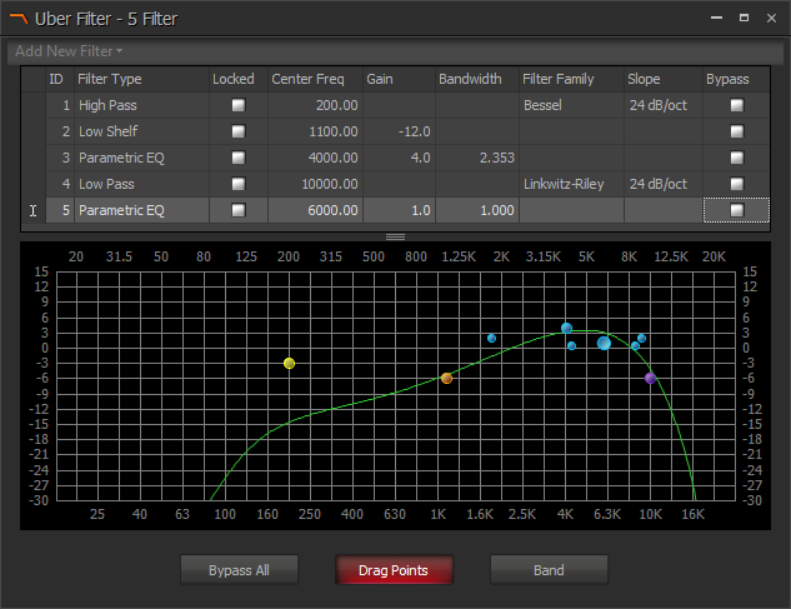
Be sure to listen to the audio passing through this EQ and adjust the settings as necessary for optimal performance. Each room and system will behave uniquely so there is not a 'One size fits all' EQ curve.
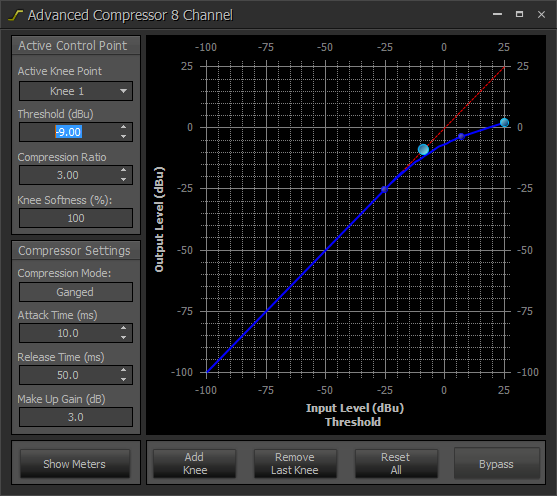
Compressors
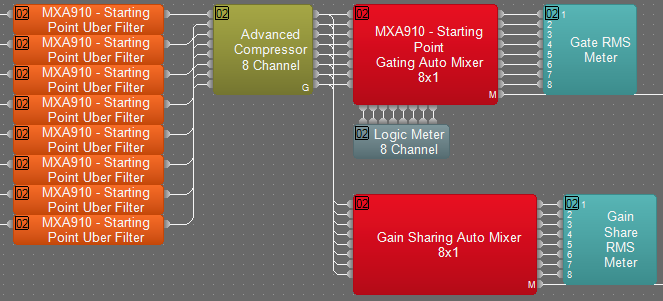
When compressors are deployed well, they can be helpful to the downstream automixer. We chose the following settings on an eight channel Advanced Compressor block:
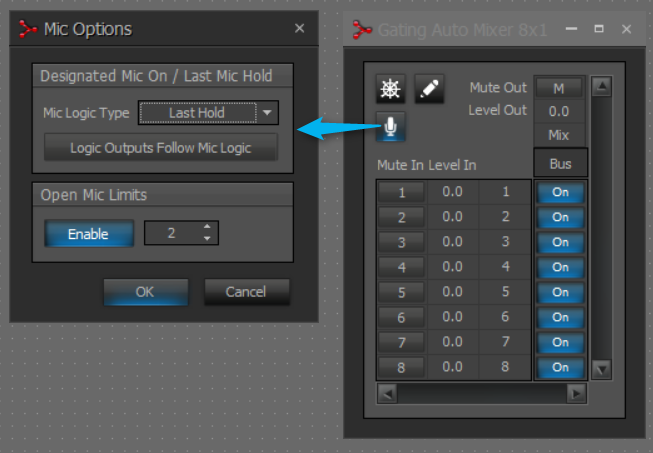
Auto Mixers
The Gating Auto Mixers in Tesira were developed and configured for a variety of microphone types. Since the MXA910 utilizes microphone array technology, we've discovered that the following settings should be adjusted for better performance:
- Mic Options
- Mic Logic Type should be set to Last Hold.
- Open Mic Limits should be set to 2 or 3.
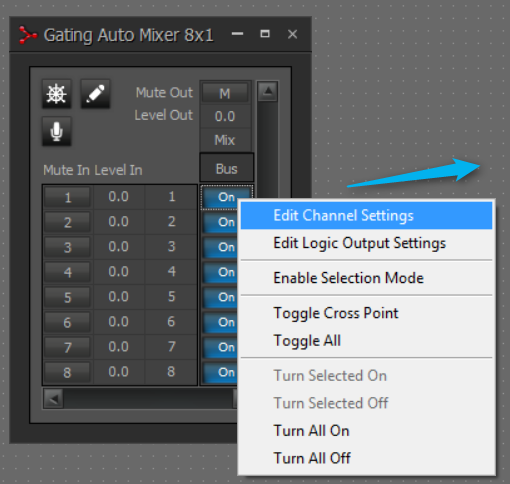
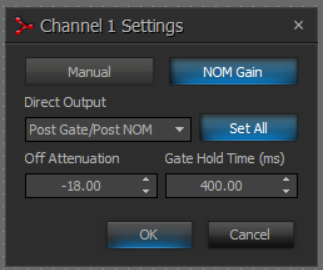
- Channel Settings
- Off Attenuation should be set to -18 or more (-40) for eight active lobes.
- Gate Hold Time seems to perform better when set at 300 or 400ms.
Although Gating Auto Mixers typically perform better in conferencing applications, there are occasions where Gain Sharing Auto Mixers can be considered. Systems with small lobe counts and higher room noise may sound a bit better through a Gain Sharing Auto Mixer. Write the system file so that you can toggle between the two auto mixer options and choose the one that performs best for that room.
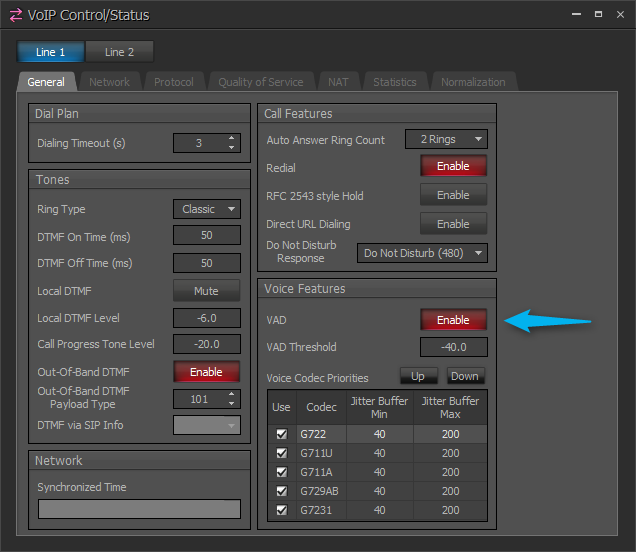
VoIP specifics
With all Tesira conferencing systems, we need to send a 0 dBu RMS level of the microphone mix to the VoIP transmit block. This can be viewed via RMS meter at the output block.
Be aware of Voice Activity Detection (VAD) setting in the VoIP Control/Status block. VAD may also be referred to as silence suppression by the VoIP administrator. Its purpose is to reduce network bandwidth usage when audio signal drops below a defined threshold by stopping the transmission of RTP packets. If VAD is engaged, the far side of a call may notice the silence and think the call has ended. Some sites may benefit from disabling VAD and therefore providing persistent confidence room noise. Additionally, some phone systems will automatically send "comfort noise" to the far end when VAD is engaged, to minimize disruption.
MXA910 and MXA920 LED & Mute Control from Tesira
The MXA910 does allow control of various parameters within the unit via API. This means that the Tesira Network Command String Block can be used to change LED color, recall presets or change mute states within the MXA910. Note that the control port of the Tesira hardware must be connected to the same network as the MXA910. The following images will help in the configuration of the Tesira Network Command String Block:
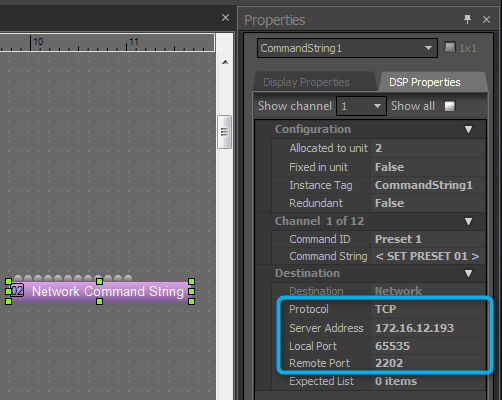
The MXA910 control API is detailed in the User Guide as well as in the MXA910 Command Guide.
The MXA920 control API uses the same or similar control commands, here is a link to the MXA920 Command Guide.
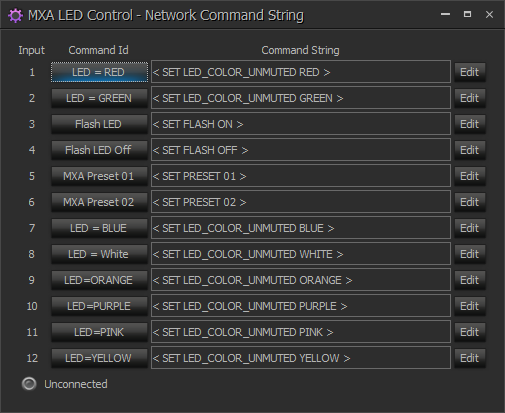
The following image is an example of the commands as they could be configured in the Network Command String block. This is included as part of the sample Tesira file download Single_MXA910_Example_file_2017-8-4.tmf:
Processing Library
File download: MXA910_-_Starting_Points_Catalog_v03.tlf
The Processing Library is a little known tool within Tesira software that allows users to create catalogs of their favorite blocks. These catalogs can be exported and shared with other Tesira users. The following image shows the wing menu and icon used to import the .tlf that was just downloaded.
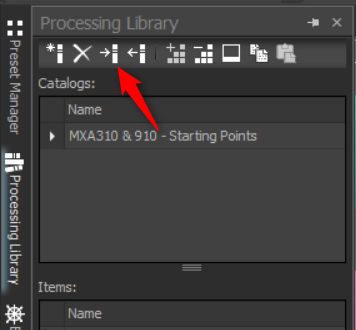
Now, when the Processing Library is opened you will see all of the items that comprise the selected catalog. This catalog contains all the blocks that were used to build the example files above. These items can be added to the current system file simply by dragging and dropping them into the file.

What about using the MXA920 with Tesira?
With the release of the MXA920, the integration with Tesira changes a bit and the following pointers should help:
- It is best to use generic Dante input and output blocks to match the project needs.
- Per-lobe Tesira AEC processing is highly recommended due to the many echo paths that exist in a conferencing space. The settings should follow the recommendations above.
- It may be helpful to send the AEC Reference signal back to the MXA920 via Dante as this will inform the microphone array when the Far End is talking and subsequently the MXA920 can relax lobes accordingly.
- The MXA920 has a slightly different response curve as compared to the MXA910 and performance will vary with each acoustic space.
- Here's an early draft EQ should you choose to EQ in the DSP and bypass the MXA920 EQ:
- Here's an early draft EQ should you choose to EQ in the DSP and bypass the MXA920 EQ: