Extracting a configuration from a Vocia system
This article explains how to connect to and extract a configuration file from a Vocia system. It is always recommended to first extract the current Vocia configuration, then make changes and send it back to system. Depending on the network structure and the type of Vocia system, there are several different methods available.
Vocia has been designed such that the firmware and software versions must always be in step with each other.
It is strongly recommended that prior to doing a firmware update that the running system configuration is extracted and saved using the latest available Vocia software package.
Understanding the network connection path
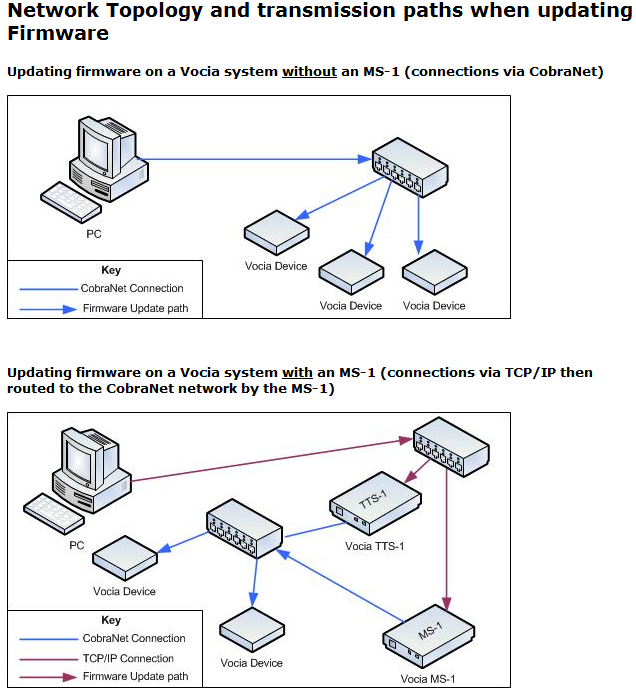
The method used to connect to a Vocia system largely depends on whether that Vocia system includes a Vocia MS-1 or MS-1e message processor.
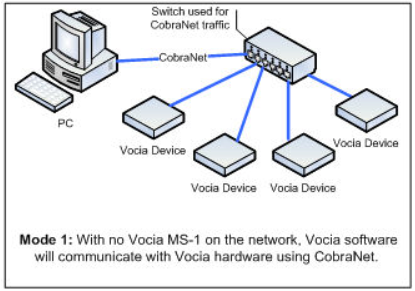
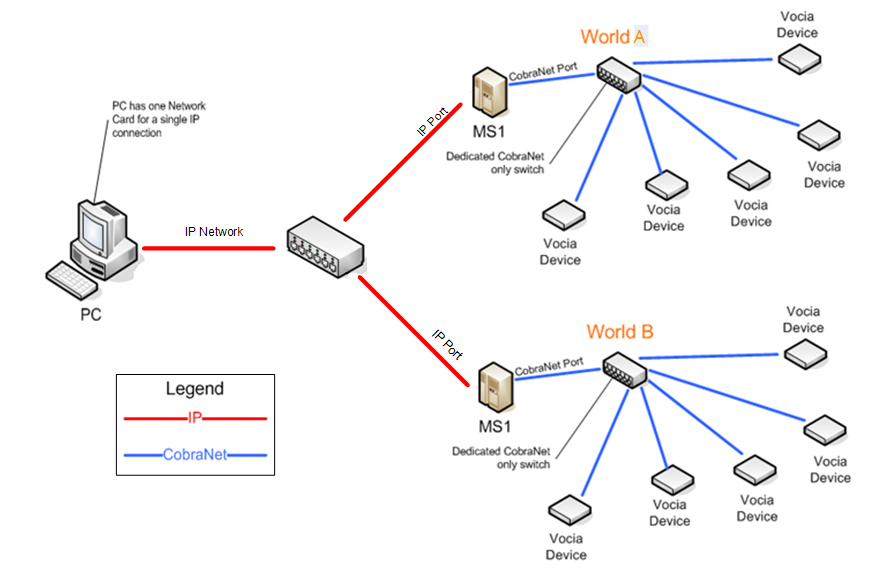
If the Vocia system does not have an MS-1(e), the PC should be connected to the CobraNet network and will communicate with all Vocia devices independently.
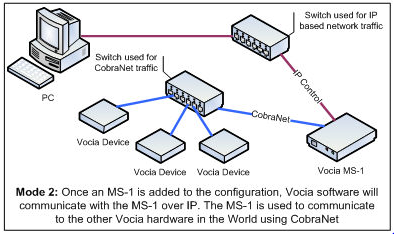
If the Vocia system includes an MS-1(e), the PC will connect to the control network and communicate only with the MS-1(e). In this case, the MS-1(e) will act as a bridge, passing on communication and control to the individual Vocia devices on the CobraNet network.
See Connecting to an MS-1(e) for more details.
 |
 |
 |
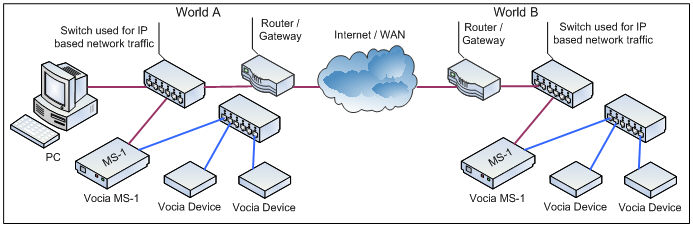 |
| Possible Vocia network configurations. | |
MS-1(e)'s in system
Discover and extract a single World via Ethernet
To extract the configuration for a Vocia system with an MS-1(e) in it, you will need to connect to the system via Ethernet. This section deals with extracting the configuration from a single-world Vocia system.
Create a new Vocia project
- Launch the Vocia Software.
- You will encounter a login screen. Simply click the OK button to proceed.
- Once the software has fully opened click on the "New Project" icon. The icon is on the tool bar located at the top left. This will launch the New Project Wizard. The New Project Wizard will ask you to name your new Universe and World. Give your new Universe and World any name you like and click next.
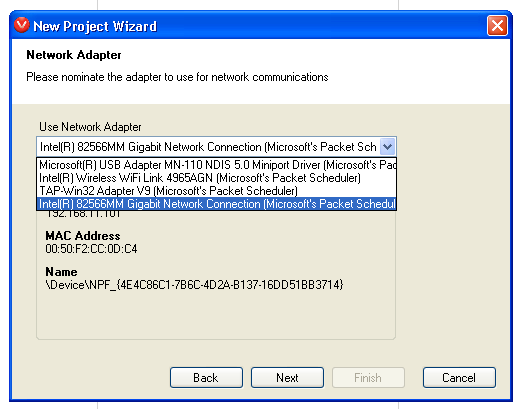
- Select the Network Interface you will be using to connect to the system.
- You will get a confirmation screen listing the details you have just entered. Click Finish.
Extract the system configuration
- Manually add an MS-1(e) to this new World by right-clicking on the new World’s Servers folder and selecting Add MS-1(e).
- Enter the IP address and Device ID information for the remote MS-1(e). Click Save. The device should show Online after this step.
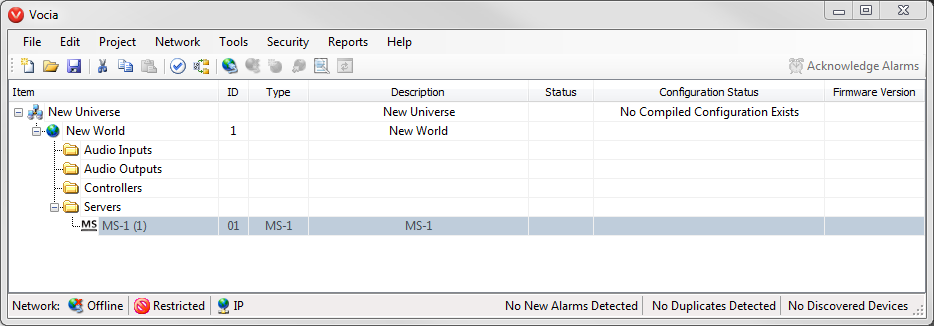
- Choose "Extract Configuration From System" from the Vocia toolbar. The Configuration Comparison screen and the Extract Configuration from System screen now show a World to be extracted.
- Notice that the Configuration Status has turned yellow. This indicates that the file on your computer does not exactly match the configuration loaded in the Vocia system. To update the MS-1(e) to the current configuration select "Send Configuration to System" from the Vocia toolbar. (Note that if your device firmware is not up to date with the software version you will be required to update it before being allowed to send a configuration. See the Update Firmware section for more details on this process.)
- Once the configuration has been uploaded you should see a Universe containing a single World system with a green Configuration Status.
Discover and extract multiple Worlds via Ethernet
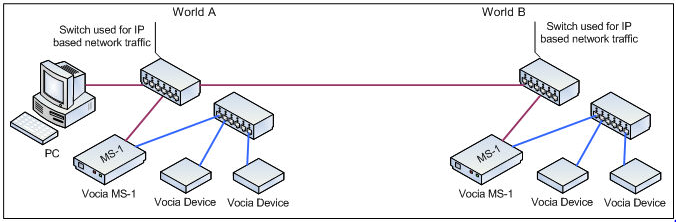
To discover and add an existing single-World paging system, running on a remote MS-1(e), to a Universe with one or more Worlds already in it you will need to know:
- How many Worlds need to be added to the Universe.
- How many MS-1(e)'s are in each of the Worlds.
- The IP addresses of each MS-1(e).
In these steps you will include the additional World's MS-1(e) in the online design and extract the configuration from their system into the online system. You will need to repeat this process for each World you wish to discover and add into your Universe.
Extract the system configuration
- Add a new World to your online system by right-clicking on your Universe and selecting "Add World".
- Manually add an MS-1(e) to this new World by right-clicking on the new World’s Servers folder and selecting "Add MS-1(e)".
- Enter the IP address and Device ID information for the MS-1(e) that belongs to this new World. The device should show up online after this step.
- Choose "Extract Configuration From System" from the Vocia toolbar. Take notice that the Configuration Comparison screen and the Extract Configuration from System screen now shows two Worlds to be extracted (or more if there are more than two Worlds).
- Notice that the Configuration Status has turned yellow. This indicates that the file on your computer does not exactly match the configuration loaded in the Vocia system. The reason for this is that although each MS-1(e) has a configuration loaded, they do not know about each other. To update the MS-1(e)’s to the current configuration select "Send Configuration to System" from the Vocia toolbar.
- Once the configuration has been uploaded you should see a two (or more) World system with a green Configuration Status.
No MS-1(e)'s in system
Discover and extract via CobraNet
This will guide you through the basic steps on connecting via CobraNet to a running Vocia system (without an MS-1(e)). You must use CobraNet network to discover the system.
Create a new Vocia project
- Launch the Vocia software.
- You will encounter a login screen. Simply click the OK button to proceed.
- Once the software has fully opened click on the "New Project" icon. The icon is located on the tool bar at the top left. This will launch the New Project Wizard. The New Project Wizard will ask you to name your new Universe and World. Give your new Universe and World any name you would like and click Next.
- Select the NIC (Network Interface Controller) that will be used to connect to the Vocia system. Make sure you select your LAN connection.
- You will get a confirmation screen listing the details you have just entered. Click Finish.
 |
 |
 |
| New Project Wizard | ||
Extract the system configuration
- Now you can extract the running Vocia system into this blank project. Plug your computer's LAN connection into an available port on a CobraNet switch.
- Click the "Online" button
 located on the toolbar. Selecting it will cause the Vocia software to connect to the network and attempt to discover any Vocia devices that are present on the network. No configuration data will be sent by the software using this command; however any discovered Vocia device will report Configuration Status and Firmware Version back to the software.
 - Now look at the bottom right side of the software, you should see something similar to the following message:
 Double-click on the message, this will open a new dialog wndow. Devices that are found on the network but that are not in the currently loaded project file will populate the Discovered Devices dialog.
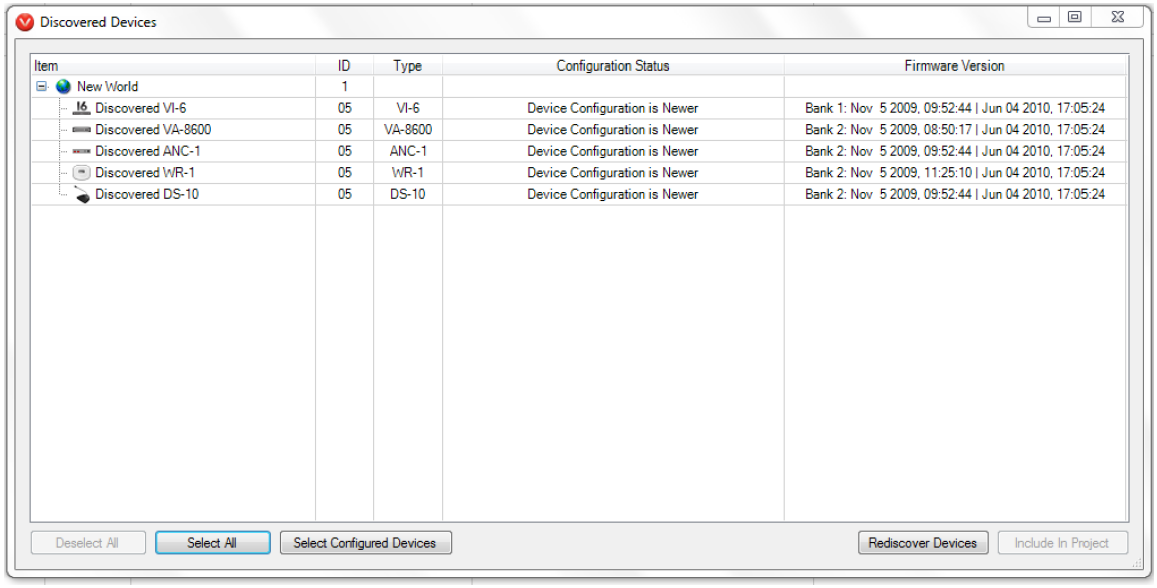
- You will now add the discovered devices on your network to your new project file. Click “Select All” and finally “Include in Project”.
- You should now see the devices in your project. At this point you only have the devices, and not their running configuration.
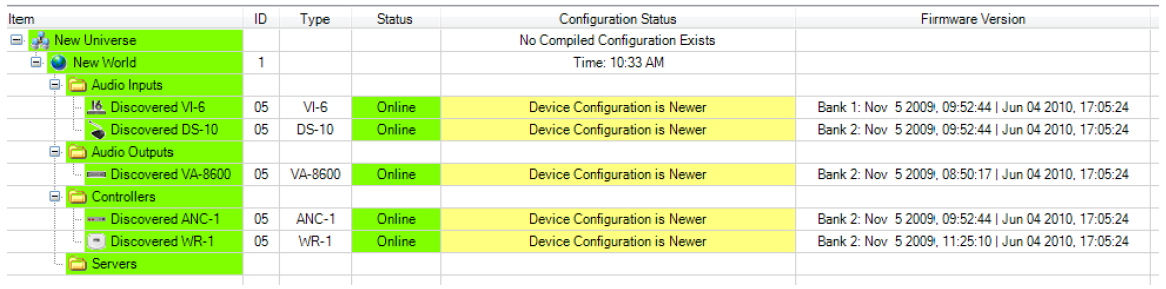
- To extract the configuration click on the “Extract Configuration”
 button on the tool bar. This will bring up the Extract Configuration window. This function gives the user the ability to ask all devices for current configuration and then extract that configuration for use in the Vocia software. All configuration data stored in the selected devices will be extracted and will populate the project file.
 - Click on the “Begin Acquisition” button. This will then display which devices are configured. By default, everything will be marked for “Import into project”. At this point, you can simply click OK.
- You are now connected to the system with your project file and have acquired the configuration.
NOTE: If there are MS-1(e)'s in the system you can obtain the IP address of the MS-1(e) via CobraNet but you will not be able to extract the configuration files off the MS-1(e) over CobraNet. After discovery, the MS-1(e) will force the system connection to the control network for further management.
Firmware and Software
In addition to errors that may occur on devices, other Vocia behavior and guidelines needed to be respected to guarantee correct system operation.
The most important rule is that Vocia has been designed such that the firmware and software versions must always be in step with each other.
To update firmware, first download both the latest Vocia software and firmware files (all are executables) and install them to your PC. Use the updated software to extract a copy of the running configuration as outlined in this article, then update the firmware of all devices on the network.
The latest Vocia software and firmware are available at https://support.biamp.com/Vocia/Software-Firmware
See the "Update Firmware" section of the Vocia software's Help file for more details on this process.