Creating and Building an Organization
After creating and signing into your Biamp Workplace account, create an organization in the Workplace admin portal.
Resources to have on hand
Biamp recommends having the following resources ready when creating an organization.
A plan to acquire licenses for your organization's locations
Each location in a Biamp Workplace organization must have an active license assigned to it. This enables monitoring, management, and booking functions for all audiovisual and booking devices assigned to that location. Licenses are purchased for organizations from authorized Biamp resellers.
-
To find an authorized reseller and obtain a quote, please fill out the form found on the Biamp website page: Product Catalog Information or Purchase Request.
-
For information on license types, licenses included with newly purchased devices, and how to purchase licenses, please see: Acquiring Licenses for an Organization
Good organization and location names
An organization in Biamp Workplace is your locations-based system for managing booking and audiovisual devices. Locations in an organization can range from a single room equipped with AV and/or booking devices to sites with multiple buildings, floors, rooms, and desks, all populated with AV and booking devices. The organization name should be intuitive and readily recognizable to both system administrators and end-users, now and several years in the future.
Biamp recommends drawing up a naming scheme prior to setting up the organization.
Floor plan and room images
You can create floor maps in Biamp Workplace showing the locations of bookable rooms, desks, and parking spaces for display on monitors. Additionally, you can create desk and room descriptions that list available features for end-users and show a picture of the location. These are visible to end-users in the Biamp Workplace Booking mobile app.
Biamp recommends having floor-plan and room image files ready to upload when creating an organization.
List of email addresses for invites
Emails are required for inviting end-users, admins, and other owners to the organization. Invitations are the only way to add people to the organization.
Step 1: Create the organization
1. On the Biamp Workplace portal homepage, select the "+ Create organization" button.

Note: You will be able to create additional new organizations at any time on the Biamp Workplace homepage.
2. Fill out the fields in the Create organization form, then click the "Create organization" button.
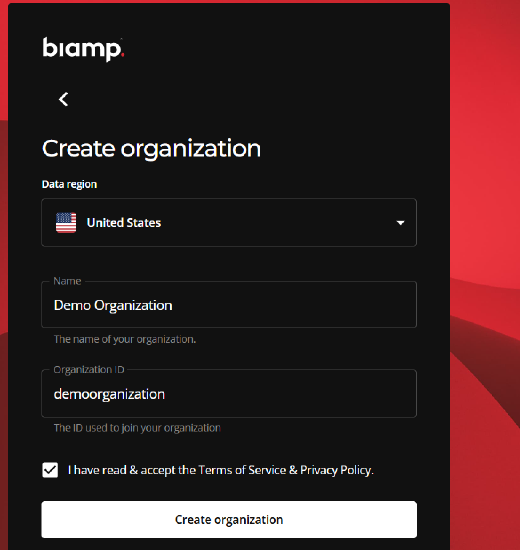

- Data region (optional): By default, Biamp Workplace runs and stores your organization's data on a US server instance. Customers based in the European Union can opt to choose a Europe option. This runs the organization and stores its information in a European server. This option is only available to customers in Europe.
- Name: Enter your organization's name here. This will automatically generate an organization ID based on the name in the "Organization ID" field.
- Organization ID: You may edit the automatically generated organization ID. However, Biamp recommends using the automatically generated ID.
- Take note of this ID. Users can use it to request membership in the organization, and it will be used for purchasing licenses.
- After creating the organization, you will be able to find the Organization ID under the Settings tab in the portal.
Step 2: Build out the organization
Selecting the "Create organization" button takes you to the administration console of your new organization.

1. Use the Get started guide that the console will automatically direct you to. The guide walks you through the following operations in sequence.
-
Add licenses to the system to make desk and room resources bookable.
-
For information on purchasing licenses for your organization, please see: Acquiring Licenses for an Organization
-
For information on assigning licenses within your organization, please read: Assigning Licenses to Locations in Organizations
-
-
Add top-level Site and Building locations to the organization.
-
Add Floor sub-locations to your organization's Building locations.
-
Add Room, Desk, and Parking Space sub-locations to your organization's Floors.
-
Note that you can add licenses to the Desks and Rooms as you create them. You may also choose to add licenses to the Desks and Rooms on the admin console's License page after you finish creating them.
-
-
Get the Workplace Booking mobile app to add and connect Desk and Room booking devices with the licensed desks and room locations in your organization.
-
The Workplace Booking app can be downloaded from Apple's App Store (iOS) or Google Play (Android). For more information on the Booking app, please see: Workplace Booking Mobile App Overview
-
The app is used onsite in the physical location where the devices are located. Adding the devices requires an NFC connection between the mobile platform with the app and the room or desk manager device.
-
For more information on adding Kleeo and Naso devices, please see:
-
2. Get the Workplace Connect desktop app and use it to discover and add Workplace-supported audiovisual devices such as Tersia, Qt X, and Voltera devices.
- Once you have the app, you will need to connect to the subnet these devices are on.
- For more information on the Connect App, please see: Biamp Workplace Connect Desktop App.
-
For a step-by-step procedure on discovering and adding AV devices, please see: Audiovisual devices: Discovering and Assigning
Next steps
You can now use the Other actions guide to do the following:
-
Invite administrators and end-users to the organization.
-
Add additional floor plans to help users find desks and rooms.
-
Add an overview screen to show information about bookable resources on smart displays.