Qt X Scheduled Message Playback with NPX
Qt X software version 2.3.0 and later adds the ability to add Scheduled Message Playback from any Qt X system that includes NPX paging stations in the configuration. This allows for a scheduled playback of any Recorded page code to be created in the "Schedule Management" interface of a running configuration.
This article outlines physical connections and programming steps required to achieve this functionality.
Please note that:
- Scheduled Message Playback configuration is not supported via the Qt X controller's Web UI.
- NPX hardware running firmware 1.3.0 is required to implement this functionality within a QT X system. Qt X controllers cannot host page codes locally. At least (1) NPX station of any type is required in the active configuration.
- Only page codes that are set to Recorded in the action drop-down will be available to assign to a Scheduled Message Playback. Live page actions are not supported when using Logic Paging or Scheduled Message Playback.
Prior to getting started
A scheduled page may be configured once a Qt X system has been established with at least one Recorded Page Code assigned to at least one NPX paging station in the configuration. This requires that the configuration has been sent to hardware and is visible when selecting the Devices & Systems icon.
Getting started
Step 1: Open the Scheduled Message Playback window
- To begin setting up Scheduled Message playback, highlight at least one device in the active system
- Select the schedule management
 icon. This opens the Schedule management pop-up that includes the new Scheduled Message Playback tab to the far right.
- If no devices are selected, the icon will be grayed out and cannot be selected.
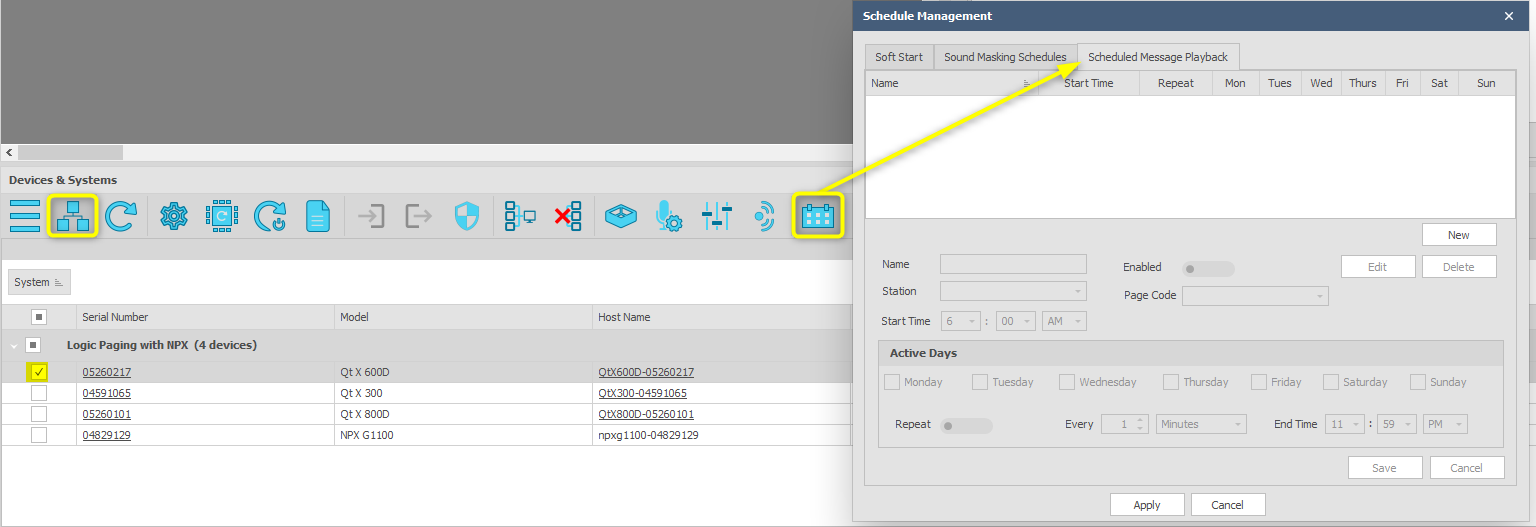
New scheduled playback events are created and edited on this window.
Tip: Verify the system Date & Time are set correctly, or the proper NTP server has been selected for time sync. This can be checked via the  Device Information icon under the General tab, All scheduled Messages will use this time value for scheduled play-out to the system.
Creating a Scheduled Message Playback
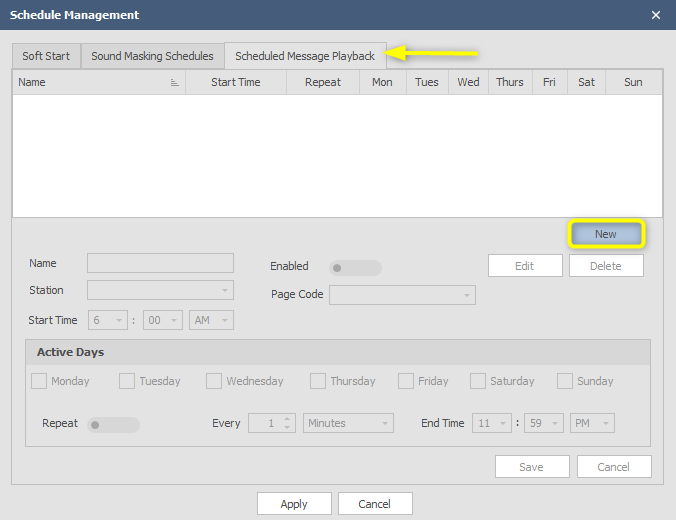
The Scheduled Message Playback tab will list all active messages that have been created. In a new system, this list will be blank.
Step 2: Click the New button
To create a new scheduled playback, select the new button, enabling the selection and naming fields.
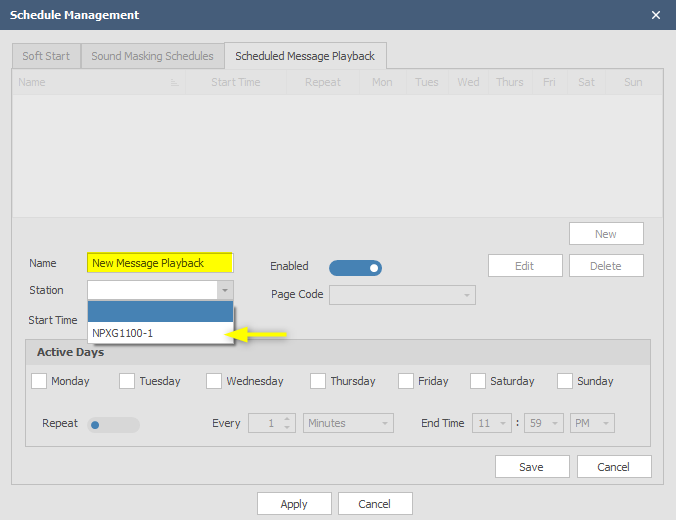
Step 3: Name message and select a station
Create a unique Name for the message and select an NPX paging station from the list that hosts the required recorded message.
- The Name field supports up to 32 characters.
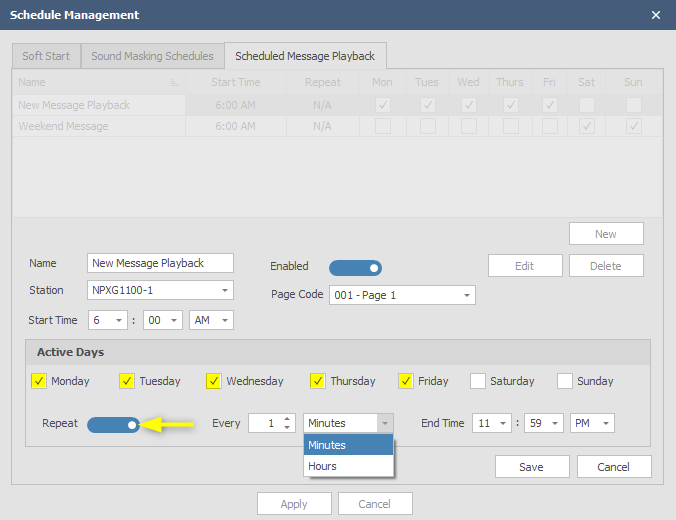
Step 4: Select the start time and page code
Enter a start time for the playback and a required page code from the dropdown selection.
- Only recorded messages from the selected NPX paging station will be shown in this list. The default start time of 6:00 AM may be changed as needed for the desired playback.
- By default, the Enabled toggle will be selected to allow pages to play out. Any messages that are saved with the Enabled toggle in the off position will be shown in the list and available to make active via the "Edit" button. g

Note: Only page codes that are set to Recorded in the action drop-down will be available to assign to a Scheduled Message Playback. Live page actions are not supported when using Logic Paging or Scheduled Message Playback.
Step 5: Assign Active Days and an End Time
Select active days for message playback. The message can be toggled to play at set intervals on the chosen day or days with a scheduled end time.
Step 6: Save the message
When complete, select Save to add to the list. More messages can be created and scheduled throughout the system.
- Messages can also be edited from this screen. Choose a message from the top list, press 'Edit', make your changes, and then 'Save'.
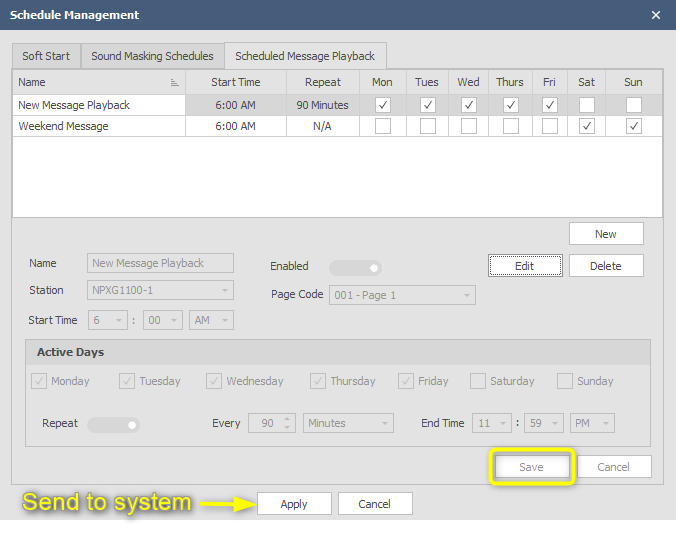
Step 7: Send the schedules to the system
Once all message playback schedules have been created and enabled they should be sent to the system by pressing 'Apply'. A pop-up message will confirm the schedules have successfully been sent.
Tip: Use the "Get Configuration" icon to extract the running file from the system to retain any live setting changes or schedules that were added or modified. This will ensure that all the live changes that were made in the system are updated in the local saved file. The updated file can then be saved locally after the updates to the system have been applied by resending the configuration. This ensures any future changes will be made using the most recent version of the configuration file that matches the running system.
