Crowd Mics design guide
Crowd Mics™ is a powerful audience engagement tool that allows event participants to use their mobile device as a microphone. It enables seamless audience participation by eliminating the need to pass a microphone around the room. Due to the multitude of applications and environments this technology can be used in, this article is intended to cover potential interfacing challenges with typical audio/video gear used in all types of venues. There is also additional information on interfacing Crowd Mics with Biamp Tesira DSP systems, including programming hints and ready-to-use library files.
- For generic information on the Crowd Mics product, please refer to our web-help: crowd-mics-help.biamp.com
- Additional information on Crowd Mics network infrastructure and setup, see the Network Administrator's Guide
Example of a typical enterprise Crowd Mics deployment:
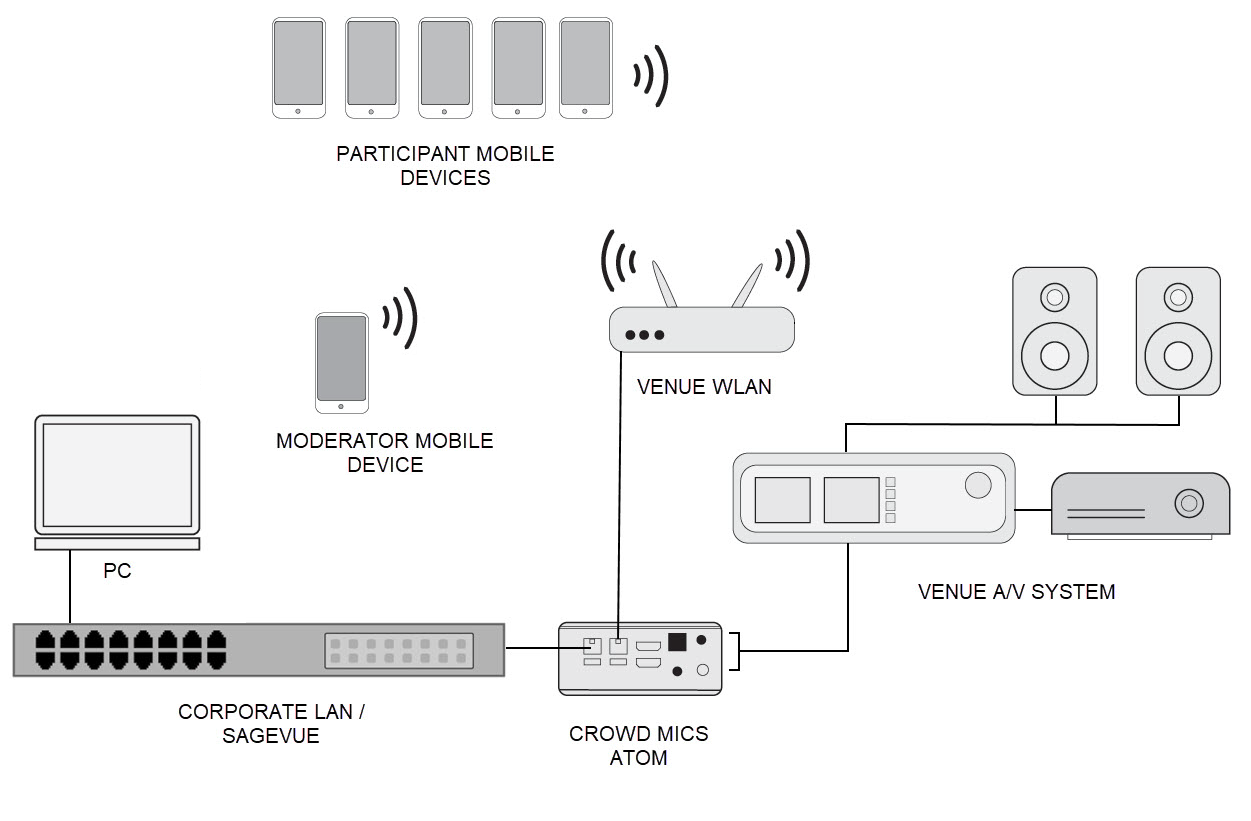
The following sections will concentrate on the signal flow from the participant endpoint device to the venue A/V system
Crowd Mics ATOM
The ATOM is equipped to integrate with virtually any type of audio/video infrastructure, and will work seamlessly with an existing Tesira system. It offers numerous A/V connections to allow for ease of deployment in a variety of venues. The following sections will point out in detail how to connect the ATOM to the venue A/V system. Video connections must be made using standard HDMI cable. Audio may be connected with RCA plugs, 1/8" stereo jack, Phoenix connector and HDMI. Multiple audio connections may be made from any/all audio outputs simultaneously.
 (1) Balanced line audio output
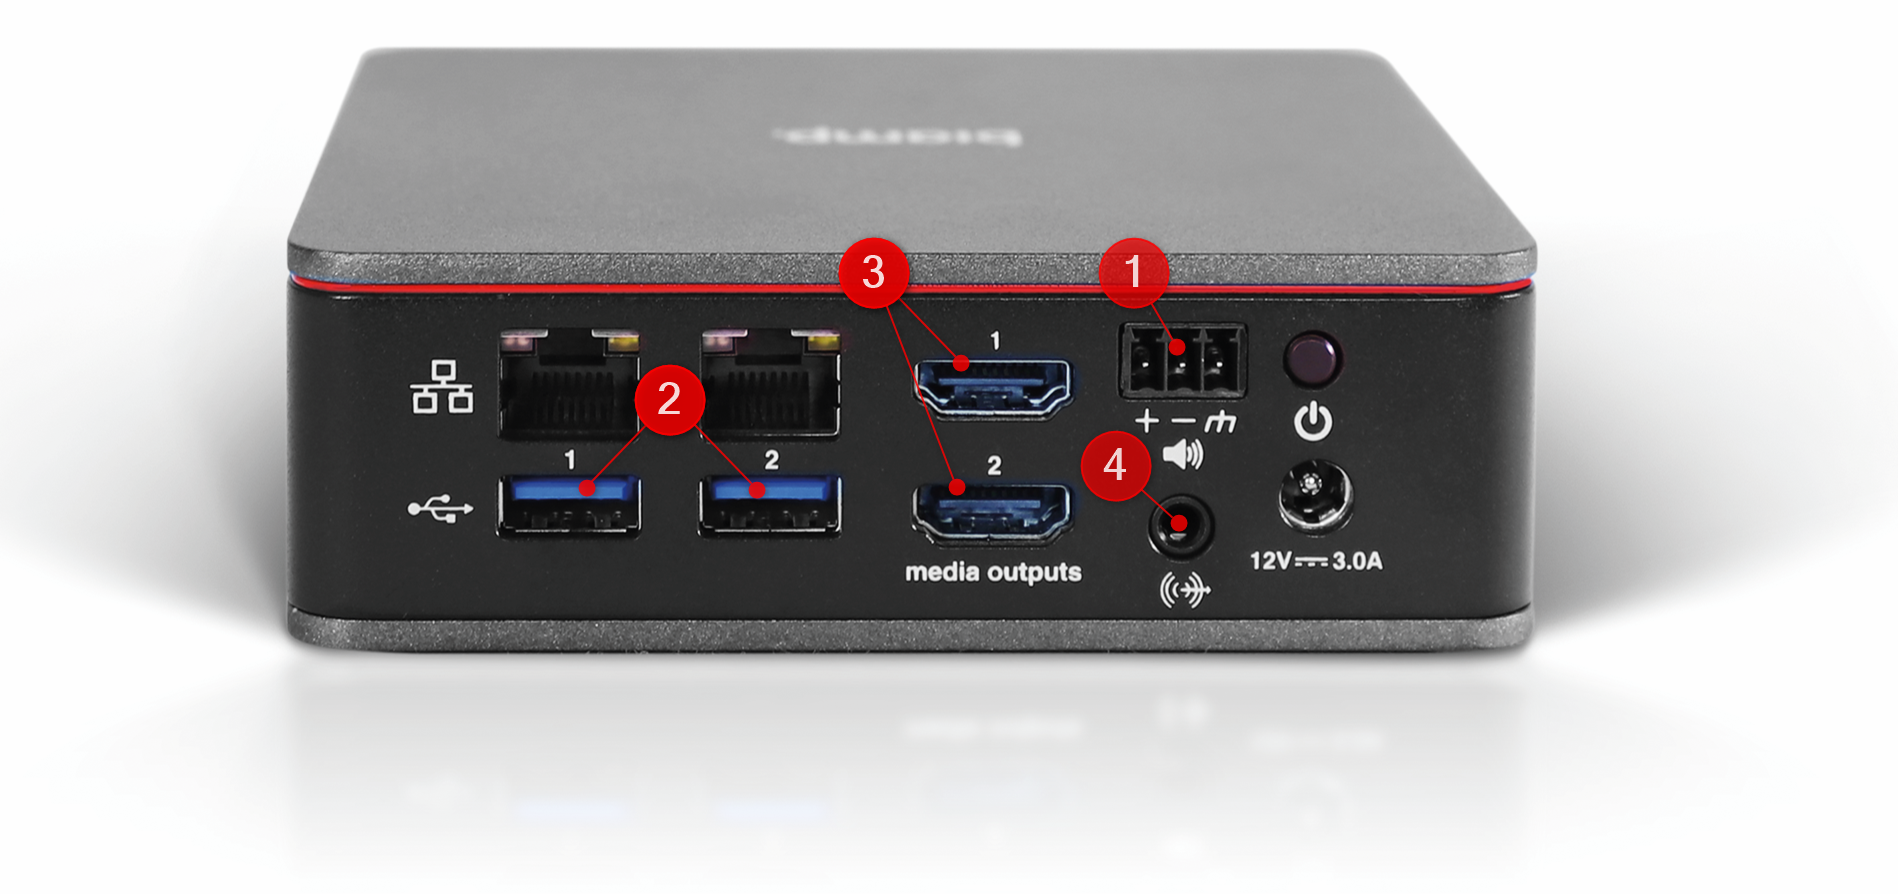
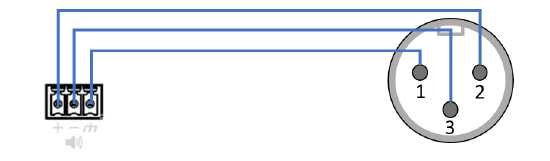
Equipped with a professional-grade, balanced audio output, the ATOM can be interfaced with various installed audio systems. The connection occurs through a 2.5mm pitch, 3-Pin Euroblock connector. Mixing consoles or other pro-audio devices equipped with analog XLR inputs, will require a 3-Pin Euroblock connector to XLR (male) adaptor. For more information on the connector's pinout, or how to connect with an unbalanced line input, please see our reference guide on audio output connections.
The balanced audio output signal can reach a maximum level of +12dBu at full scale. Although these levels are only expected during very loud signal peaks, it is still recommended to set up the input stage accordingly and avoid potential clipping. Professional audio hardware, such as Biamp Audio DSPs provide a headroom of +24dBu before the input stage is expected to start clipping. In order to make use of the entire dynamic range throughout the signal chain, it is therefore recommended to add +12dB of gain to the analog input channel when interfacing the ATOM with Tesira.
(2) USB audio
The USB 3.0 ports of the ATOM allow to connect external USB audio interfaces, such as the Tesira EX-UBT or any TesiraFORTÉ device. Use a USB 2.0 cable to connect the USB Type 'A' connector with the Type 'B' connector of a TesiraFORTÉ or EX-UBT. A USB input added to a Tesira configuration file will now allow to directly receive low-latency digital audio from Crowd Mics, feeding the venue's audio DSP system.
Note that a 2-Channel USB input block must be used in order for Crowd Mics to work correctly with TesiraFORTÉ USB or EX-UBT USB inputs. However, there is no need to use both channels; either one can be left open, or both can be mixed together. More details on USB setup is available in the Application Example below.
(3) HDMI outputs
Two HDMI outputs on the ATOM device will be providing a video signal to the venue's video switching matrix or TesiraLUX video distribution. Once the ATOM has fully started up, a Crowd Mics splash screen should be displayed. During a running session, the moderator can now share selected questions of participants and poll results with the audience. The splash screen will disappear and a graphical visualization of the results or chat messages will appear on screen. The ATOM will adapt its output resolution and frame rate to the preferred EDID settings of the connected video endpoint, up until 4K30. There is no content protection applied to the output signal. Both HDMI ports are active by default and provide the same (mirrored) content.
The HDMI output also provides the participants speech signal through an embedded 2-CH (mono) audio stream (PCM). HDMI-Audio capable devices, such as video distribution and production systems, or video endpoints with integrated speakers should appear in the audio settings administration page when properly connected.
(4) Unbalanced audio output
A 3.5mm Minijack connector offers an auxiliary output to most consumer-grade audio equipment, by using a Minijack auxiliary cable or a Minijack to RCA adapter cable. This output also allows to connect headphones directly to the ATOM, which can be helpful during system tuning and troubleshooting.
Audio setup
The following section will provide tips and instructions on setting up the audio signal path from Crowd Mics into a venue's PA system. General advice for a successful audio setup:
- Ensure there is enough time to prepare and test the audio system during the event setup. Working with consumer-grade endpoint devices can lead to different results, even when operated at the same site, with the same configuration. The variety of smartphones available on the market, may result in unpredictable audio levels - some talkers might be perceived louder, while others could require additional gain in order to reach sufficient operating levels.
- In order to provide a reference audio output level, the ATOM can play back different test signals, such as sine wave and different noise signals, via the Audio Controls configuration page.
Important note:The sine wave test signal is a 440Hz tone at full scale. On a Tesira USB input, an input RMS level of 23dBu is expected at 100% volume setting. The pink noise test signal ranges about +10dBu.
- Large venues with an extended distance to the stage, often use delay speakers to equally cover the entire area front-to-back. Additional delay applied by the DSP to the overhead speakers or sidefills, allows their sound to blend into the FOH speakers. While this is a desired effect for a presenter (sound source) located at the front, it can be counter-productive, if the talker is located in the audience. If the audio system allows, bypass any additional speaker delays for only the Crowd Mics audio feed and observe if this setting does increase intelligibility for audience questions.
Interfacing Crowd Mics with a mixing console
 Audio connection: The ATOM device offers an installer-friendly 2.5mm Euroblock connector as a balanced line audio output. Make sure to prepare a Euroblock-to-XLR male adapter in advance. Use a free microphone input channel of the audio mixer and make sure phantom power is disabled.
Gain structure: Start with 0dB Gain at the mixer's preamplifier and use the test signal available through the ATOM Audio Controls configuration page. Under "Play test tone" by choosing the sine wave signal, the ATOM will play back a 440Hz tone at +12dBu on the balanced output. This is a full scale signal, so there shouldn't be expected any signal louder than this. If the peak level of the microphone input is +24dB, it is advisable to add +12dB of gain at the preamp. Now the test signal reaches a level of +24dB and matches the dynamic range of the mixing console.
Filters: Enable a High-Pass filter at 80Hz, 24dB/Oct, LR. Even though smartphone microphones typically don't emphasize on lower frequency bands, it actually helps to suppress proximity effects and rumbling sounds caused by wind noise. If the room turns out to develop modes and reverb in the lower frequencies, which can lead to acoustic feedback, higher cut frequencies will be advised.
EQ: Equalizers can be set "to taste" but shouldn't be necessary as we expect to receive a 'flat' frequency response from any smartphone device.
Dynamics: Compression should be applied to the Crowd Mics input to accommodate for unexpected peaks and different microphone sensitivities. Set the compressor to a 3dB threshold at 5:1 compression ratio. Attack at 10ms and a slow 800ms release time. Although the high compression ratio is limiting the dynamic range substantially, it will help to create an equal volume among different talkers and smartphones, which is an important concern.
Signal routing: It is recommended to route the Crowd Mics feed to the monitors at distinct levels, ensuring that the presenter will intuitively listen to the audience question through the monitors. If monitor levels are set too low, the sound perceived on stage may become unintelligible as it mixes with the FOH signal, or even with the direct sound of the talker’s voice if seated close to the stage.
Testing: During testing, remember that users of the participants app are supposed to speak into their mobile device's microphone at close proximity. This will improve the signal-to-noise ratio of the spoken word, while reducing the risk of acoustic feedback to occur. As a point of reference during setup and testing, an IPhone XS spoken into at normal voice, 6” away from the bottom microphone, the peak meter should be ranging around +3dB.
Interfacing Crowd Mics with a Tesira USB input
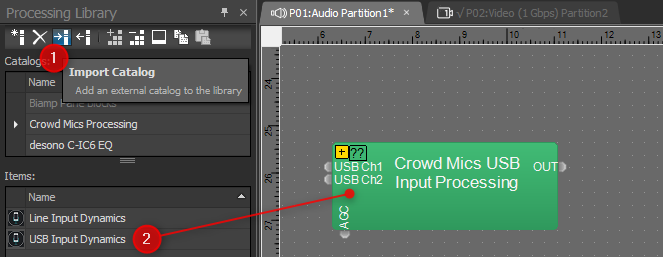
A custom block for recommended processing on Crowd Mics is available for the processing library in Tesira Software. Start by downloading the Catalog and Importing it to the Processing library.
Download link: Crowd Mics Processing.tlf
Via drag & drop, the Crowd Mics processing block can be added to any Tesira input. While USB is the preferred method to connect Crowd Mics and Tesira, the same processing chain can be used for analog line inputs. Both versions are available as a custom block. This example shows the setup of a USB input.
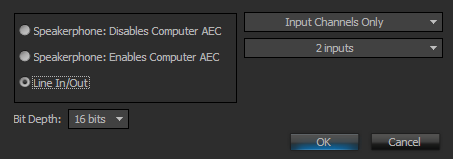
Add a USB input. In the USB Block initialization window, configure the block properties for 2-Channel "Line In/Out", followed by "Input Channels Only":
Complete the signal path downstream to any further mixing/routing of the audio system. The next picture shows the USB input and the expanded custom block. Some noteworthy settings which should be checked during set up are pointed out below:
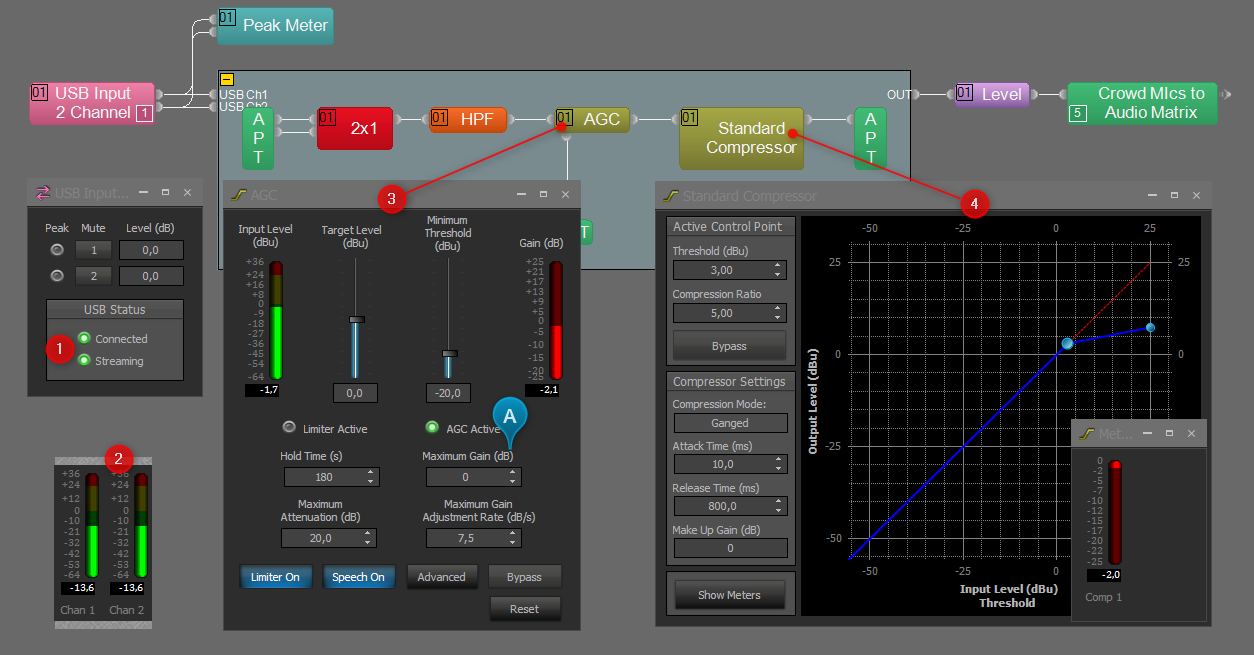
- Use a USB 2.0 cable to connect the USB Type 'A' connector on the ATOM with the Type 'B' connector of a TesiraFORTÉ or EX-UBT. Note that this cable is a 3rd party accessory, not included with the ATOM or any Tesira device.
- Ensure the USB Input is indicating "Connected" and "Streaming" when the USB connection is established and audio is flowing from the ATOM, e.g. with the test tone generator engaged.
- The peak meter should be ranging just over 0dB (occasional peaks of +3) when directly talking to an iPhone XS at 6" distance. Use a hold time of 100ms or higher to smooth out the meter readings.
- The AGC block adds Biamp's unique Speech Sense technology and automatically adjust the gain of any talker using their Crowd Mic.Set up the AGC block to meet the acoustic requirements, while keeping the room's Potential Acoustic Gain (PAG) in mind. Means, keep tight control on the "Maximum Gain" setting (A). By default this value is set to 0dB, ensuring no gain is added under any circumstance that could potentially drive the system into feedback. With the default setup, the AGC will gradually reduce the volume of loud talkers, without compressing the sound.
- Using a fast Attack time and a slightly delayed release, the compressor irons out any unwanted transients and keeps the signal clean from too many peaks or excessive volume. Loud events, such as a person talking very close into a microphone, will now be perceived less obtrusive. Since there is already AGC in the signal chain, the Compressor would only work on the transients and therefore can be set to a rather high compression ratio.
Audio output level control
 All output channel levels will be accessible through the admin web page via https://atom-XXXXXXXXXXXX.local (X's represents the serial number of the ATOM and can be found on a label on the underside of the ATOM). A log in screen will require the following case-sensitive default credentials:
- Username: admin
- Password: first four and last four digits of the device serial number
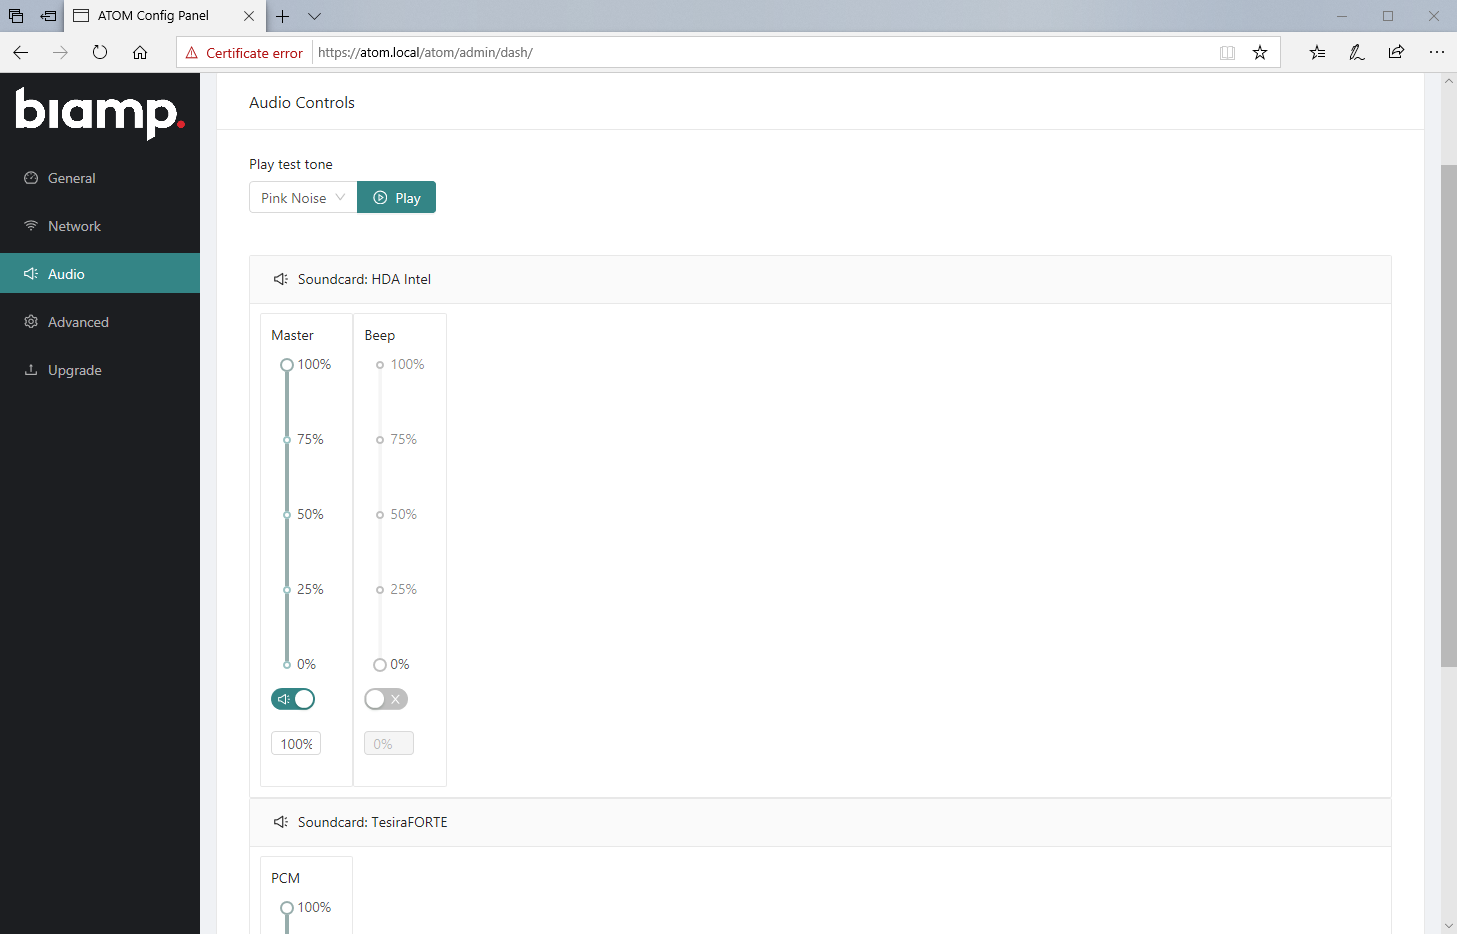
After accessing the admin page and navigating to the 'Audio' section, all analog outputs should be visible. Whenever a digital audio output, such as USB or HDMI is connected, it will also be visible with a separate level control slider. Note that the web page may require a refresh in order to display recently connected audio devices. It is recommended to leave all level control faders at 100%, to maintain unity gain throughout the signal chain.
Crowd Mics system latency
While time sensitive audio network protocols mostly require a physical network medium to transmit data fast and reliably, Crowd Mics has been designed to work on wireless networks in order to let the audience participate with their personal devices. But the increased versatility does come with a cost. In comparison to category cable or fiber network links, wireless networks will introduce additional delay to any communication between Ethernet devices. Crowd Mics is designed to keep the audio latency as low as possible, whilst providing a professional grade 48kHz sampling rate and being bandwidth efficient and lightweight to the local wireless network.
The expected audio latency (from smartphone input to analog output) ranges from 55ms (best) to 70ms (typ.). Note that the the network performance, diameter and occupation of WAPs can have a direct effect on audio latency and is difficult to predict.
Distance conferencing applications
Some Crowd Mics deployments may not only route the participants voice to the local audio system, but also to a remote connection via video conference or a voice-only codec. A typical application would be a meeting or congress broadcasted to remote participants through a collaboration software. Such a near-end / far-end communication scenario typically requires Acoustic Echo Cancelation (AEC) to avoid incoming audio from the far-end (the remote participant) being picked up by a microphone and transmitted back to the far-end.
Please be aware that the requirement of adding AEC processing to the Crowd Mics signal path might be an edge case, out of the following reasons:
1. The remote attendees might rather be "listen-only" participants and not be able to actively join the conversation using their microphone..
2. Crowd Mics are not "always open" and only transmit audio when a participant intentionally wants to speak, using the PTT button on the App.
Still, there might be situations when a distance conference link will be able to have a two-way conversation during the event, while a participant is talking through Crowd Mics.This would be applicable for distance-learning situations when multiple classrooms are interconnected via video- or telepresence codecs but each classroom also using Crowd Mics.
In Biamp Tesira, any input signal can be routed through available AEC processing channels, such as a USB input delivering the Crowd Mics audio, or any other analog audio input feed. In the below example, the Crowd Mics input signal is routed through the unused AEC processing channel No.12.
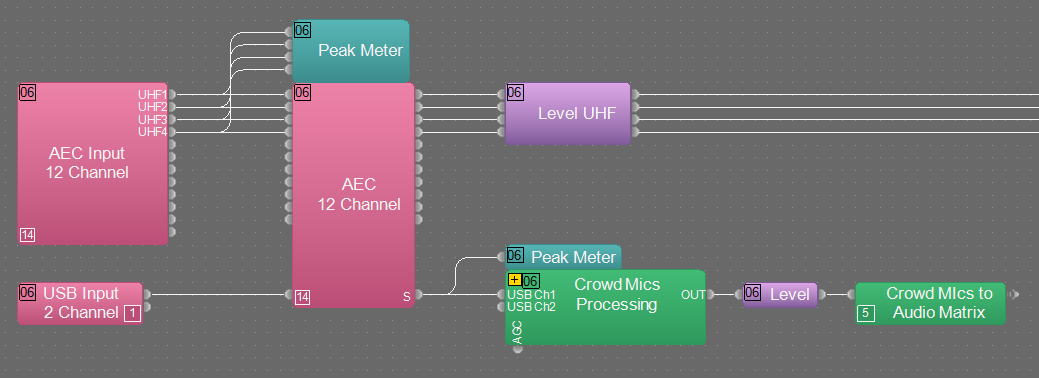
Now processing channel #12 provides AEC for the Crowd Mics input signal. But in order to work correctly, the AEC reference of CH #12 must receive the far-end signal from the Matrix Mixer. Ensure that the AEC Ref block is configured for "per channel reference" mode. If the AEC Ref block only shows one input for all AEC channels, it is currently set to "single channel" and per channel mode must be enabled, by right-clicking the processing block and navigating to the block parameters.
As explained in a previous section, Crowd Mics will introduce additional delay due to network transport. Additional 50ms of audio delay on the reference input can help to off-load the AEC's tail length and improve the overall AEC performance:

Make sure to test the AEC performance prior to an Event. In order to verify if AEC is working correctly, set up a test call or meeting and ask remote participants to speak through their local (PC/Headset/Meeting room) microphone, while a Crowd Mics App (at the near-end) is held open in talking mode and able to pick up the far-end signal through the venue speakers. If the far-end party hears a delayed echo of themselves, AEC is not working correctly and needs further tweaking. A first course of action could be increasing the Delay from 50ms to 75ms, and further to 100ms. Also, the following article includes guidance on how to set up and troubleshoot AEC: Calibrating AEC in Tesira